
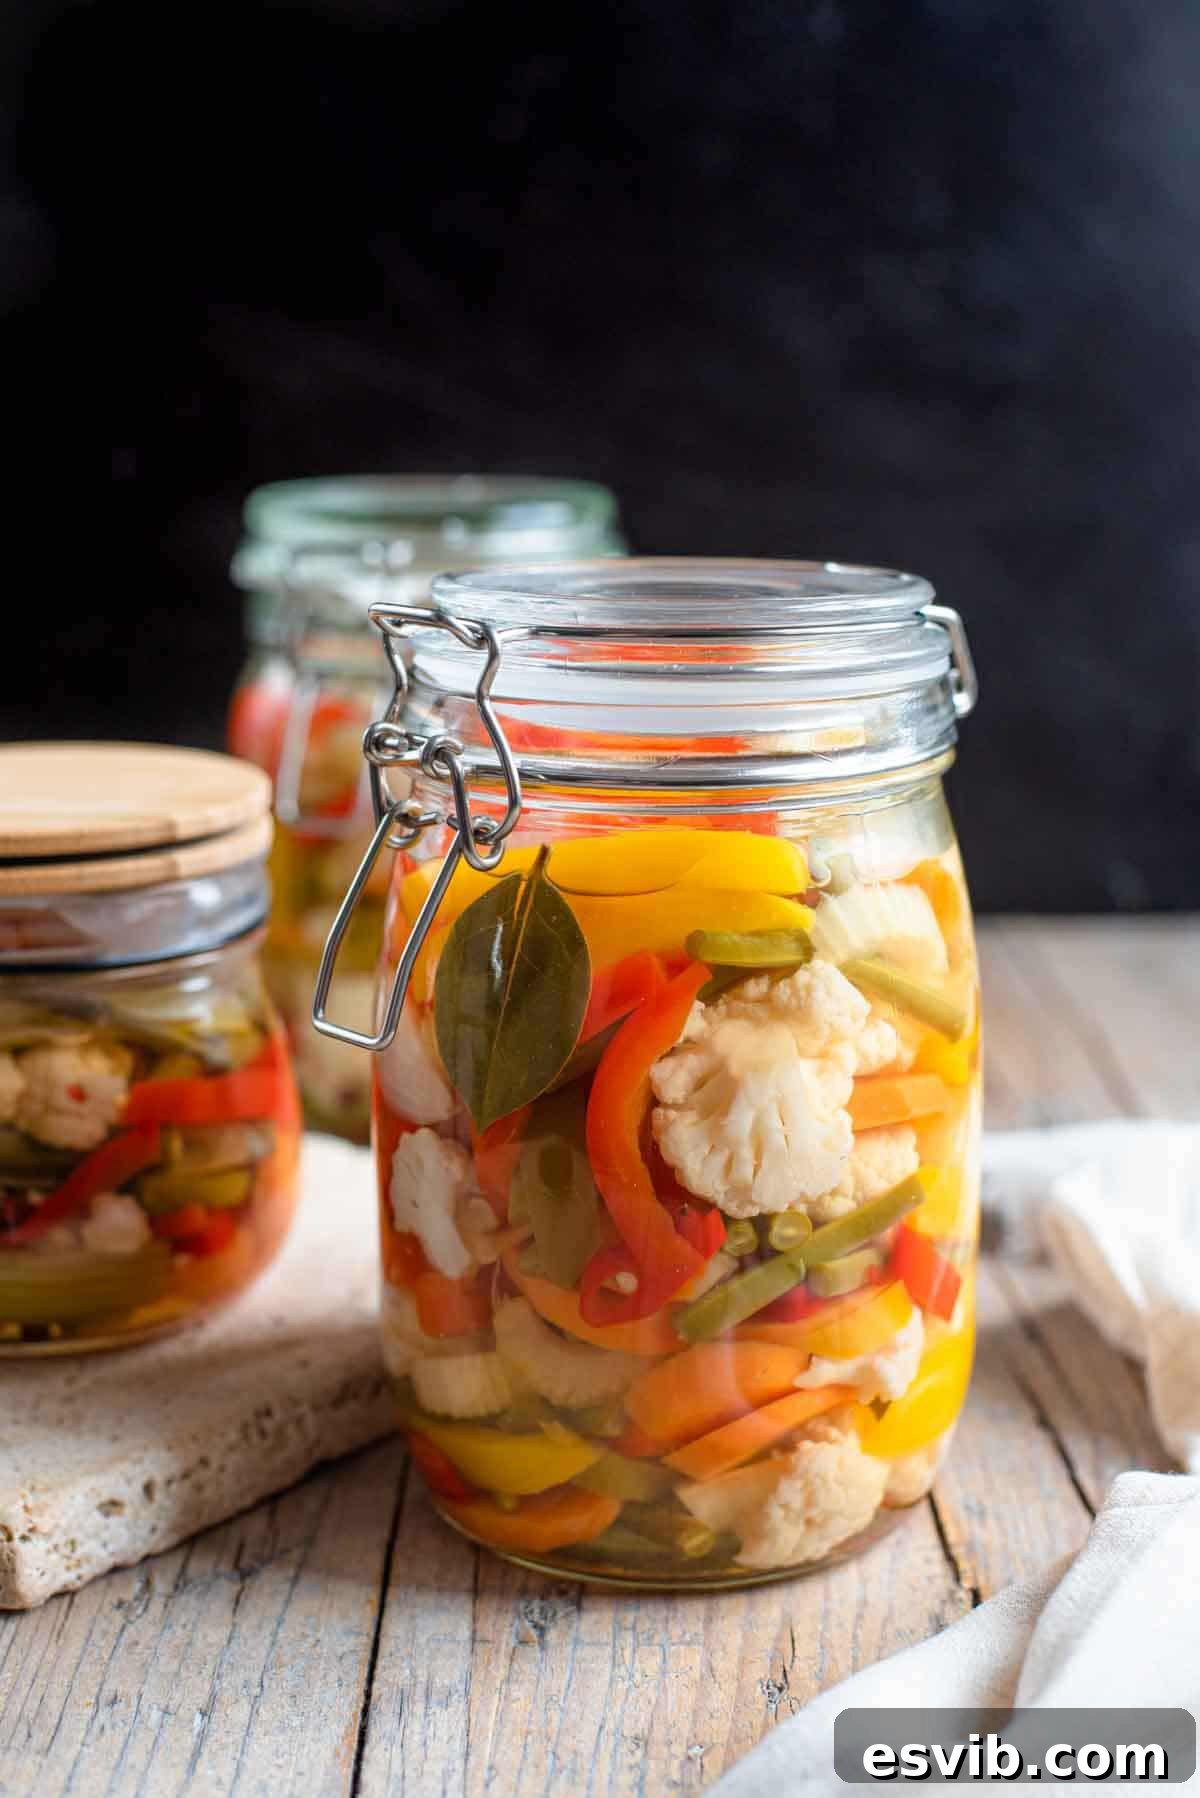
Experience the vibrant flavors of Italy with this guide on how to make **La Giardiniera**. If your garden is overflowing with beautiful summer vegetables, this recipe offers the perfect solution to preserve their peak freshness. Enjoy these crisp, tangy Italian pickled vegetables throughout the colder months, serving them alongside robust cured meats, artisanal cheeses, or even grilled dishes.
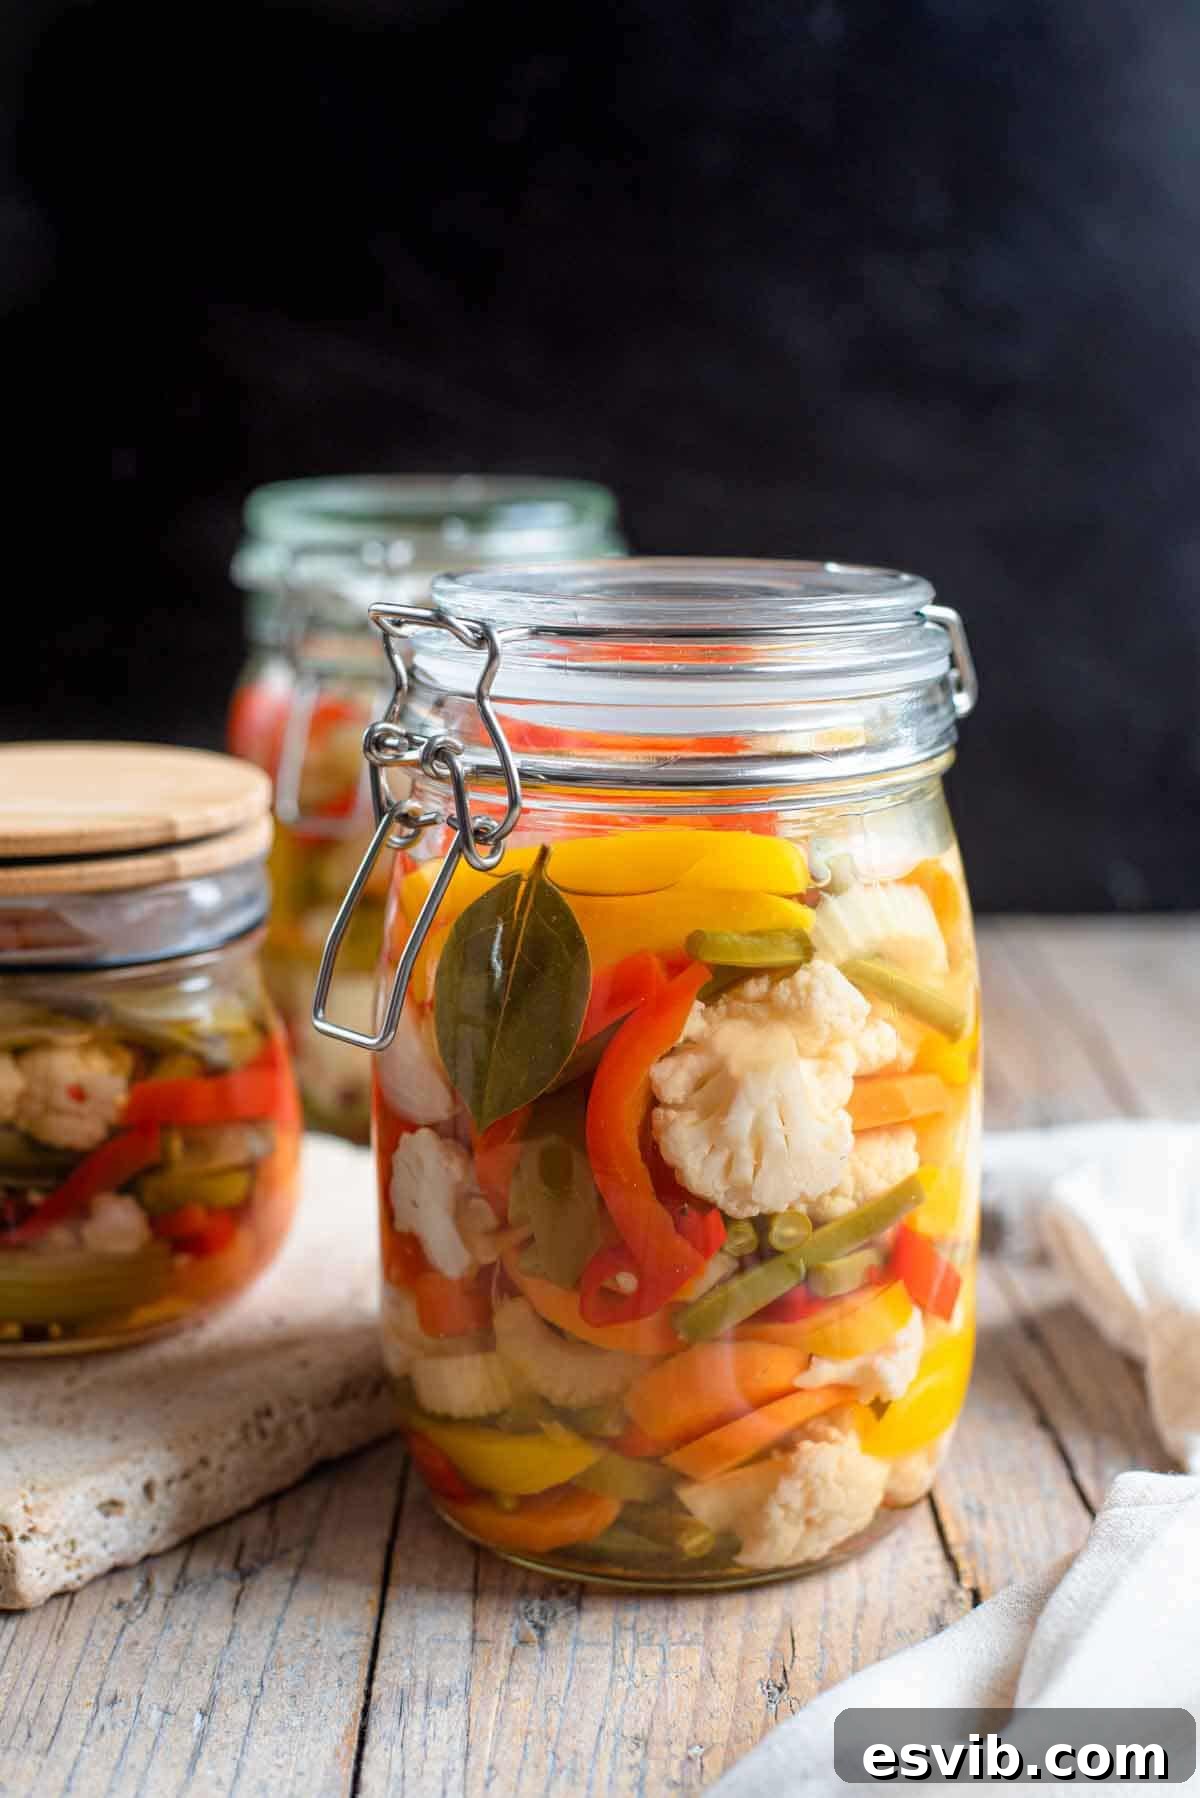
What is La Giardiniera? An Italian Tradition
La Giardiniera, which beautifully translates to “the gardener,” is a cherished classic in Italian culinary traditions. It refers to a delightful medley of seasonal vegetables, carefully pickled to extend their shelf life and allow you to savor the taste of summer long after the season has passed. This traditional Italian preserve ensures that the fresh, crisp essence of garden-fresh produce can be enjoyed even in the depths of winter.
Known in Italy as verdure sott’aceto (vegetables under vinegar), these pickled delights are celebrated for their crisp texture, fresh taste, and invigorating tang. They make an exquisite accompaniment to rich cured meats, a selection of fine cheeses, or any charcuterie board. Beyond the classic antipasto, Giardiniera’s versatility shines when served with grilled meats, poultry, or fish, or when added to a variety of salads for an extra pop of flavor and crunch. The possibilities for incorporating this flavorful condiment into your meals are truly endless.
One of the most appealing aspects of this recipe is its inherent flexibility. There are no strict rules dictating which vegetables you must use. The very essence of La Giardiniera lies in utilizing the bounty of fresh, seasonal produce when it is at its absolute best. This allows for endless customization, adapting the recipe to whatever fresh vegetables are abundant and appealing to you.
Essential Ingredients for Your Homemade Giardiniera
Crafting the perfect Giardiniera begins with selecting high-quality ingredients. While the choice of vegetables is wonderfully flexible, the pickling liquid requires a precise balance to ensure both preservation and exquisite flavor.
- Vegetables: This is where you can truly express your culinary creativity. Common choices that yield fantastic results include crisp **carrots**, tender **green beans**, vibrant **bell peppers** (incorporating all colors for visual appeal and varied flavor profiles), crunchy **celery**, aromatic **fennel**, firm **cauliflower**, refreshing **cucumber**, delicate **baby onions**, flavorful **scallions**, and for a hint of heat, fresh **chilli peppers**. Aim for a total of around 2kg (4.5 lbs) of mixed, prepared vegetables.
- Vinegar: The cornerstone of the pickling process, vinegar not only preserves the vegetables but also imparts a distinctive tangy flavor and helps maintain their crispness. White wine vinegar is traditionally preferred for its clean, bright taste that complements the vegetables without overpowering them. However, apple cider vinegar can also be used for a slightly different, fruitier note.
- Salt & Sugar: These two ingredients are crucial for balancing the acidity of the vinegar and enhancing the overall flavor. Salt plays a vital role in preservation and drawing out moisture, while sugar mellows the tartness and adds a subtle sweetness. Use sea salt flakes for best results.
- Aromatic Spices: Classic Giardiniera typically features whole **peppercorns** and fragrant **bay leaves**. These add a subtle warmth and aromatic depth to the pickling liquid. Feel free to experiment with other spices like mustard seeds, coriander seeds, or a pinch of dried oregano if you wish to personalize your flavor profile.
- Water: Used in conjunction with vinegar to create the ideal pickling brine, ensuring a balanced acidity.
Crafting La Giardiniera: A Step-by-Step Guide
Step 1: Sterilizing Your Jars – The Foundation of Safe Preserving
Proper sterilization is paramount for safe and successful canning, preventing spoilage and ensuring your Giardiniera remains delicious for months. This process eliminates any bacteria or contaminants from your jars and lids.
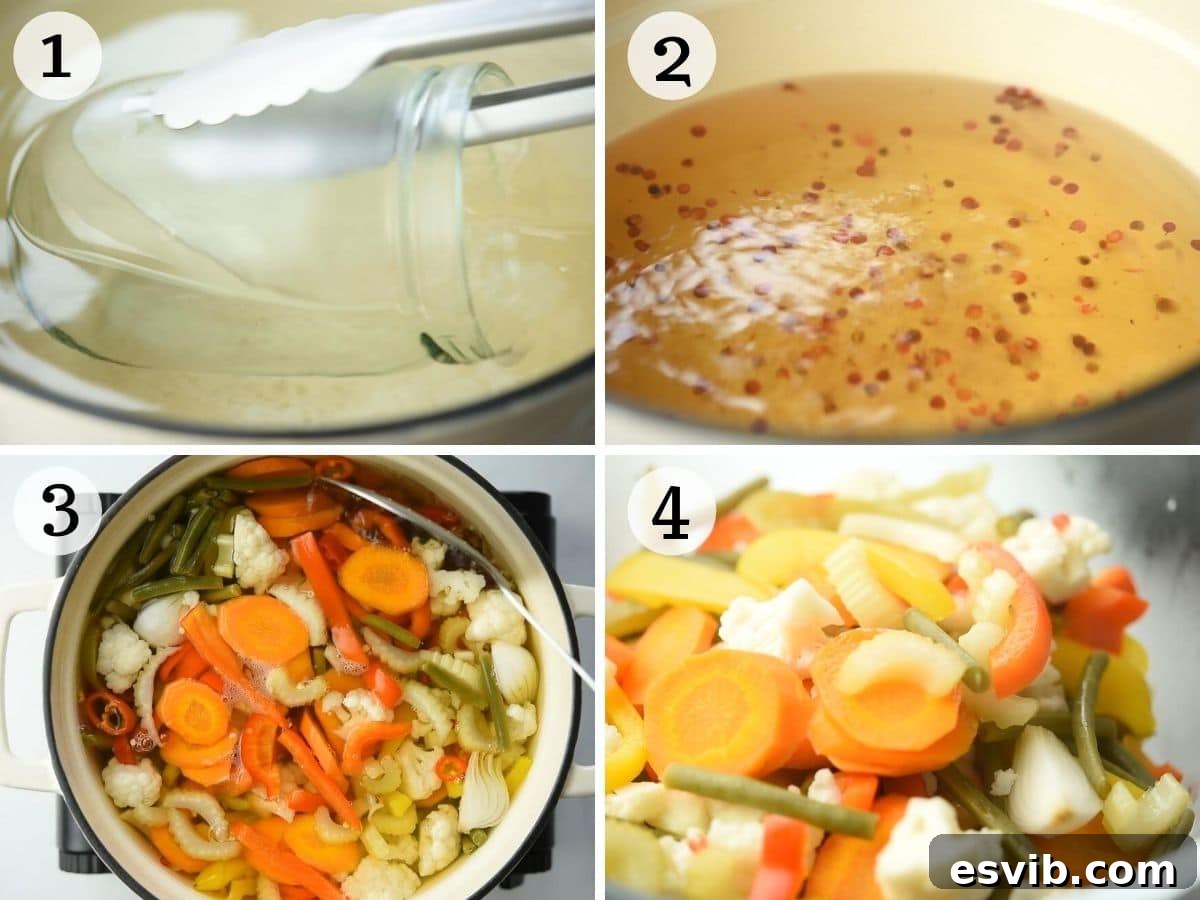
To sterilize, place your clean glass jars right side up in a deep pot or a dedicated canning rack. Pour hot water over them until they are completely submerged. Bring the water to a rolling boil and continue boiling the jars for a full 10 minutes. Any rubber seals and lids should also be sterilized in this manner, either in the same pot or separately. Carefully remove the sterilized jars using clean tongs and place them upside down on a clean kitchen towel to air dry. Do not wipe them, as this can reintroduce contaminants. A thin layer of steam inside the jars is a sign of proper sterilization.
Tip: If you don’t own a canning rack, you can improvise by placing clean kitchen towels (fabric towels, not paper) around and between the jars in the pot. This prevents them from rattling against each other and potentially cracking during boiling.
Step 2: Preparing the Vegetables and Brine
Begin by washing and preparing all your chosen vegetables. Cut them into bite-sized pieces or uniform slices to ensure even cooking and an appealing presentation. For instance, cut cauliflower into small florets, carrots and celery into disks or sticks, and bell peppers into strips.
In a large, non-reactive pot, combine the water, white wine vinegar, sea salt flakes, sugar, and whole peppercorns. Bring this mixture to a vigorous boil over medium-high heat. Once the liquid is boiling, add the cauliflower florets first. Cauliflower benefits from a slightly longer cooking time to reach the desired tenderness. Boil for 3 minutes, then add the remaining prepared vegetables. Continue to boil all the vegetables together for another 5 minutes. This brief blanching step helps to set their color, tenderize them slightly, and prepare them for pickling.
Step 3: Canning and Sealing Your Giardiniera
Once the vegetables have blanched, carefully remove them from the hot pickling liquid using a slotted spoon. Transfer them to a clean, heatproof bowl. Optionally, you can strain the pickling liquid through a fine-mesh sieve into another clean bowl or large measuring jug to remove the peppercorns, resulting in a clearer brine. This step is purely for aesthetic preference.
Begin filling your sterilized jars with the blanched vegetables, ensuring an even distribution of colors and textures. Tuck one bay leaf into each jar for added aroma. Pack the vegetables relatively snugly, leaving approximately 1 inch (2.5 cm) of headspace from the rim of the jar. Carefully pour the hot pickling liquid over the vegetables, ensuring they are completely submerged. The liquid should cover the vegetables by about 1/4 inch (1 cm).
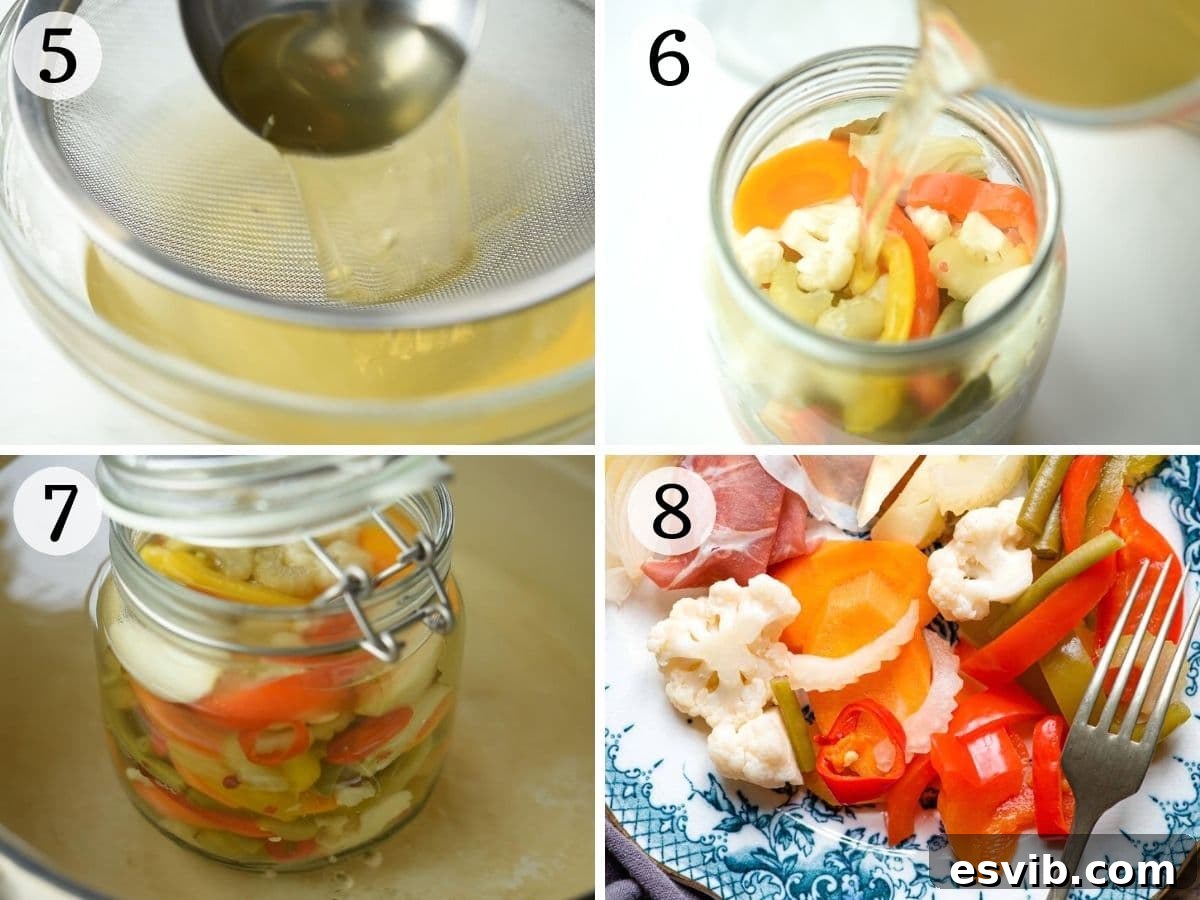
Carefully place the filled jars back into the deep pot or canning rack with hot water. Ensure the lids are placed loosely on top, not sealed completely shut, to allow air to escape during processing. Bring the water to a boil once again. Process the jars by boiling them for 10 minutes. This second boil is critical for creating a vacuum seal and further sterilizing the contents. *Note: If you live at a high altitude (above 1000ft/300m), you will need to adjust the processing time. Consult a reliable high-altitude canning guide for precise adjustments.
Immediately after the 10-minute boil, remove the hot jars from the pot using tongs and place them on a clean kitchen towel. Seal the jars completely shut by tightening the lids (for screw-top jars) or clamping the clips (for clip-top jars). Allow the jars to cool completely undisturbed at room temperature. As they cool, a vacuum seal will form. Once fully cooled, your homemade Giardiniera is ready! It will keep well for up to 3 months in a cool, dry place. Once opened, refrigerate and consume within 4-5 days.
Expert Tips & Frequently Asked Questions for Perfect Giardiniera
Achieving perfectly crisp and flavorful Giardiniera is simple with a few key considerations and techniques. Here are some essential tips and answers to common questions:
- Vegetable Preparation: As mentioned, it’s crucial to boil the cauliflower slightly longer than other vegetables. Its denser texture requires a little extra time to become tender-crisp without being mushy. Cut all vegetables to a consistent size for uniform cooking and an attractive final product.
- Herbs and Spices: While classic Giardiniera traditionally relies on the simple yet elegant flavors of bay leaves and whole peppercorns, feel free to personalize your brine. Consider adding a few cloves of garlic, a sprig of fresh thyme, or even a pinch of dried red pepper flakes for an extra kick.
- Jar Selection: You can successfully use various types of jars for canning. Clip-top jars with rubber seals (often seen in European preserving) offer a charming aesthetic and reliable seal. Standard screw-top jam jars are equally effective and widely available. The key is ensuring they are designed for canning and have intact seals.
- High-Altitude Processing Time: For those living above 1000ft (300m) above sea level, water boils at a lower temperature. This means that the standard processing times for canning need to be increased to ensure food safety. A fantastic resource for understanding and calculating these adjustments can be found at The Spruce Eats’ guide to high-altitude canning. Always prioritize safety in canning.
Ensuring a Secure Seal on Your Jars
A proper seal is vital for the long-term preservation of your Giardiniera. After the second boil and once the jars have cooled to room temperature, you can check if they have sealed correctly:
- For Clip-Top Jars: Gently loosen the metal clip without attempting to open the jar. Carefully try to lift the jar by its lid only. If the lid holds firmly and you can lift the entire jar by it, the rubber seal has created an airtight vacuum.
- For Screw-Top Jars: As these jars cool, you might hear a distinct “pop” sound – this is a positive indicator that the lid is sealing. If you don’t hear a pop, check the lid’s surface once completely cool. A properly sealed screw-top lid will be indented downwards in the center and will not flex when pressed. If it flexes, the seal has not formed.
Common Giardiniera Questions Answered
- Is Giardiniera spicy? Generally, traditional Italian pickled vegetables are not spicy. However, you have complete control over the heat level. You can add as much or as little fresh chilli pepper to the mix as you prefer.
- Why do I need to boil the jars after canning? This crucial step serves two primary purposes: it provides an extra layer of sterilization for the contents, and more importantly, it creates a vacuum seal within the jars. This vacuum seal is what allows the vegetables to be safely stored at room temperature for an extended period. The exact duration of this boiling time can vary based on your altitude.
- How long will my homemade Giardiniera last? When properly sealed and stored in a cool, dry place, this recipe for Giardiniera will last for up to 3 months. Once a jar has been opened, it must be refrigerated and should be consumed within 4-5 days to ensure optimal freshness and safety.
- What should I do if my jars don’t seal properly? If you find that your jars have not formed a proper seal after cooling, it’s essential not to store them at room temperature. You have a couple of options:
- Re-process: You can attempt to re-process the jars with new, freshly sterilized lids or rubber seals. Sometimes, an old or faulty lid can prevent a proper seal.
- Refrigerate Immediately: If you prefer not to re-process, simply refrigerate the contents. The vegetables will still be delicious but must be eaten within 2-3 days, as they won’t have the long-term stability of a properly sealed jar.
- Freeze: As a last resort, you can freeze the pickled vegetables in freezer-safe containers until you are ready to use them. While freezing may slightly alter the texture, it’s a safe way to preserve them.
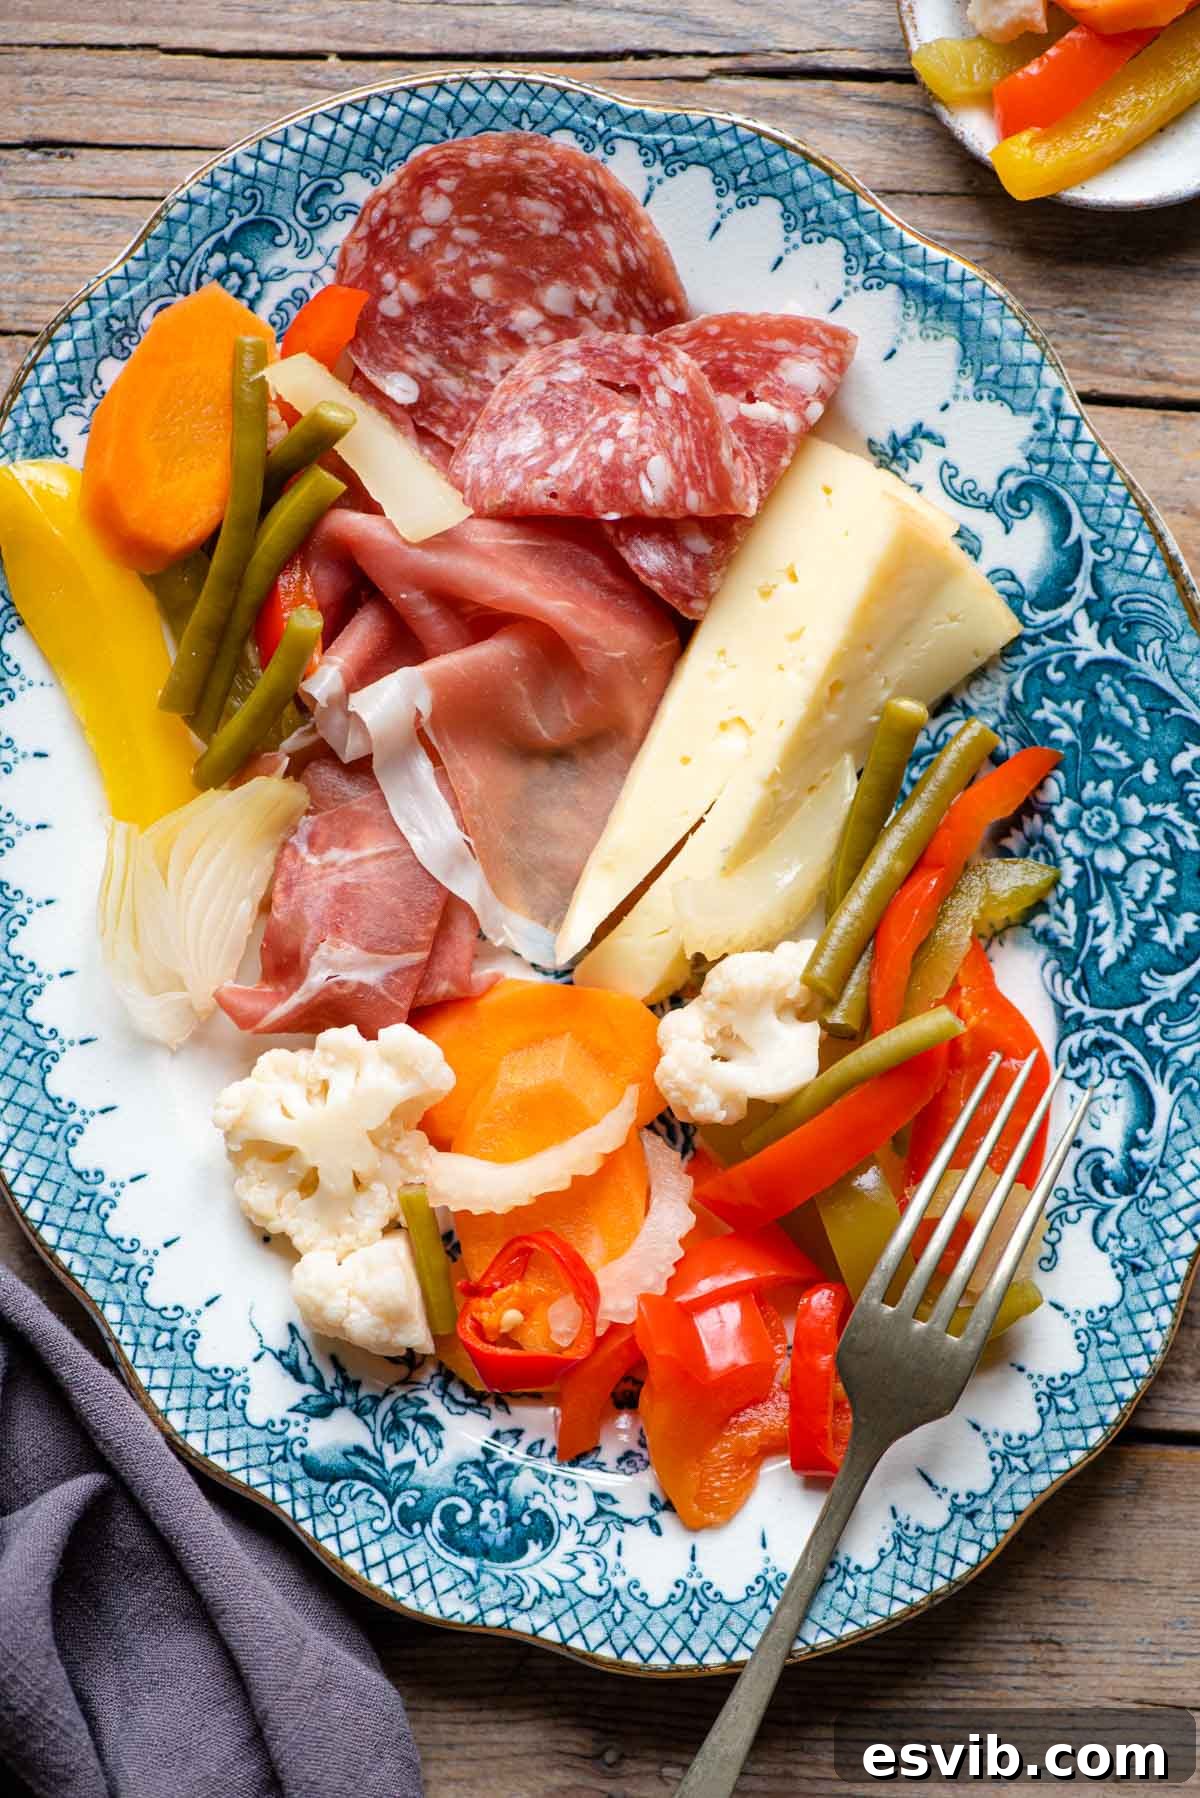
Delicious Ways to Serve Your Homemade Giardiniera
Once you’ve mastered the art of making La Giardiniera, you’ll find it to be an incredibly versatile condiment in your kitchen. Beyond the classic antipasto platter, these vibrant pickled vegetables can elevate a wide array of dishes:
- Antipasto & Charcuterie Boards: The most traditional way to serve Giardiniera. Its bright acidity cuts through the richness of cured meats like prosciutto, salami, and mortadella, and perfectly complements various Italian cheeses.
- Sandwiches & Panini: Add a generous spoonful to your favorite sandwiches, subs, or panini for an irresistible tangy crunch. It’s particularly good with Italian beef sandwiches or grilled chicken.
- Salads: Toss Giardiniera into green salads, pasta salads, or grain bowls for an extra burst of flavor and texture. The briny vegetables can replace or supplement other pickled ingredients.
- Side Dish: Serve it alongside grilled fish, roasted chicken, or a hearty steak. Its refreshing taste provides a wonderful contrast to richer main courses.
- Omelets & Frittatas: Chop Giardiniera finely and fold it into your morning omelet or a savory frittata for a quick and flavorful breakfast or brunch.
- Pizza & Flatbread Topping: Sprinkle chopped Giardiniera over pizza or focaccia before baking for a unique and zesty twist.
Explore More Italian Antipasti Recipes
If you’ve enjoyed making this Giardiniera, delve deeper into the world of Italian appetizers with these other delightful recipes:
- 5 Minute Marinated Olives – Quick to prepare and packed with flavor.
- Fried Sage Leaves with Anchovies – A unique and savory bite.
- Mozzarella in Carrozza (Fried Mozzarella Sandwiches) – A comforting and irresistible fried cheese delight.
- Italian Marinated Eggplant – Tender, flavorful eggplant perfect for spreading.
- Italian Farinata Chickpea Flatbread (La Cecina Toscana) – A naturally gluten-free and savory Tuscan specialty.
We hope this detailed guide helps you master the art of making delicious homemade La Giardiniera. If you’ve tried this **Giardiniera Recipe** or any other recipe from our collection, please share your experience and feedback in the comments section below. We always love hearing from our readers! You can also **FOLLOW US** on FACEBOOK, INSTAGRAM, and PINTEREST to discover more delicious food and stay updated with our latest culinary adventures.
La Giardiniera Recipe Overview
Prepare a batch of homemade Italian pickled vegetables with this easy-to-follow Giardiniera recipe. Ideal for preserving your summer harvest and enjoying classic Italian flavors year-round.
Yields: 10-12 servings (approximately 10 cups of pickled vegetables)
Prep time: 30 mins
Cook time: 30 mins
Total time: 1 hr
Ingredients
- 1 medium sized cauliflower, cut into small florets (300g / ~10.5 oz)
- 3 bell peppers (yellow, green, and red), sliced (450g / ~1 lb)
- 3 large carrots, sliced (250g / ~9 oz)
- 2 sticks celery, cut into pieces (150g / ~5.3 oz)
- 1.5 cups green beans, trimmed and cut in half (150g / ~5.3 oz)
- 4 giant scallions (spring onions) or baby onions (the white part of scallions can be cut into quarters)
- 2 fresh red chillies, medium heat (optional, adjust to taste)
- 4 cups white wine vinegar (1 liter)
- 4 cups water (1 liter)
- 2 tbsp sea salt flakes
- 2 tbsp sugar
- 1 tbsp whole peppercorns
- 1 bay leaf per jar
Instructions
- Sterilizing Jars: Place clean jars right side up in a deep pot. Submerge them completely with hot water and boil for 10 minutes. Also sterilize rubber seals and lids. Remove with tongs and place upside down on a clean kitchen towel to air dry. (Refer to detailed instructions above for tips.)
- Prepare Vegetables & Brine: In a large pot, combine water, vinegar, salt, sugar, and peppercorns. Bring to a boil. Add cauliflower and boil for 3 minutes. Then, add all remaining prepared vegetables and boil for another 5 minutes.
- Canning:
- Using a slotted spoon, remove vegetables from the liquid and transfer to a clean bowl.
- (Optional) Strain the pickling liquid into a clean bowl or measuring jug.
- Fill the sterilized jars with vegetables and one bay leaf per jar, leaving 1 inch (2.5 cm) headspace. Pour hot pickling liquid over vegetables, ensuring they are submerged by 1/4 inch (1 cm).
- Place jars back into hot water in the pot. Ensure lids are not sealed completely. Bring to a boil and process (boil) for 10 minutes (adjust for high altitude if necessary).
- Remove jars with tongs immediately after boiling and place on a clean kitchen towel. Seal lids shut tightly and let them cool completely without moving.
- Once cooled to room temperature, they will keep for up to 3 months in a cool, dry place. Once opened, refrigerate and consume within 4-5 days.
Notes
- Total Weight: Aim for approximately 2kg / 4.5 lbs of mixed vegetables as a guideline.
- Cauliflower: It is crucial to boil cauliflower slightly longer to ensure it becomes tender enough.
- Customization: While bay leaves and peppercorns are classic, feel free to add other herbs and spices like garlic, mustard seeds, or chili flakes to customize the flavor.
- Jar Types: This recipe works well with both clip-top jars with rubber seals or standard screw-top canning jars. Ensure a proper seal for long-term storage.
- Altitude Adjustments: If you reside above 1000ft (300m) elevation, you will need to increase the processing time during the second boil. Consult a reliable high-altitude canning guide for specific adjustments.
Nutrition Information (per serving, approximate)
Calories: 74kcal | Carbohydrates: 13g | Protein: 2g | Fat: 1g | Saturated Fat: 1g | Sodium: 1450mg | Potassium: 452mg | Fiber: 3g | Sugar: 7g | Vitamin A: 4967IU | Vitamin C: 90mg | Calcium: 46mg | Iron: 1mg
Nutrition information is automatically calculated and should only be used as an approximation.
Helpful Information for All Our Recipes
- We consistently use extra virgin olive oil in all our recipes unless otherwise specified.
- For the best flavor and results, we recommend using Cirio or Mutti brands for canned or jarred tomatoes.
- All vegetables are assumed to be medium-sized unless specifically stated otherwise in the ingredients list.
- All recipes are carefully tested and developed using a fan (convection) oven.
- Learn more about how our nutrition information is calculated.
- Discover our essential Italian Pantry Staples to stock your kitchen.
- Find a comprehensive list of all our Essential Kitchen Tools for Italian Cooking.
Did You Try This Recipe?
We’d love to hear from you! Please leave a comment below to share your experience and any tips you discovered while making this delicious Giardiniera.