
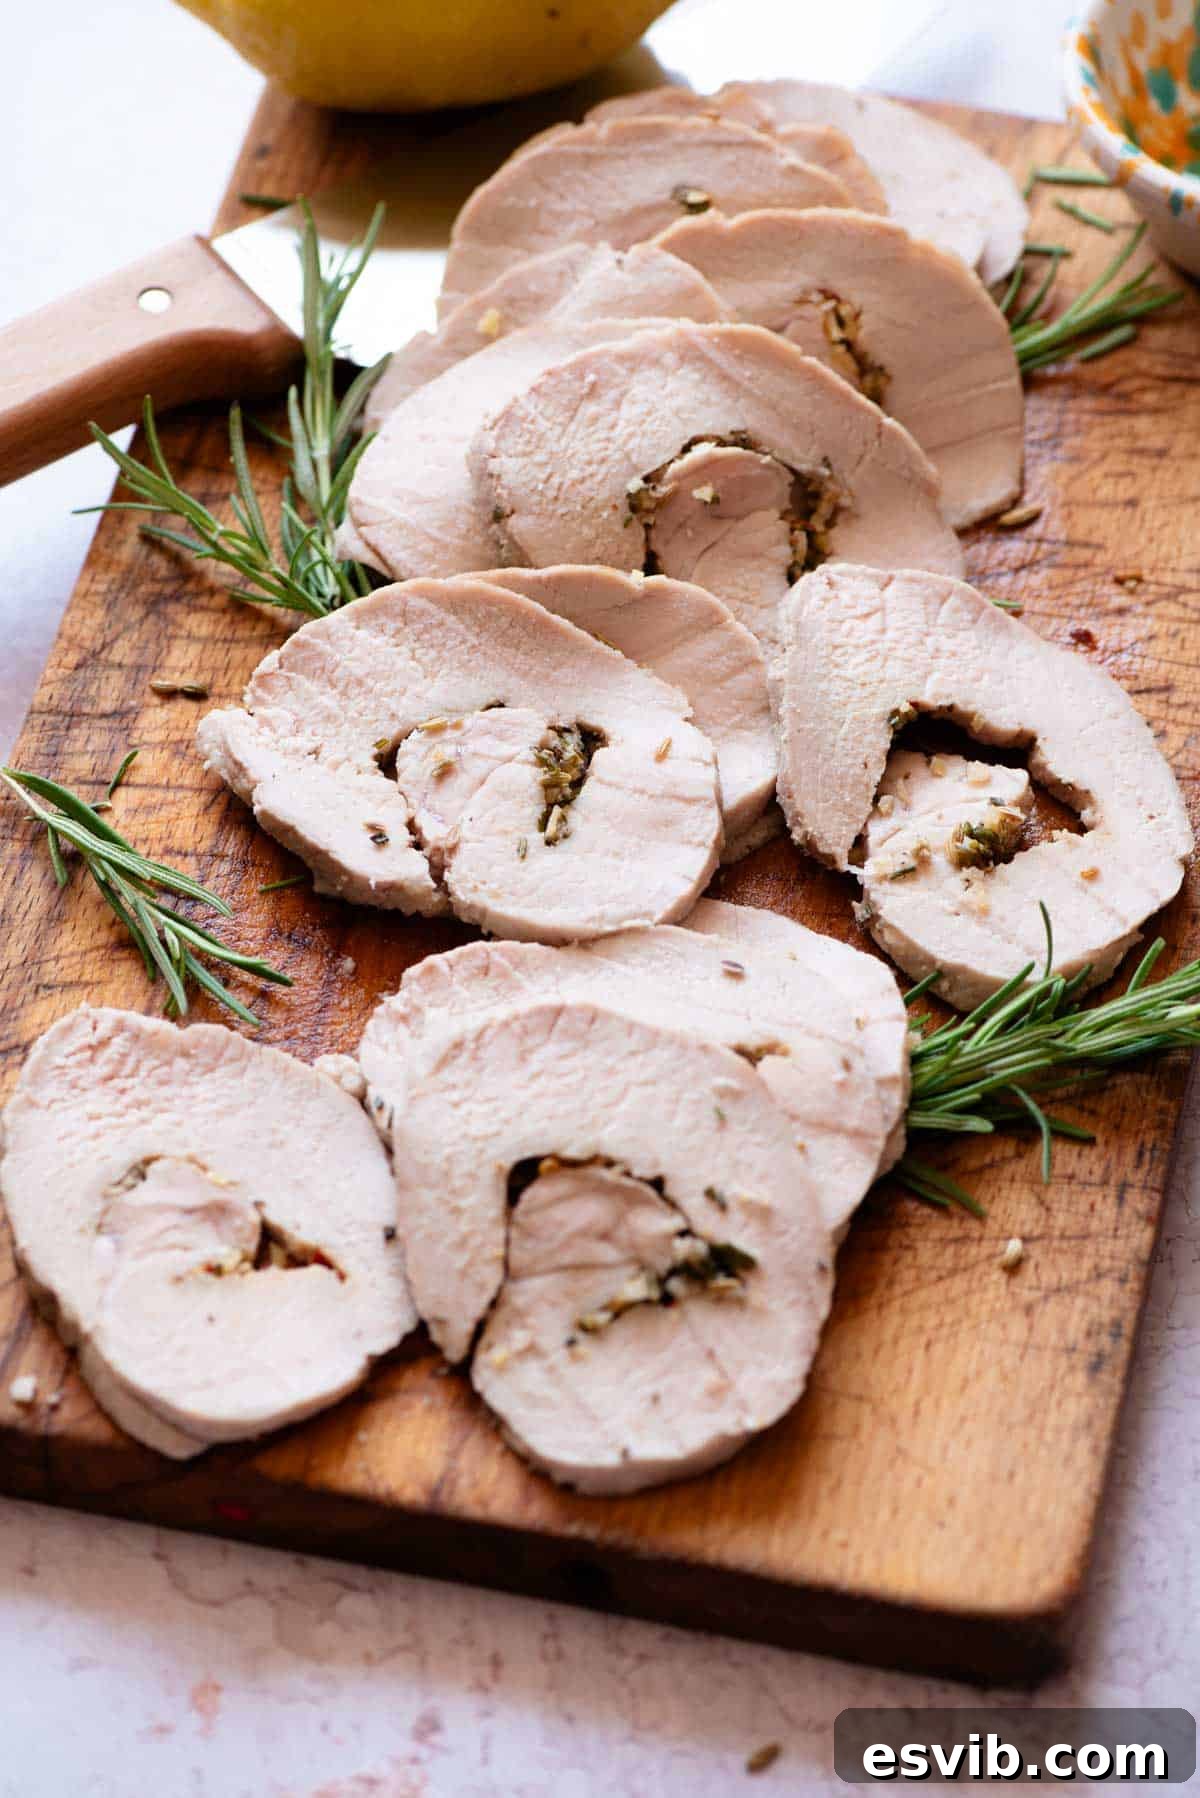
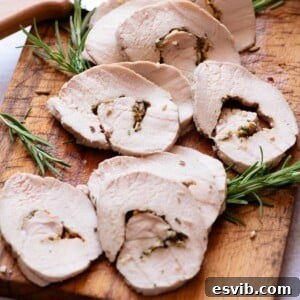
Discover the secrets to crafting the most exquisite **Italian Roast Pork Loin**, a culinary masterpiece that will transport your taste buds straight to the sun-drenched coasts of Italy. This exceptional dish features a succulent pork loin, generously stuffed with the vibrant zest of Amalfi lemon, fragrant fennel, savory garlic, and a splash of crisp white wine. Roasted to absolute perfection, each slice promises an incredibly juicy, tender, and intensely flavorful experience. Whether you’re planning a lavish holiday feast, a comforting Sunday dinner, or an impressive meal for guests, this Italian roast pork loin is sure to be a showstopper. Serve it alongside classic Italian roast potatoes or your cherished Italian side dish for a truly memorable dining experience.
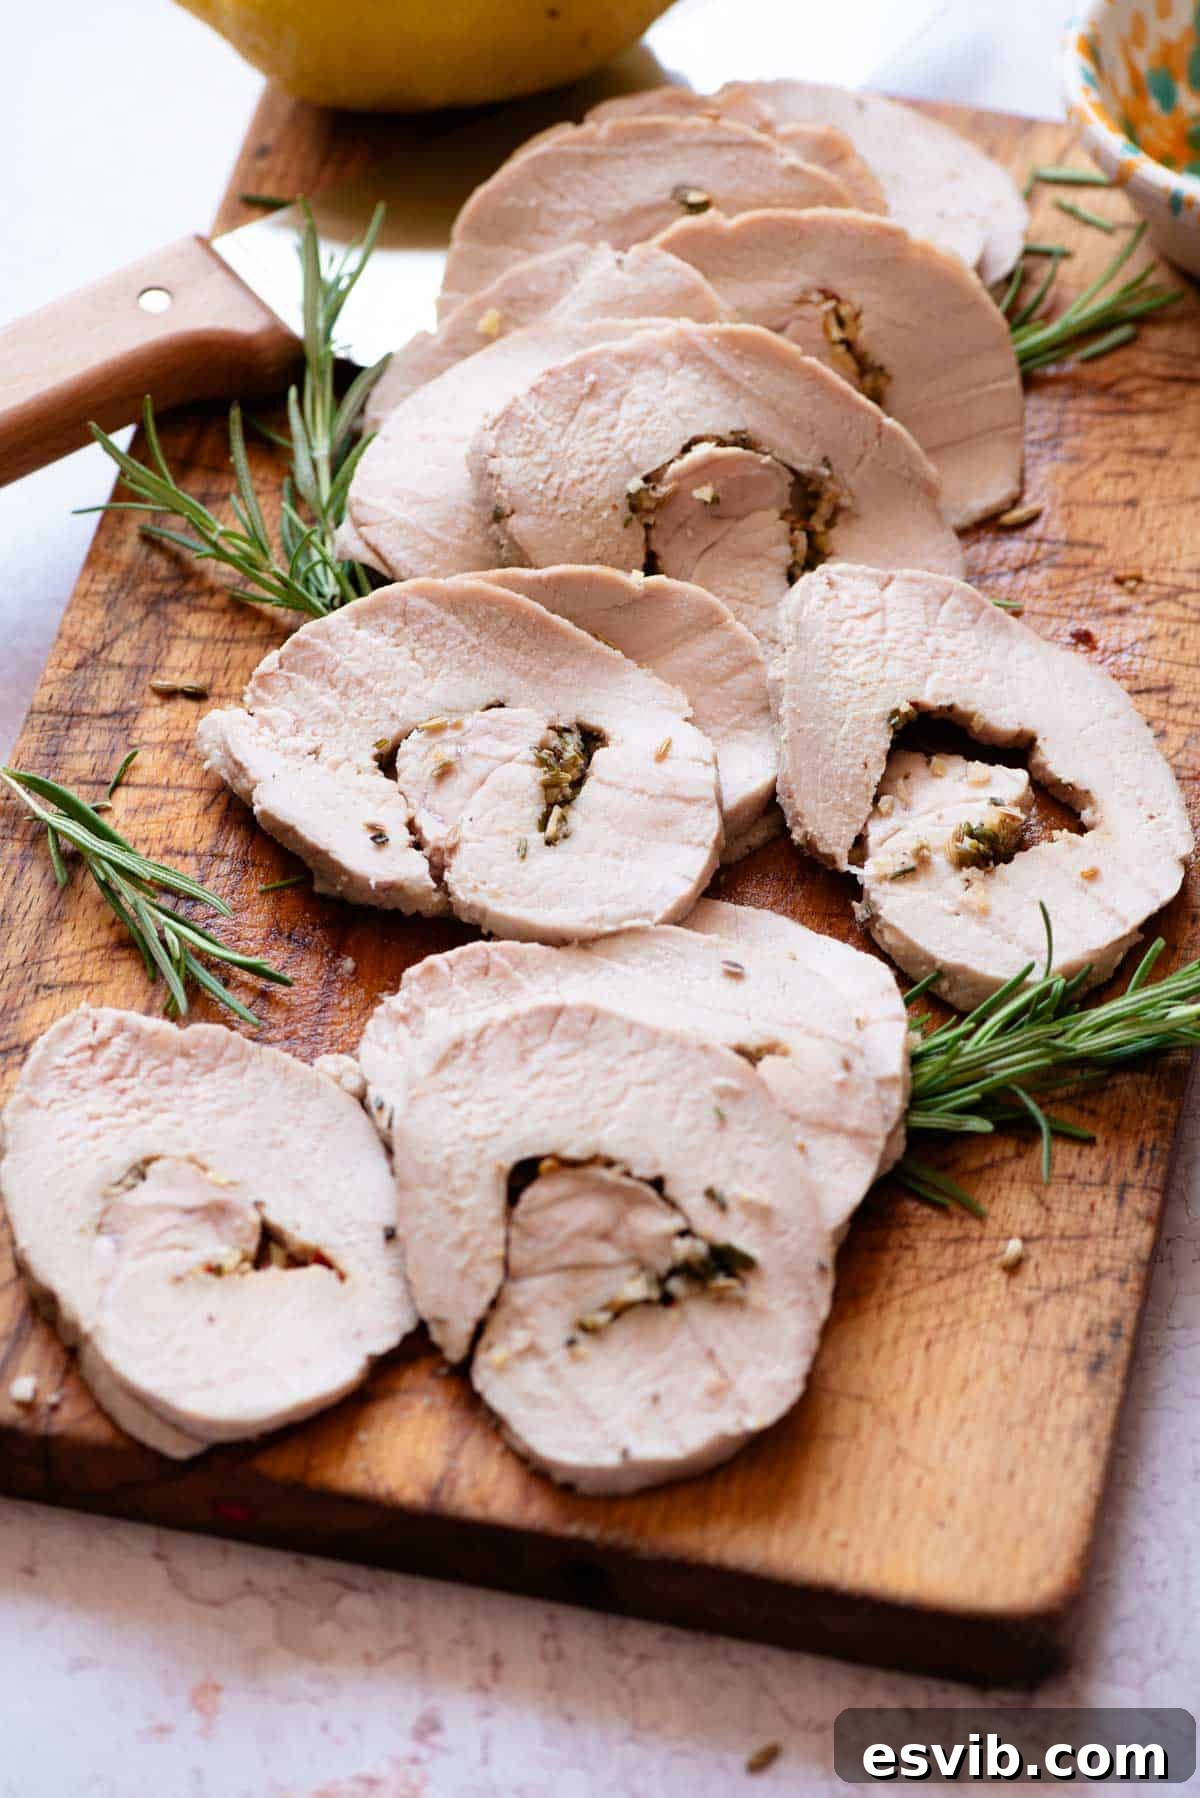
This magnificent Italian roast pork loin has quickly become a beloved staple in our kitchen, captivating us with its irresistible charm for months on end. Its unparalleled juiciness and tenderness are a testament to the meticulous preparation and the rich blend of authentic Mediterranean flavors. The vibrant zest of lemons, the aromatic embrace of fresh herbs, the pungent kick of garlic, and the subtle depth of white wine converge to create a symphony of tastes that promises pure delight in every bite. It’s more than just a meal; it’s an experience that speaks to the heart of Italian cooking – simple ingredients elevated to extraordinary heights.
What makes this recipe truly exceptional is its surprising simplicity. Despite its gourmet appearance and complex flavor profile, preparing this roast pork loin is remarkably straightforward. The process involves just a few key steps: expertly seasoning the butterflied pork, tightly rolling it to encapsulate the aromatic stuffing, and then roasting it until golden brown and perfectly cooked. The fresh, zesty, and fragrant notes infused into this pork loin make it an undeniably delicious choice, versatile enough to grace your table in any season. Imagine the bright flavors cutting through the richness in summer, or providing warmth and comfort in the colder months. It truly is a dish for all occasions.
For a complete and utterly delightful meal, we highly recommend serving this Italian roast pork loin with a selection of classic Italian accompaniments. Pair it with crispy on the outside, fluffy on the inside Italian roast potatoes, vibrant green beans tossed with a touch of olive oil and garlic, and a refreshing peppery arugula salad with a simple lemon vinaigrette. These side dishes not only complement the richness of the pork but also add texture, color, and additional layers of flavor, creating a harmonious and unforgettable spread that embodies the essence of Italian hospitality. Prepare to impress your family and friends with this truly delicious culinary creation!
Unlock the full potential of this recipe with our comprehensive guide below. It includes detailed notes on selecting the finest ingredients, step-by-step photographs to guide you through each stage, invaluable tips for achieving perfection, exciting variations to inspire your creativity, and a helpful video tutorial. For your convenience, the complete printable recipe card is located at the bottom of this page, or simply click the recipe link to jump directly to it.
Essential Ingredients for an Authentic Italian Roast Pork Loin
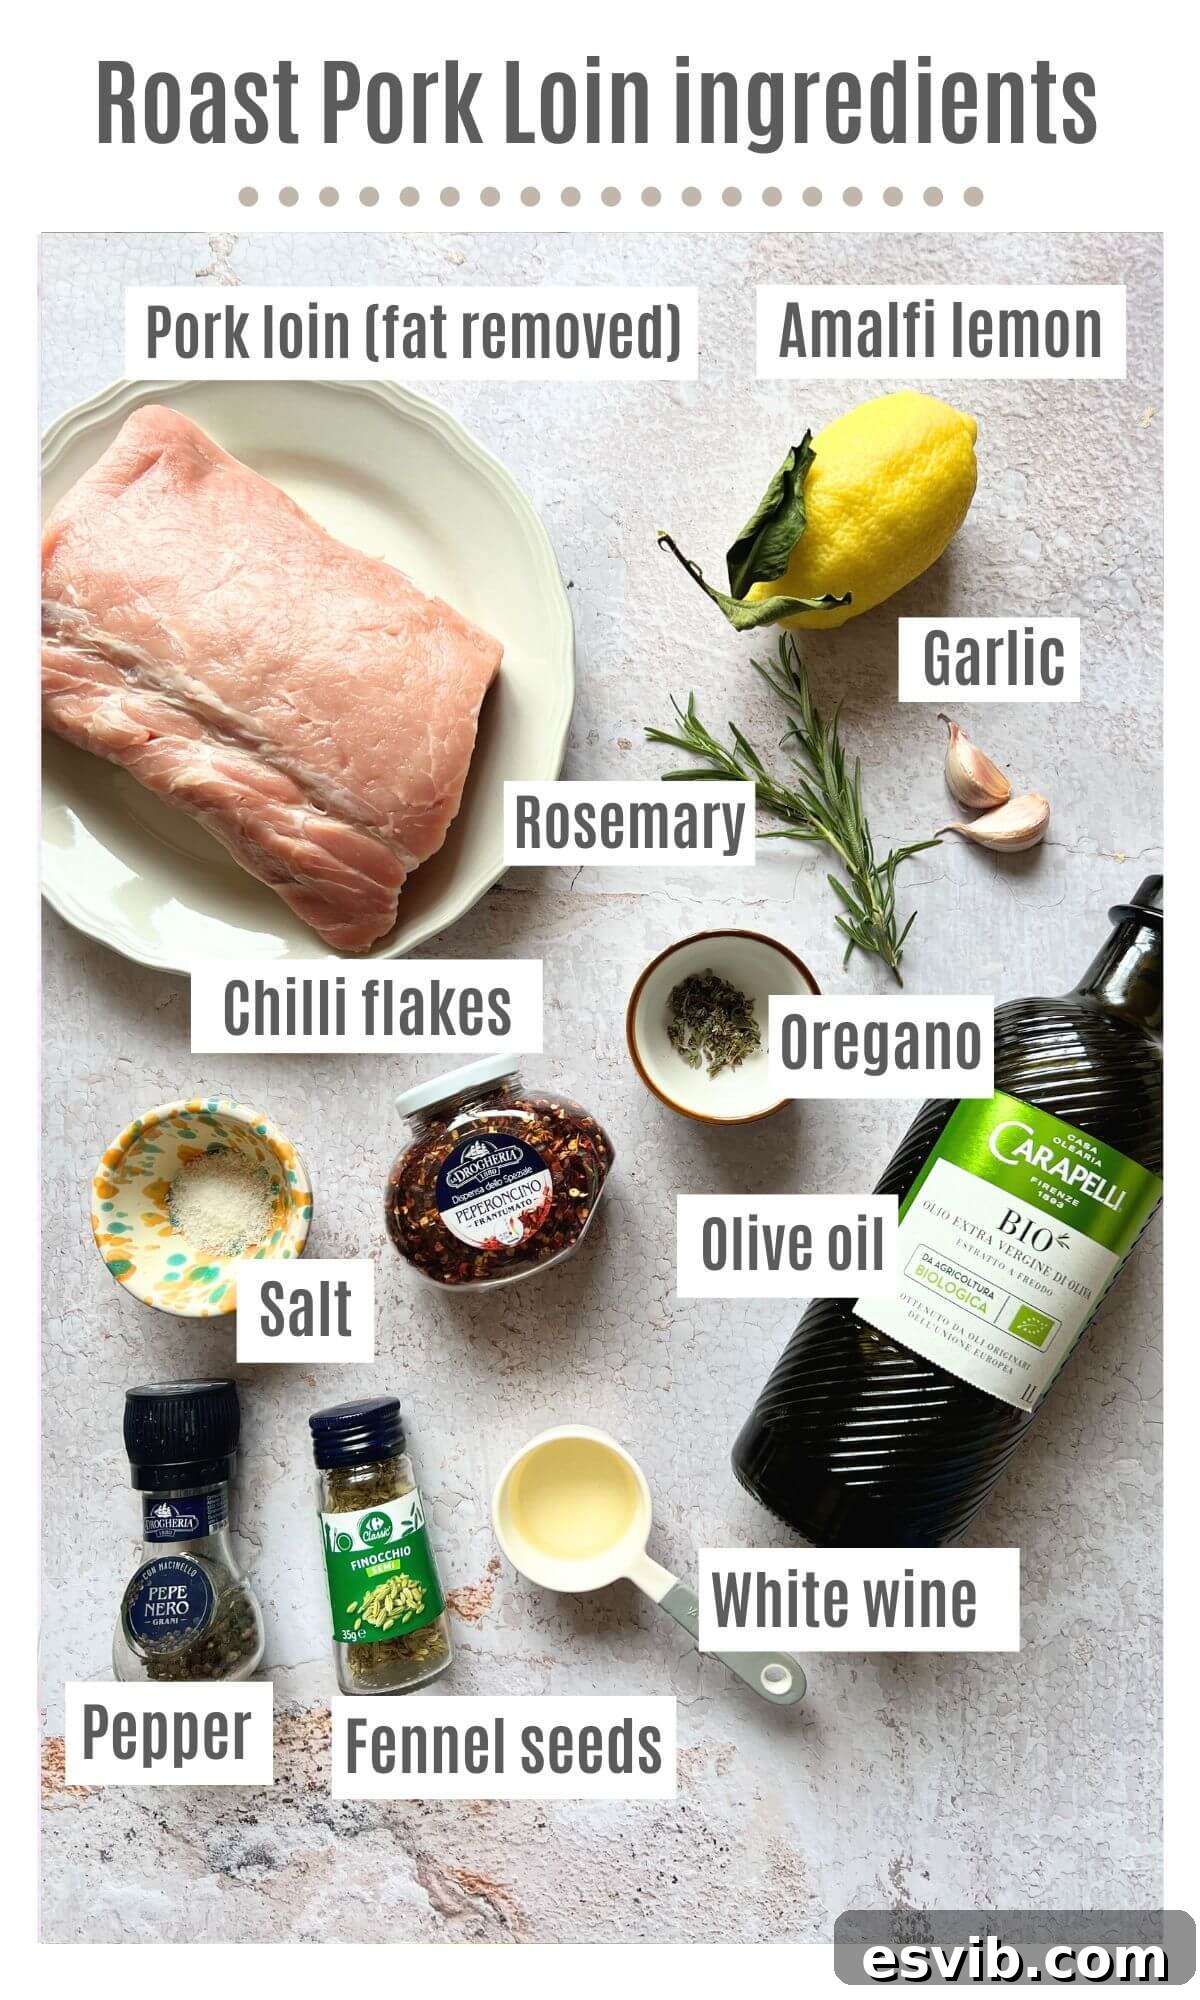
Crafting an exceptional Italian Roast Pork Loin begins with selecting the right ingredients. Each component plays a vital role in building the layered flavors that make this dish so special. From the quality of the pork itself to the freshness of the herbs and the brightness of the lemon, every choice contributes to the final masterpiece. Here’s a closer look at what you’ll need to gather:
Ingredient Notes and Expert Substitutions
To ensure your Italian Roast Pork Loin turns out perfectly, pay close attention to the quality and type of each ingredient. Here are some detailed notes and practical substitution advice:
- Pork Loin – For this recipe, you’ll need approximately 1kg (2 lbs) of pork loin, *after* any thick layers of fat have been removed. If you’re purchasing pork with the fat still attached, aim for a piece weighing around 1.5kg (3.3 lbs) to account for the trim. **Important Note:** A pork loin is a distinct cut of meat and should not be confused with a pork tenderloin. While both are lean cuts, a tenderloin is much smaller and cooks significantly faster, making it unsuitable for this specific recipe’s cooking times and preparation method. Ensure you select a proper pork loin for the best results, as its size allows for effective stuffing and even roasting.
- Lemons – Our recipe specifically calls for Amalfi lemons, renowned for their incredibly fragrant zest and intensely bright, complex flavor. These lemons are a true star in Mediterranean cuisine, offering an aromatic depth that is truly unique. However, if genuine Amalfi lemons are not accessible in your region, don’t despair! A high-quality, unwaxed lemon will serve as an excellent substitute. Always opt for unwaxed lemons when using the zest, as the wax coating can impart an unpleasant bitterness. The fresher the lemon, the more potent and delightful its aroma will be.
- Rosemary, Oregano & Fennel – This harmonious blend of herbs and seeds is what imbues the pork with its signature, irresistibly delicious Italian flavor profile. We recommend using fresh rosemary, finely chopped, for its robust, piney notes. For oregano, dried is perfectly acceptable and often preferred in long-cooked dishes as its flavor concentrates beautifully. Fennel seeds are critical; they provide a delicate anise-like warmth and sweetness that complements pork wonderfully. If you prefer a stronger anise flavor, you can lightly crush the fennel seeds before incorporating them.
- Garlic – The use of fresh garlic is an absolute must for this recipe. Its pungent, sweet, and aromatic qualities are essential to the stuffing’s flavor. Avoid using ground or powdered garlic, as these lack the vibrant complexity and fresh intensity that finely grated or minced fresh cloves provide. We recommend grating the garlic for a finer texture that integrates seamlessly into the stuffing mixture, ensuring its flavor is evenly distributed throughout the pork.
- White Wine – We utilized a Vermentino wine in our tests, a fantastic dry Italian white that lends a crisp, slightly herbaceous note to the roast. However, any good quality, dry Italian white wine will work beautifully. Consider options like Pinot Grigio, Pecorino, or even a dry Sauvignon Blanc. The wine helps tenderize the pork and adds a layer of acidity and depth to the stuffing. If you prefer to cook without alcohol, simply omit the white wine; the dish will still be delicious thanks to the other strong flavors.
Step-by-Step Preparation: Crafting Your Italian Roast Pork Loin
Embark on your culinary journey with these detailed instructions, complete with visual guidance, to ensure your Italian Roast Pork Loin is a resounding success. Each step is designed to make the process enjoyable and the outcome spectacularly delicious.
**1. Prepare the Pork: Trimming Fat and Sinew**
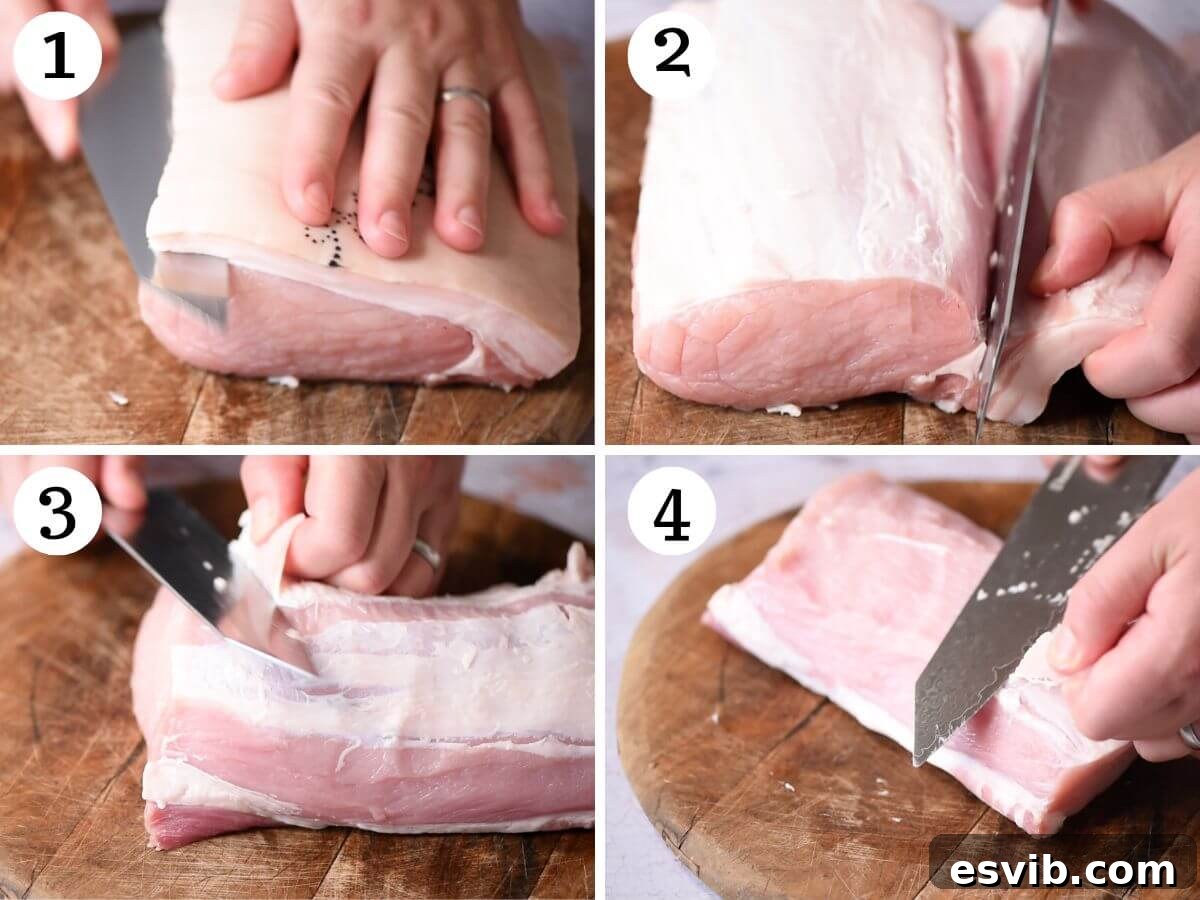
The first crucial step is to meticulously prepare your pork loin. If you’ve purchased a piece with a thick layer of fat still attached, use a large, very sharp knife to carefully remove it. Glide your knife along the natural curve of the fat, taking care to minimize the removal of any precious meat. Once the fat is off, inspect the loin for any visible sinew, also known as silver skin. This tough, silvery membrane does not break down during cooking and can make the roast chewy. Using the same sharp knife, carefully slide it just underneath the silver skin, angling upwards slightly, and gently saw it away. The goal is to remove as much sinew as possible without cutting deeply into the lean pork. This attention to detail ensures a tender and pleasant eating experience. (Refer to **photos 1-4** for visual guidance on this trimming process.)
**2. Butterfly and Tenderize the Loin**
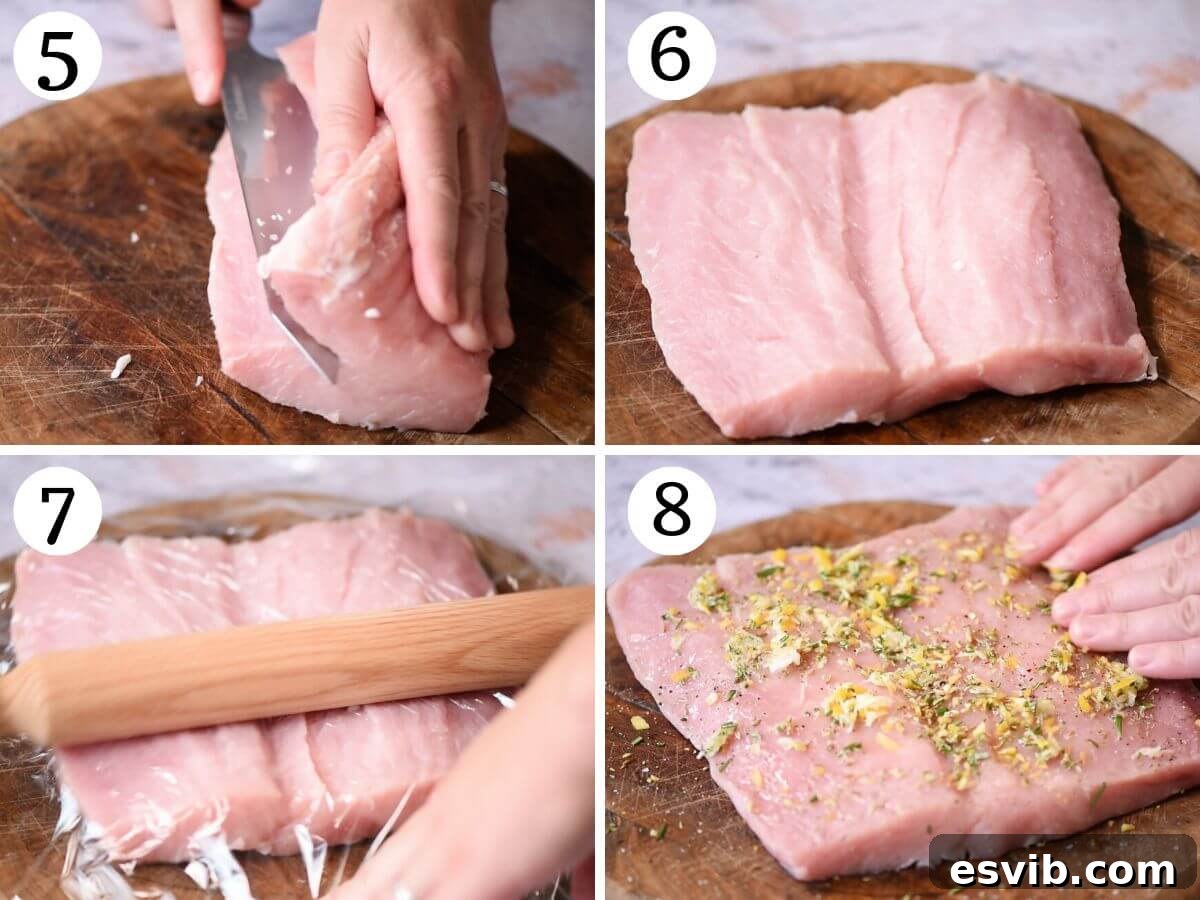
Now, it’s time to butterfly your pork loin. Lay the trimmed loin on a clean cutting surface. Carefully make a long cut down the middle lengthways, almost but not quite all the way through, allowing the pork to open up like a book. The goal is to create a larger, flatter surface area for the stuffing, ensuring it remains a single, coherent piece. Next, place a sheet of plastic wrap over the butterflied pork. Using a meat mallet or a heavy rolling pin, gently but firmly bash the pork a few times all over. This tenderizes the meat, breaking down some of the muscle fibers, and also helps to create a more even thickness across the entire surface. An even thickness is key for uniform cooking. Discard the plastic wrap once done. (Refer to **photos 5-7** for visual guidance on butterflying and tenderizing.)
**3. Crafting the Aromatic Stuffing and Seasoning**
Prepare your vibrant stuffing mixture. Using a mezzaluna (a curved, two-handled knife perfect for chopping herbs) or a sharp chef’s knife, finely chop the fragrant lemon zest together with the fresh rosemary. The finer the chop, the more evenly the flavors will distribute.
Now, it’s time to season the butterflied pork. Generously sprinkle the inside of the pork with sea salt flakes (regular fine salt can also be used, but sea salt flakes add a delightful textural crunch). Then, evenly distribute the chopped lemon zest and rosemary, freshly grated garlic, dried oregano, a pinch of red pepper flakes for a subtle warmth, and a good grind of fresh black pepper. Finally, drizzle the white wine and a tablespoon of good quality olive oil over the seasoned pork. With clean hands, gently but thoroughly rub all the ingredients into the meat, ensuring every surface is coated with the aromatic mixture. This step is crucial for infusing the pork with maximum flavor. (See **photo 8** for the seasoning and rubbing process.)
**4. Rolling and Securing the Pork Loin**
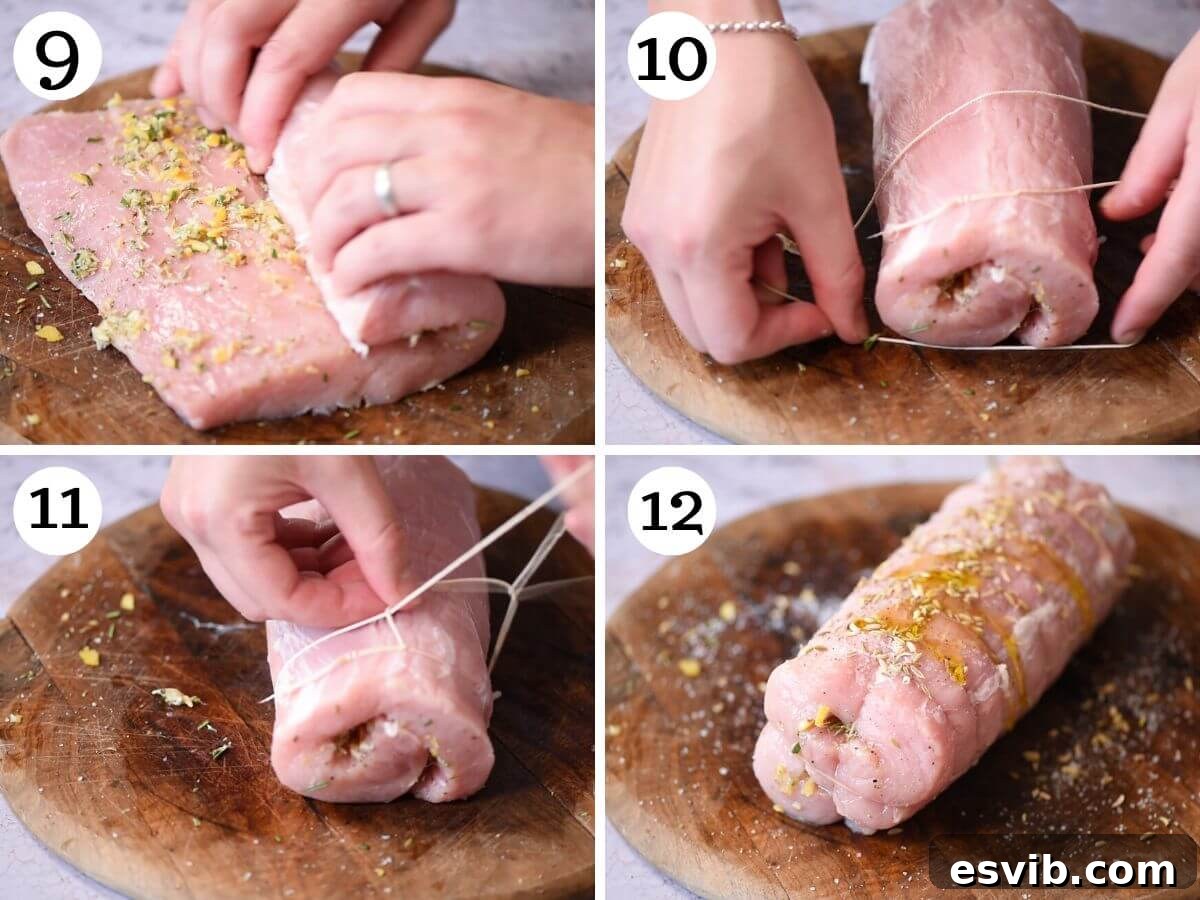
With your pork beautifully seasoned, it’s time to roll it up. Starting from one end, tightly roll the pork lengthways, ensuring the stuffing remains snugly inside. The goal is to create a compact, uniform cylinder. Once rolled, secure the pork with kitchen string. A simple yet effective method is to tie individual loops of string at each end of the pork, ensuring they are tight enough to hold the shape without cutting into the meat. Then, continue tying additional loops about ½ an inch apart across the entire length of the pork. This prevents the stuffing from escaping and helps the roast cook evenly and maintain its appealing shape. (Refer to **photos 9-11** for a visual guide on rolling and tying.)
After the pork is securely tied with kitchen string, give it a final flourish of flavor and texture. Sprinkle a bit more sea salt flakes over the exterior of the meat, along with the distinctive fennel seeds. The fennel seeds on the outside will toast during roasting, releasing their sweet, aromatic essence. Drizzle with an additional tablespoon of olive oil and rub it all over the surface. This will aid in browning and create a delicious crust. (See **photo 12** for the final seasoning of the exterior.)
**Tip: Flavor Infusion (Optional but Recommended)**
For an even deeper infusion of flavors, if your schedule allows, consider placing the tied pork loin in the refrigerator for at least 2 hours, or even overnight. This resting period allows the herbs, spices, and lemon to meld beautifully with the pork, intensifying the taste. However, if time is of the essence, you can proceed directly to roasting; it will still be incredibly delicious!
**5. Roasting to Perfection**
Begin by preparing a fragrant bed for your pork. Thickly slice one large onion (or two smaller ones) into rings, about ½ inch thick. Arrange these onion slices evenly in a sturdy roasting tin. This onion bed not only infuses the pork with a subtle sweetness and depth of flavor as it cooks, but it also creates a slight elevation for the pork, allowing air to circulate and ensuring more even roasting. Place the tied pork loin directly on top of the onion bed. (See **photos 13 and 14** for setting up your roasting tin.)
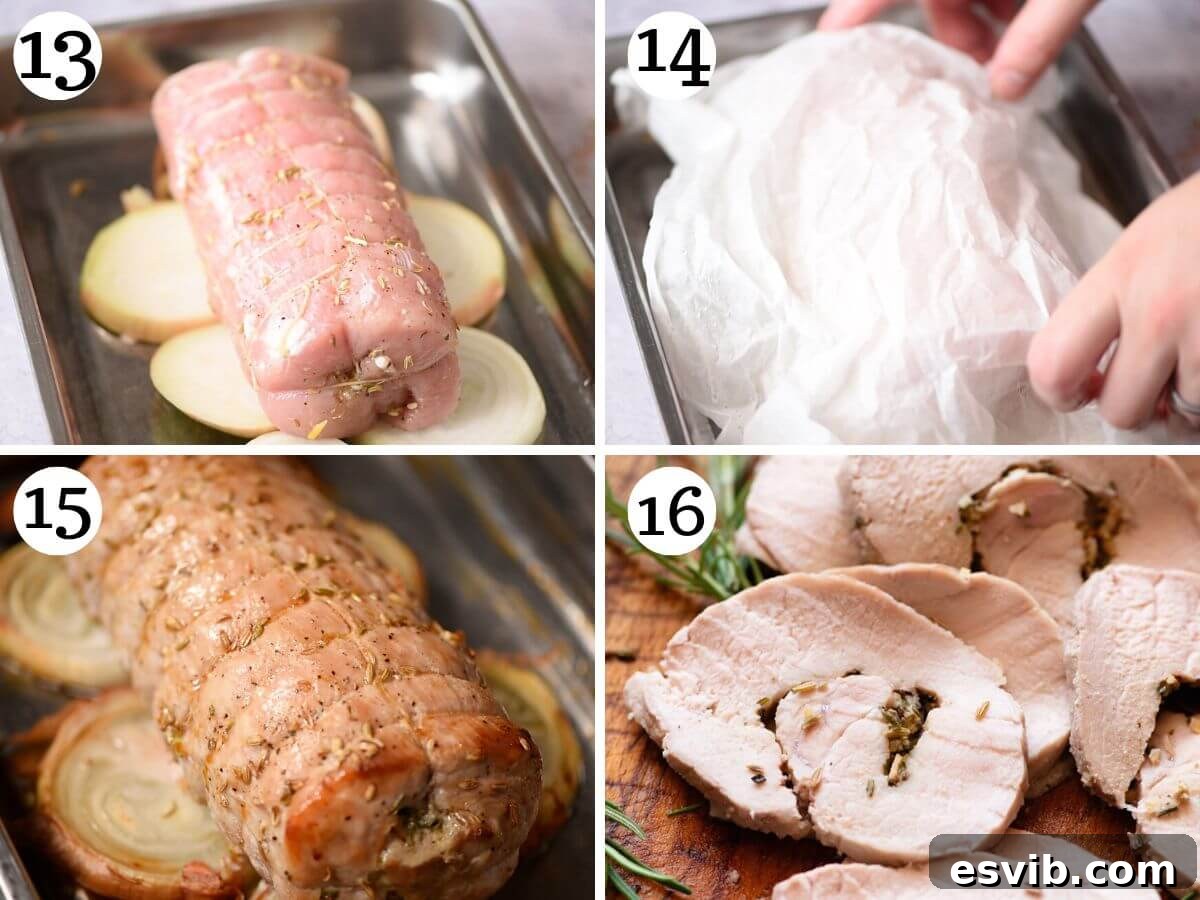
To begin the roasting process, pre-heat your oven to 180°C (350°F). Cover the roasting tin tightly with a damp, crinkled piece of baking parchment. This creates a “cartouche,” trapping steam and moisture around the pork during the initial phase of cooking, which helps keep the meat incredibly juicy and tender. Roast the covered pork for 30 minutes. After this initial period, carefully remove the baking parchment to allow the pork to brown and develop a beautiful crust. Continue roasting uncovered for another 40 minutes, or until an internal temperature of 63°C (145°F) is reached at the thickest part of the loin. (Refer to **photo 15** for the roasting progression.)
**6. Resting for Optimal Juiciness**
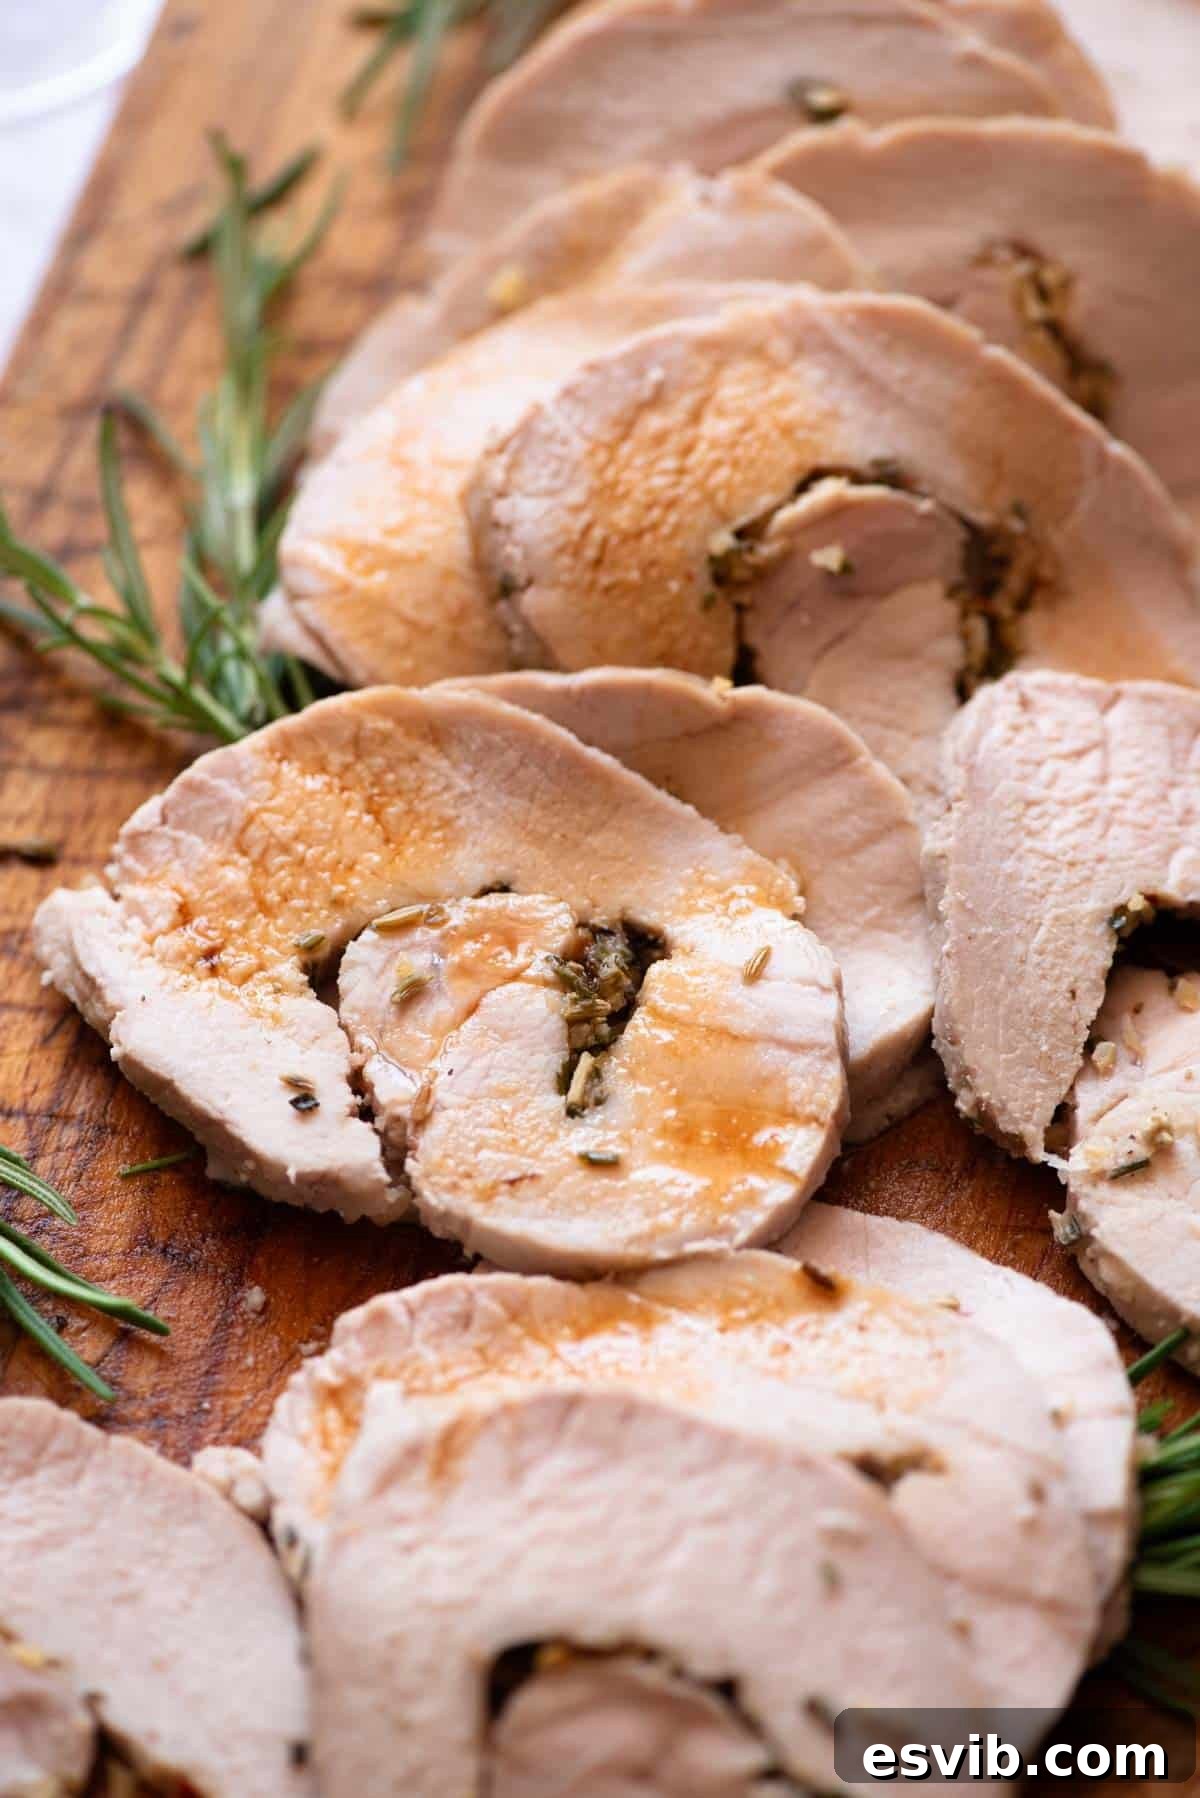
Once roasted to perfection, remove the pork loin from the oven. This next step is absolutely critical for the ultimate juiciness and flavor. Transfer the pork to a cutting board, loosely cover it with aluminum foil, and allow it to rest undisturbed for at least 20 minutes. During this resting period, the muscle fibers relax, reabsorbing the delicious juices that have migrated to the center during cooking. Skipping this step can result in a dry roast. Don’t worry, the pork will remain wonderfully hot. After resting, slice the pork loin into thick, appealing rounds and serve immediately. (See **photo 16** for the resting process.)
Mastering the Art of Tying Your Pork Loin
Tying the pork loin is a fundamental step that ensures even cooking, helps the roast maintain its beautiful shape, and keeps all that delicious stuffing securely inside. While it might seem daunting at first, there are several methods, from very simple to more technical. Choose the one that best suits your comfort level.
The Simplest Way: Individual Loops
This method is incredibly straightforward and effective, perfect for beginners or when you’re short on time. It achieves the main goal of keeping the roast intact without complex knot-tying skills.
- Start by cutting several pieces of kitchen string, each long enough to comfortably go around the pork loin and tie a knot.
- Take one piece of string and tie a secure loop around one end of the pork. Ensure the knot is tight, but not so much that it deeply indents the meat.
- Repeat this process at the opposite end of the pork.
- Continue tying individual loops, spaced about ½ an inch apart, across the entire length of the pork loin. This creates a sturdy framework that holds everything together.
This method is quick, easy, and will do a fantastic job of securing your roast.
The Technical Way: Butcher’s Knots (More Fiddly but Tighter)
The butcher’s knot method creates a more uniformly tight roast and is often preferred by seasoned cooks. It involves using a single, continuous piece of string and a specific knotting technique. While it sounds (and can initially feel) more complicated, it becomes second nature with a little practice. For a clear visual, we highly recommend watching our video tutorial.
- Begin by cutting one very long piece of kitchen string – you’ll need ample length to go down the roast and back. Form a small loop at one end of this string.
- Position the string underneath the pork at one end, allowing the small loop to extend slightly past the edge of the meat. Thread the long end of the string through this loop from above, pulling it tightly to secure the first knot at the top of the loin.
- Now, pull about ½ an inch of the main string straight up the center of the pork. Hold this segment firmly in place with your finger.
- Pass the long end of the string back underneath the meat, then feed it *underneath* the segment your finger is holding, and pull it tight. This creates a secure loop that cinches the pork.
- Continue this process, creating new loops every half inch, moving down the length of the pork loin until you reach the other end.
- Finally, to further secure the structure, pass the remaining string along the center of the *bottom* of the pork, carefully going underneath each existing loop. Tie a final knot at the very end to secure everything.
- **Phew!** As stated, explaining this in text can make it sound overly complicated when, in practice, once you’ve done it a couple of times, it’s quite manageable. If you’re keen to master this technique, watching our dedicated video tutorial will provide the clearest, most helpful visual explanation. Remember, while this method offers a very tight and professional finish, it is **not** essential. The important thing is that your pork is secure. If this seems overwhelming, confidently opt for the easy, simple method described above!
Expert Recipe Tips for a Flawless Italian Roast Pork Loin
Achieving a perfect roast pork loin is all about understanding a few key techniques and tips. Incorporate these into your cooking process to elevate your dish from good to truly exceptional.
- Mastering Sinew (Silver Skin) Trimming – Beyond just removing the thick fat layer, the complete removal of sinew is crucial. This tough, silvery membrane will contract and become rubbery during cooking, making the pork unpleasant to eat. To efficiently remove it, keep your sharp knife almost parallel to the meat, angling slightly upwards as you cut. This allows you to glide under the sinew without digging into the lean pork itself. A very sharp knife makes this task significantly easier and safer. Take your time; a lean, well-trimmed piece of meat is key to a tender roast.
- The Strategic Use of an Onion Bed – Don’t underestimate the power of a simple bed of onions! This isn’t just for flavor (though it certainly adds a wonderful sweetness and aroma to the pan juices); it serves a vital functional purpose. By elevating the pork slightly off the bottom of the roasting tin, the onion slices promote air circulation all around the roast. This prevents the underside from steaming (which can lead to soggy spots) and encourages more even browning and cooking throughout the entire loin. Cut 1-2 onions into thick slices, approximately ½ inch thick, and make sure to trim off any rounded ends so the pork sits level and stable on its flavorful foundation.
- The Magic of Damp Baking Parchment (Cartouche) – Creating a “cartouche” with damp, crinkled baking parchment might sound fancy, but it’s a simple technique with profound benefits. First, scrunching the parchment helps it conform better to the shape of the roast and roasting tin. Running it under cold water to dampen it softens the paper and, more importantly, creates a steamy, moist environment when it covers the pork. This acts like a lid but still allows some ventilation, effectively braising the pork in its own juices during the initial cooking phase. This critical step locks in moisture, ensuring the pork remains incredibly juicy and tender, preventing it from drying out before it has a chance to develop its exterior crust.
- The Indispensable Rest for the Pork – Once your roast pork loin emerges from the oven, it’s absolutely paramount to resist the urge to slice into it immediately. Resting the meat is a non-negotiable step for achieving maximum juiciness and flavor. As meat cooks, its muscle fibers contract, pushing the internal juices towards the center. If you cut it too soon, these juices will simply run out onto your cutting board. By allowing the pork to rest, loosely covered with foil, for 20 minutes, the muscle fibers relax and reabsorb those precious juices, distributing them evenly throughout the meat. This ensures every slice is incredibly moist and flavorful. Don’t worry about it getting cold; the residual heat will keep it warm and perfectly ready for carving.
Frequently Asked Questions About Italian Roast Pork Loin
Here are answers to some common questions that arise when preparing this delicious Italian Roast Pork Loin:
Removing the sinew is crucial because this tough, connective tissue will not break down during the roasting process. Instead, it will tighten and become chewy, negatively impacting the texture of your roast. By carefully trimming away as much sinew as possible, you ensure a lean, tender, and much more enjoyable pork loin. If you can purchase pork loin that has already been professionally trimmed, you can certainly skip this step.
Yes, absolutely! Leftover roast pork loin can be reheated successfully while retaining much of its flavor and tenderness. To do so, arrange the slices of pork on a small baking tray or an oven-safe dish. Add a tablespoon or two of broth or water to the bottom of the dish to help create a moist environment, then cover it tightly with aluminum foil. Bake in a preheated oven at 180°C (350°F) for approximately 10-15 minutes, or until the pork is heated thoroughly to your desired temperature.
When stored properly, cooled Italian Roast Pork Loin will keep beautifully in the refrigerator. Ensure it’s placed in an airtight container or tightly wrapped with plastic film. It will maintain its quality and freshness for approximately 3-4 days, making it excellent for meal prepping or enjoying delicious leftovers.
Indeed, cooked Italian Roast Pork Loin freezes exceptionally well! To freeze, allow the pork to cool completely, then slice it or keep it whole. Wrap it tightly in plastic wrap, then an additional layer of aluminum foil, or place it in a freezer-safe bag or container. It can be frozen for up to 2-3 months. When ready to use, thaw overnight in the refrigerator before reheating as described above.
Explore More Delightful Italian Roast Recipes
If you’ve fallen in love with the flavors of this Italian Roast Pork Loin, you’ll be thrilled to discover more of our exquisite Italian roast recipes. Perfect for family gatherings, special occasions, or simply to expand your culinary repertoire, these dishes embody the rich and comforting traditions of Italian cooking.
Inspired by the Flavors of Italy
Continue your journey through the world of Italian roasts with these fantastic recipes.
Mains
Italian Roast Beef with Marsala & Onions
Mains
Italian Meatloaf Wrapped in Pancetta (Polpettone)
Mains
Sausage & Chestnut Stuffed Turkey Breast
Mains
Stuffed Pork Tenderloin with Prosciutto & Pistachios
We truly hope you enjoy creating and savoring this **Italian Roast Pork Loin recipe**! If you’ve tried this, or any other recipe from our blog, please don’t hesitate to share your experience. We’d love for you to rate the recipe and leave a comment below – your feedback means the world to us! To stay connected and discover more of our delicious Italian-inspired dishes, be sure to **follow us** on Facebook, Instagram, and Pinterest. You can also sign up for our Newsletter to get our latest recipes delivered straight to your inbox!
Step By Step Photos Above
Most of our recipes come with step by step photos, helpful tips and tricks to make it perfectly first time and even video!
Italian Roast Pork Loin with Amalfi Lemon & Fennel
By Emily
30
1
10
1
40
6 servings
Equipment
-
Plastic wrap (cling film)
-
Kitchen string
-
Meat mallet or rolling pin
-
A damp and crinkled piece of baking parchment for covering the pork
-
Aluminum foil
Ingredients
- 1 kg pork loin, (weight is after fat removed, see note 1)
- 1 pinch chilli flakes, (red pepper flakes)
- ½ Amalfi lemon peel, or other unwaxed lemon
- 1 teaspoon oregano
- 1 teaspoon rosemary
- 1 teaspoon fennel seeds
- 2 garlic cloves, finely grated or minced
- 1 large onion or 2 small
- 1 tablespoon Italian white wine, (e.g Vermentino, Pinot Grigio, Pecorino)
- Olive oil
- Sea salt flakes and black pepper
Instructions
-
Pre-heat the oven to 180°C (350°F).
-
Cut the pork loin down the middle lengthways so it’s open like a book (don’t cut right the way through it should still be one whole piece). Place a piece of plastic wrap over the pork and bash the pork with a meat mallet or rolling pin a few times all over to tenderize the meat and make it an even thickness. Discard the plastic wrap.
-
Using a mezzaluna or knife finely chop the lemon zest and rosemary together.
-
Sprinkle the pork with sea salt flakes (you can also use regular salt) then sprinkle over the lemon zest, rosemary, grated garlic, oregano, red pepper flakes and a pinch of black pepper. Finally, drizzle the white wine and olive oil (1 teaspoon) over the pork and rub everything together.
-
Tightly roll the pork lengthways from one end to the other and secure it with kitchen string. You can do this by tying loops of string at each end then about ½ an inch apart across the pork (see our step-by-step photos and recipe video for tying up the pork using butcher’s knots, see note 3).
-
Once the pork is secure with kitchen string sprinkle more sea salt flakes and fennel seeds over the top of the meat and drizzle with 1 tablespoon of olive oil and rub it all over.
-
If you have time place the pork in the fridge for 2 hours to overnight to infuse the flavors but it can be roasted right away.
-
Thickly slice the onion and place in a roasting tin as a bed for the pork to sit on. Place the pork on top and cover with the baking parchment.
-
Roast for 30 minutes covered then remove the baking parchment and roast for another 40 minutes uncovered.
-
Remove from the oven, cover with foil and let it rest for 20 minutes before slicing and serving.
Video Tutorial
Watch our detailed video guide to perfect your Italian Roast Pork Loin.
Notes
-
- Pork weight – Please note that 1kg (2 lbs) refers to the weight of the pork loin *after* any thick fat layers have been removed. If you purchase a pork loin with fat attached, you will need a larger piece, approximately 1.5kg (3.3 lbs), to yield the correct amount of lean meat.
- Trimming the sinew (silver skin) – After removing the thick outer fat, it is essential to remove any remaining silver skin. This is a tough membrane that will contract and toughen during cooking. Use a sharp knife, keeping it level and parallel to the meat, to gently trim off the sinew without cutting into the lean muscle. A well-trimmed loin ensures a tender result.
- Tying the pork – You have two primary options for tying your pork loin. For maximum security and a uniform shape, you can use butcher’s knots (as demonstrated in our video tutorial and detailed instructions). Alternatively, a simpler method is to tie individual loops of string about ½ an inch apart along the length of the pork. The key objective is to keep the meat rolled tightly and its stuffing contained, so choose the method you are most comfortable with.
- Using a bed of onions – Placing thick slices of onion at the bottom of your roasting tin serves a dual purpose: it infuses the pork with a subtle sweetness and aromatic depth, and more importantly, it elevates the roast. This elevation allows for better air circulation around the entire loin, promoting even cooking and preventing the bottom from steaming rather than roasting. Ensure the onion slices are thick, about ½ inch, and trim any rounded ends to create a stable base.
- Baking parchment – To create an effective “cartouche” (a parchment lid), lightly scrunch the baking parchment in your hands and then briefly run it under cold water to dampen it. This technique helps to trap moisture during the initial roasting phase, ensuring the pork remains incredibly juicy and tender. The dampness creates a steamy environment that prevents the meat from drying out.
- Resting the pork – Allowing the roast pork to rest, loosely covered with aluminum foil, for at least 20 minutes after it comes out of the oven is a crucial step. This resting period enables the muscle fibers to relax and reabsorb all the delicious juices that have gathered in the center during cooking. Skipping this step can lead to a dry and less flavorful roast, as the juices would simply run out when sliced. The pork will remain warm due to residual heat.
- Storage & freezing – Leftover Italian Roast Pork Loin should be stored in an airtight container in the refrigerator and will keep well for 3-4 days. For longer storage, the cooked pork can be frozen. Wrap it tightly to prevent freezer burn and thaw completely in the refrigerator before reheating.
Helpful Info for All Recipes
- I always use extra virgin olive oil in all of my recipes unless stated otherwise. Its robust flavor is fundamental to authentic Italian cooking.
- When I use canned or jarred tomatoes of any kind, I exclusively use Cirio or Mutti brands. Their superior quality and rich flavor consistently deliver the best results in Italian dishes.
- All vegetables mentioned in our recipes are assumed to be medium-sized unless specifically stated otherwise.
- All recipes featured on this blog are meticulously tested and developed using a fan (convection) oven. Adjustments may be necessary for conventional ovens.
- Find out more about how nutrition is calculated for our recipes, providing you with approximate dietary information.
- Elevate your Italian cooking with our must-have Italian Pantry Staples, a guide to stocking your kitchen with essential ingredients.
- Equip your kitchen like an Italian chef with our recommendations for Essential Kitchen Tools for Italian Cooking.
Nutrition
Calories: 226kcal
|
Carbohydrates: 1g
|
Protein: 37g
|
Fat: 7g
|
Saturated Fat: 2g
|
Polyunsaturated Fat: 1g
|
Monounsaturated Fat: 3g
|
Cholesterol: 105mg
|
Sodium: 83mg
|
Potassium: 640mg
|
Fiber: 0.4g
|
Sugar: 0.1g
|
Vitamin A: 12IU
|
Vitamin C: 1mg
|
Calcium: 21mg
|
Iron: 1mg
Nutrition information is automatically calculated, so should only be used as an approximation.
Did you try this recipe?
Leave a comment below!