
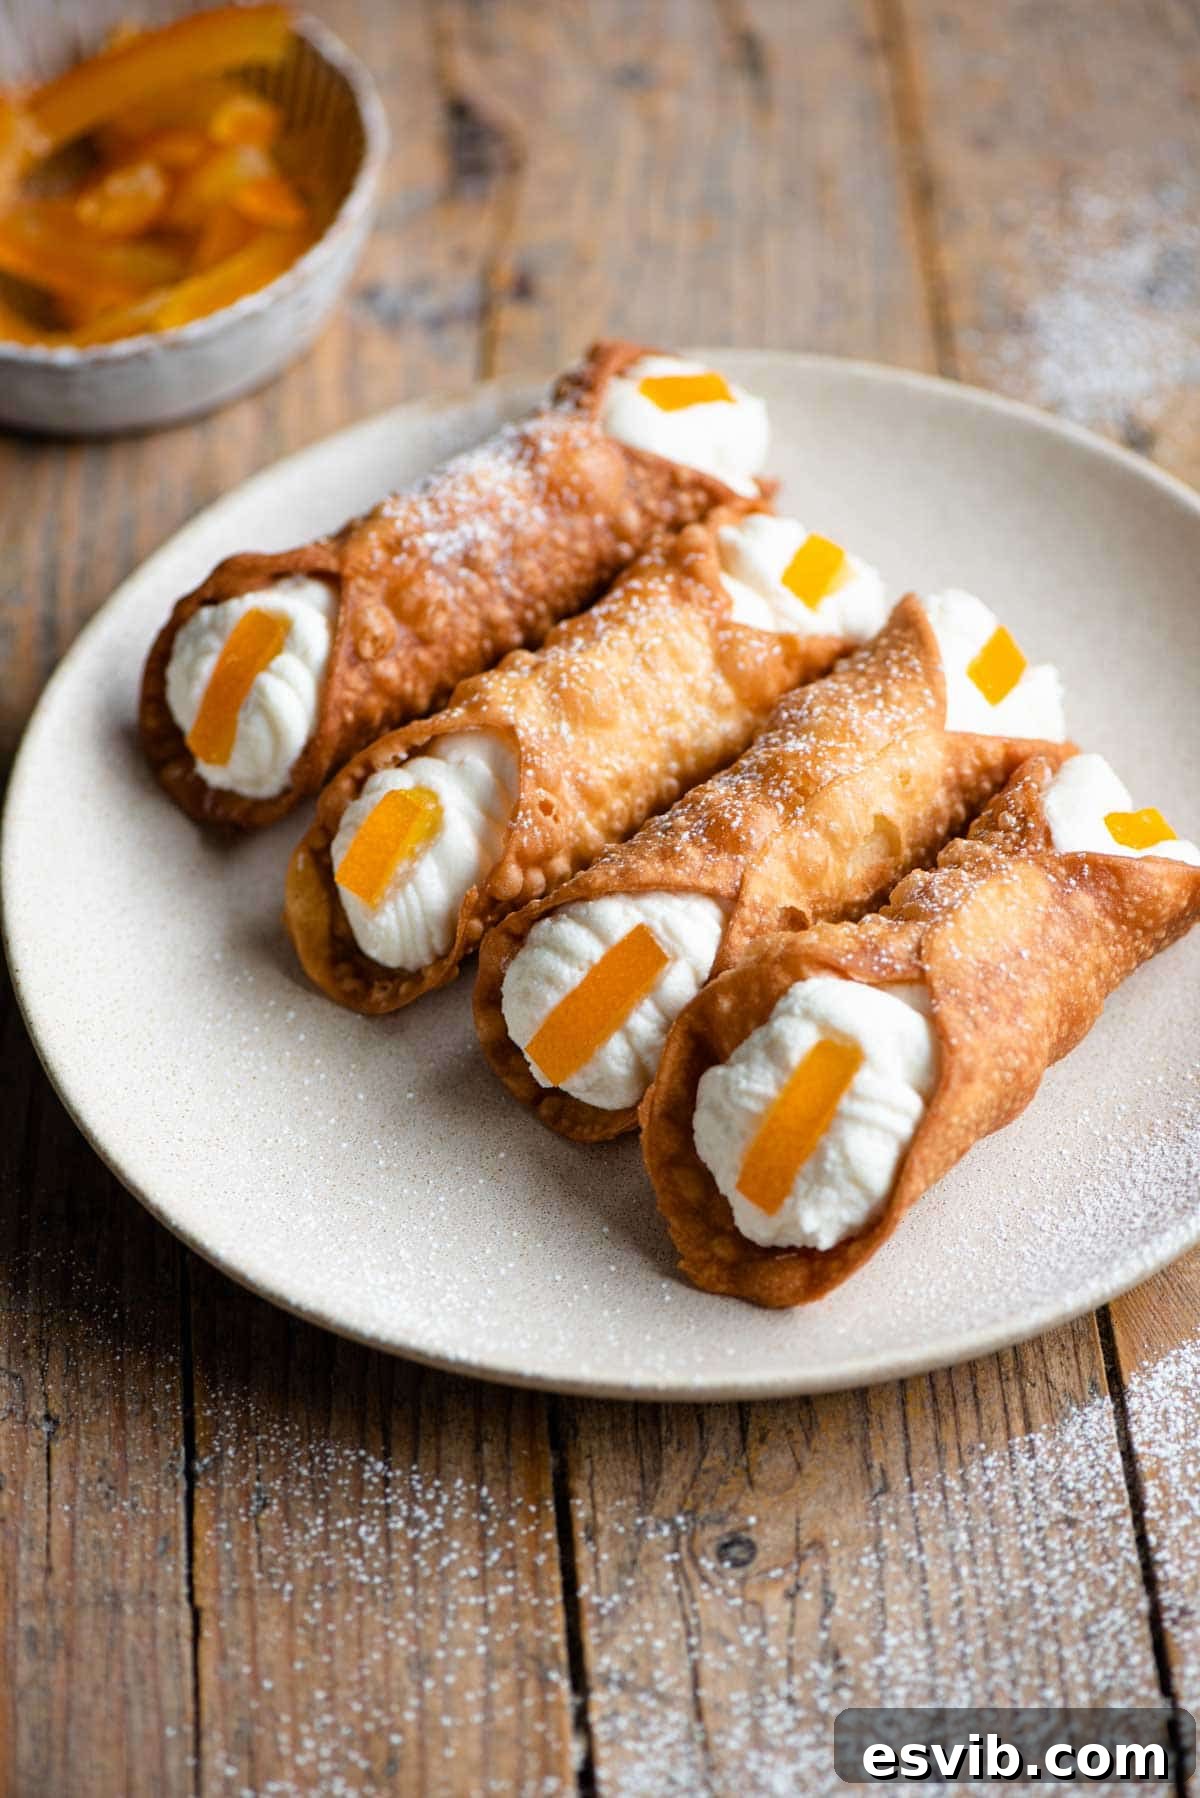
Embark on a delightful culinary journey to Sicily by learning how to make truly authentic tasting Sicilian Cannoli right in your own kitchen! This meticulously crafted recipe guides you through every step to create the finest homemade cannoli shells – incredibly crispy, delightfully sweet, and perfectly golden – alongside a classic, velvety smooth ricotta filling. Prepare to impress with these iconic Italian pastries that are a true taste of Mediterranean indulgence.
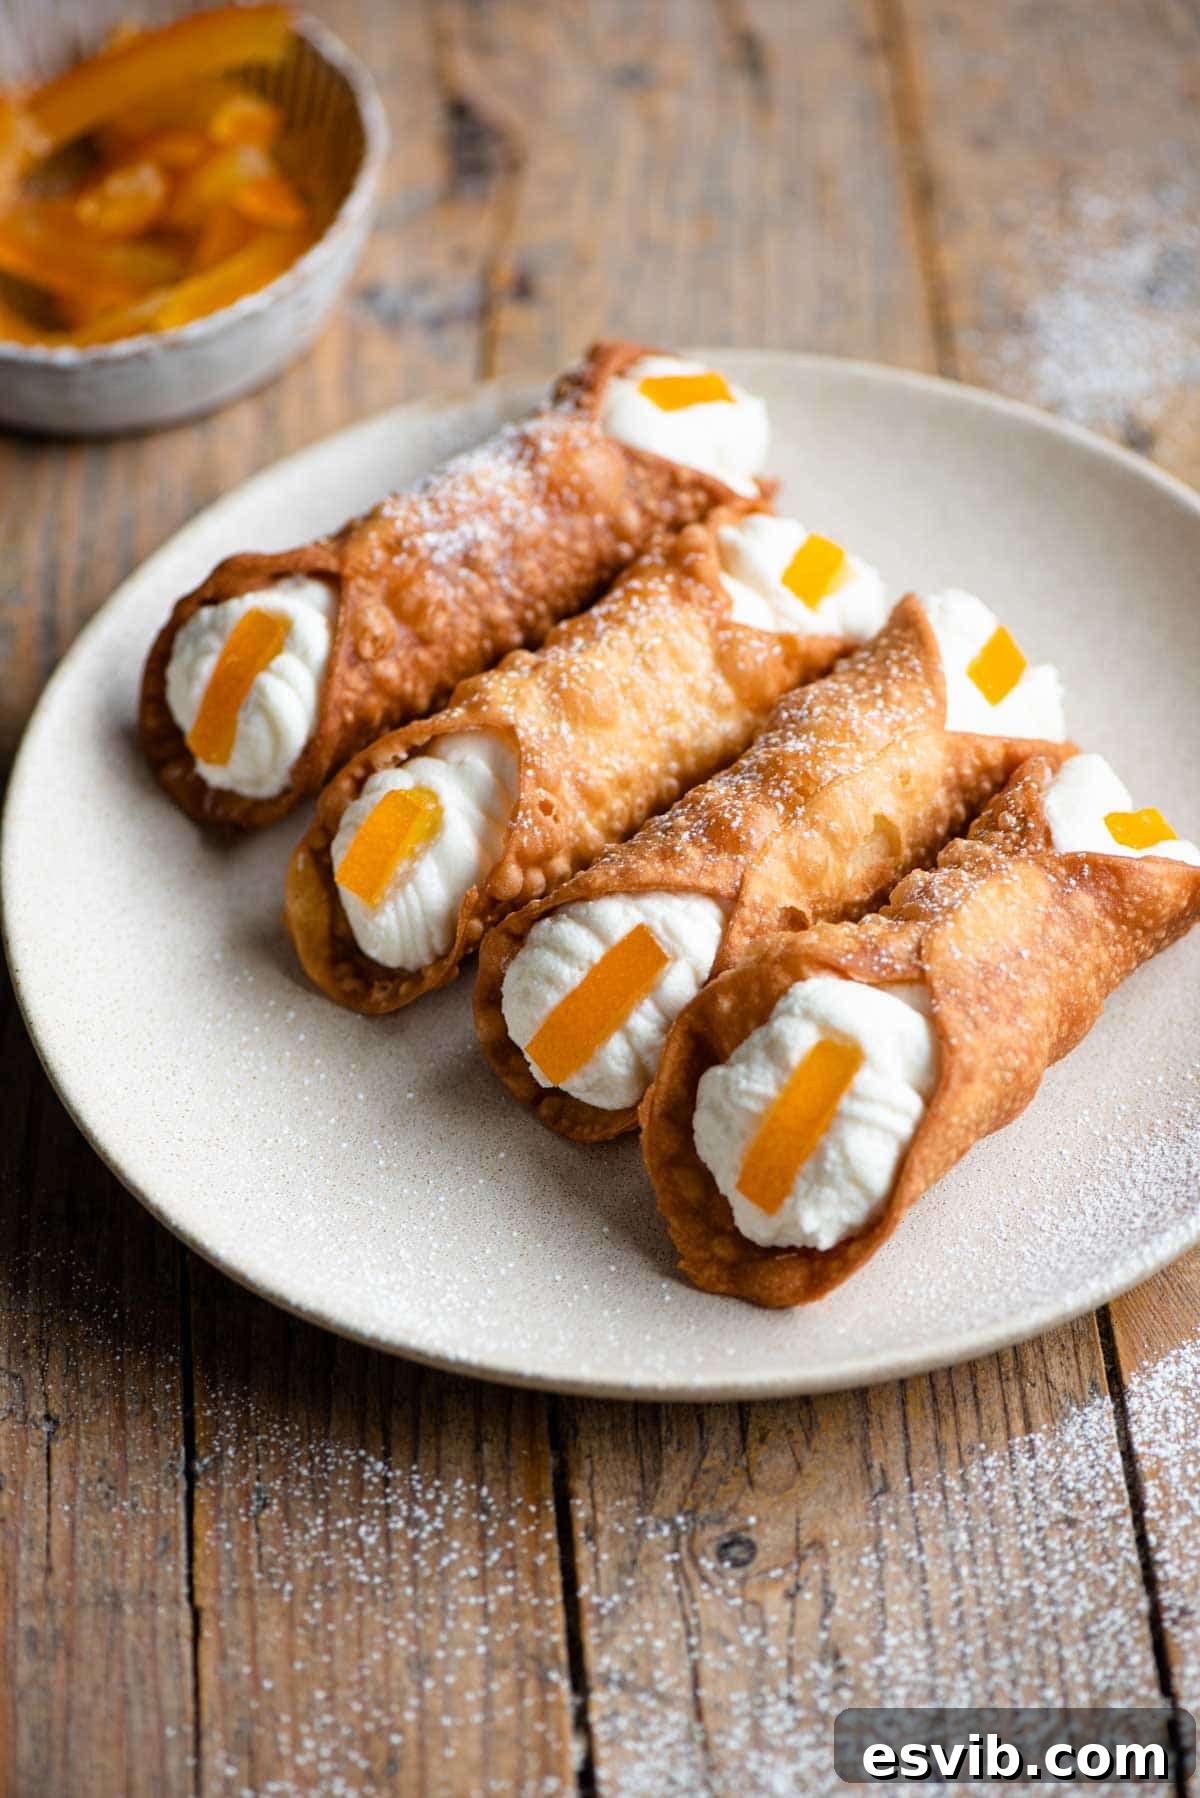
Is there any Italian dessert more captivating than freshly made cannoli? Imagine delicate, flaky pastry shells, expertly fried until they achieve a perfect golden crispness and a charmingly bubbly texture, generously filled with a luscious, subtly sweet ricotta cream. Each bite offers a sublime experience, a pure taste of dessert heaven that transports you straight to the sun-drenched streets and bustling bakeries of Sicily. The contrast between the fragile, crunchy shell and the smooth, rich filling is simply irresistible, making it a favorite for many dessert lovers.
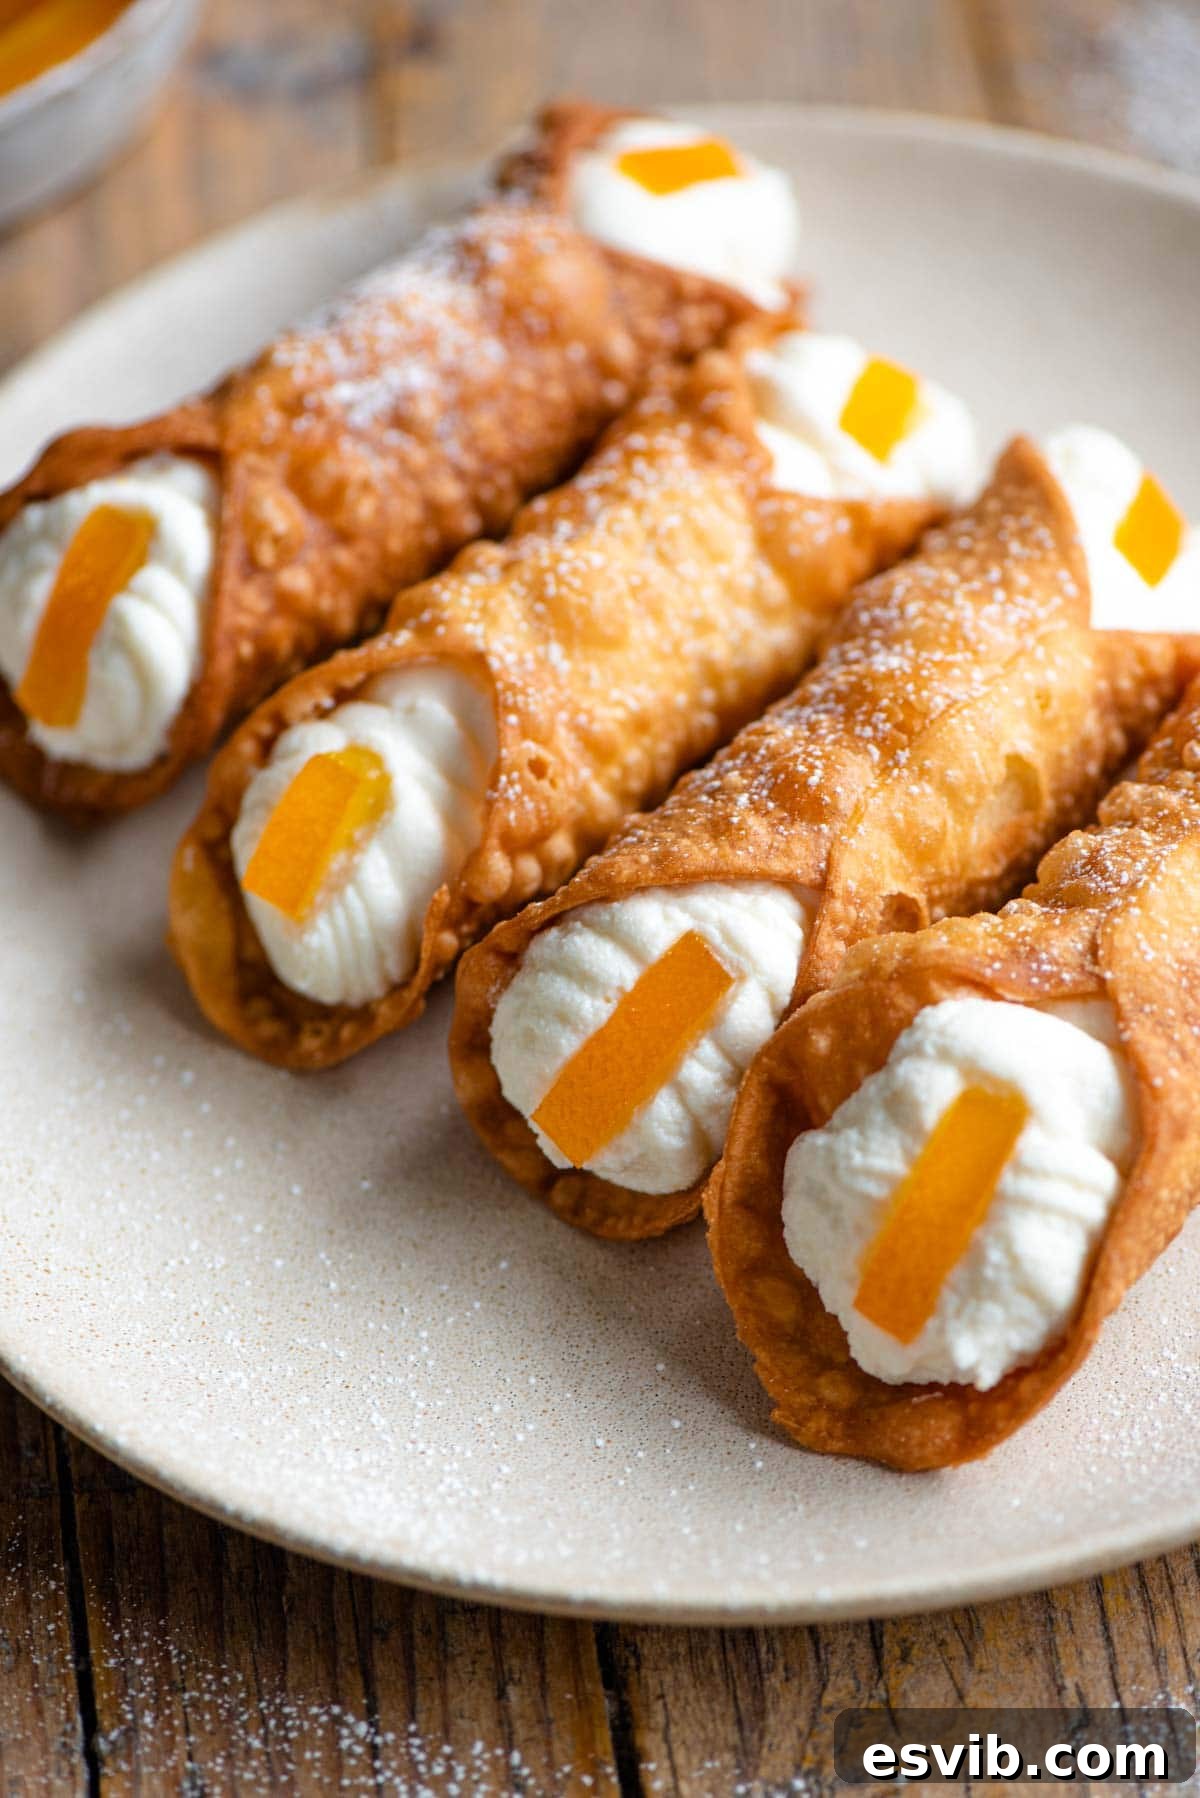
Alongside other beloved Sicilian delights like the ornate Cassata and the intriguing Minne di Sant’Agata, cannoli stand proudly as one of Sicily’s most iconic and cherished desserts. These exquisite pastries are a staple, not just in bakeries across Sicily, but also in Italian communities and fine dining establishments worldwide, celebrated universally for their unique texture and profound flavor. Traditionally, authentic Sicilian cannoli are beautifully adorned with vibrant candied orange peel at each end, offering a refreshing burst of citrus and a pop of color. Alternatively, they are often finished with finely chopped pistachio nuts – and if you can source them, the famed Bronte pistachios from Sicily provide an unparalleled nutty aroma and taste that truly elevates the experience.
Much like the irresistible Bomboloni, crafting authentic cannoli is undeniably a labor of love, requiring a dedicated investment of time and effort. However, the reward for your culinary endeavor is truly immeasurable. These aren’t merely desserts; they are an experience, a celebration of Italian heritage and flavor, making them perfect for commemorating special moments, serving as a grand finale to a lavish family feast, or adding a touch of authentic Italian elegance to cherished holidays like Easter or Christmas. There’s a profound satisfaction and sense of accomplishment in presenting a tray of homemade cannoli, knowing every single component has been meticulously prepared by your own hands.
Our comprehensive recipe is designed to empower you with the skills to make both the crisp cannoli shells and the creamy ricotta filling entirely from scratch. While the shells require the most attention and time, they are surprisingly manageable with our detailed instructions and, in our expert opinion, absolutely worth every minute for that truly authentic crunch and flavor. However, we understand that time can sometimes be a constraint. Therefore, if you find yourself short on time, you can certainly utilize our exquisite, scratch-made filling recipe with high-quality store-bought cannoli shells, though the unparalleled satisfaction and superior taste of homemade shells are truly unmatched.
Update: During a memorable trip to Palermo, the vibrant capital of Sicily, we had the distinct pleasure of visiting the revered Convento Santa Caterina. Within its ancient walls lies a hidden bakery, meticulously run by nuns, whose cannoli are legendary throughout the island and beyond. We are incredibly proud to confirm that our homemade cannoli recipe achieves a flavor and texture remarkably similar to these iconic pastries. After savoring their perfection, we found no desire to alter our own cherished recipe, which speaks volumes about its authenticity.
Crafting Perfection: Essential Ingredients for Authentic Sicilian Cannoli
Creating extraordinary Sicilian cannoli starts with the careful selection of each ingredient. Below, you’ll find a visual guide showcasing everything you need for both the signature crispy shells and the rich, sweet ricotta filling, along with crucial notes to ensure your success. Quality ingredients are not just a preference, but the cornerstone of authentic flavor and texture in this classic Italian dessert.
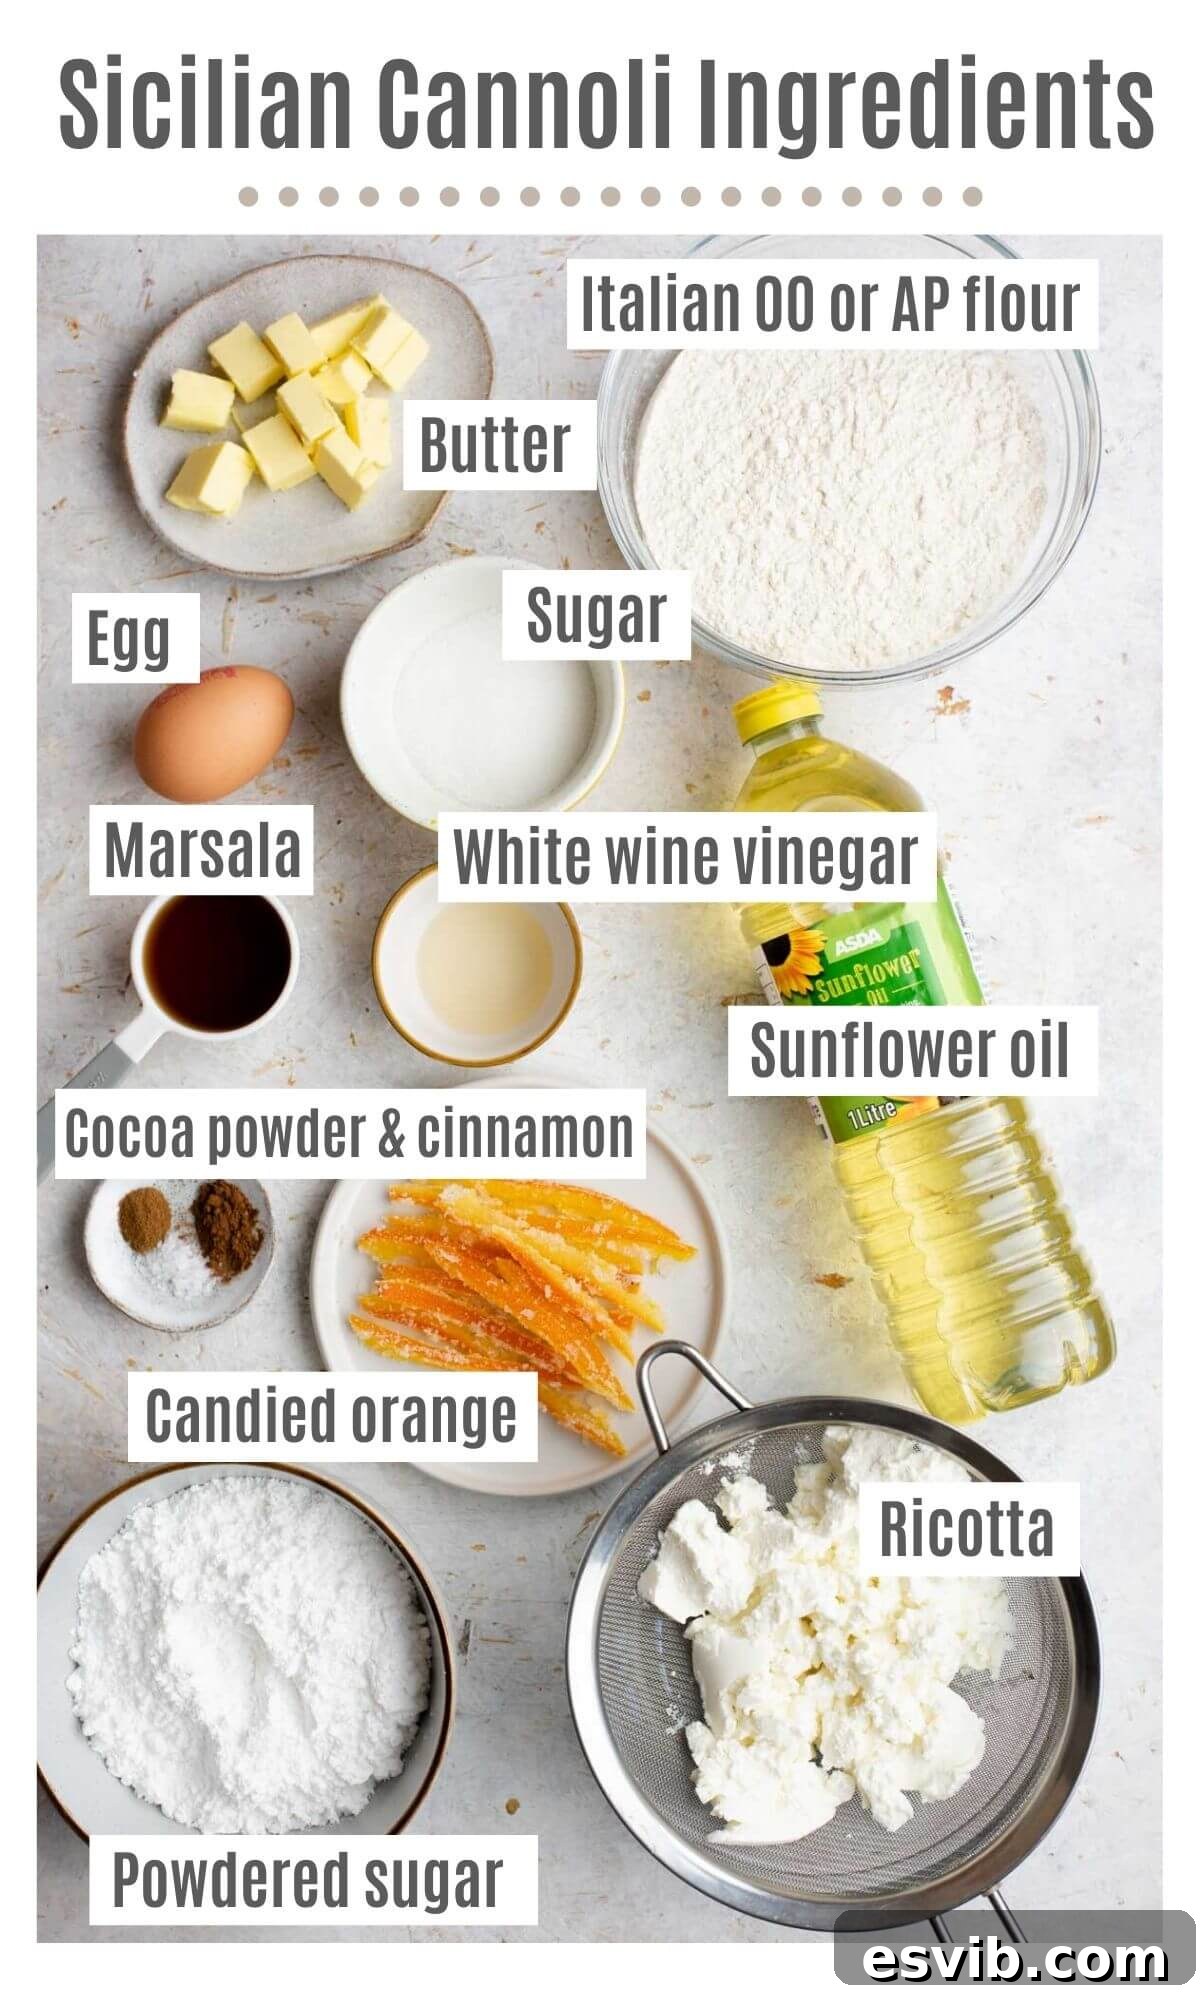
- Italian 00 or All-Purpose Flour – For the cannoli shells, Italian 00 flour is traditionally preferred due to its very fine texture and low protein content, which contributes to a delicate, incredibly crispy shell. However, high-quality all-purpose flour works beautifully as a more readily available alternative. The key is precise measurement, preferably by weight.
- Granulated or Caster Sugar – A small amount of sugar is incorporated into the shell dough. This adds a subtle sweetness and, crucially, helps with the desirable browning and crisping during the frying process. Either granulated or finely ground caster sugar will yield excellent results.
- Unsweetened Cocoa Powder – A tiny dash of unsweetened cocoa powder is a traditional addition to cannoli shells, primarily for its characteristic, slightly darker color and a very subtle hint of complexity that complements the other flavors. If unavailable, it can be omitted without significantly impacting the core flavor, but it does contribute to the authentic visual appeal.
- Ground Cinnamon – Just a pinch of ground cinnamon is thoughtfully added to the shell dough for a warm, aromatic note. This spice subtly enhances the overall flavor profile without ever overpowering it, providing a classic touch often found in traditional Sicilian baking.
- Cold Unsalted Butter – Ensure your butter is straight from the fridge and cut into small cubes. Cold butter is absolutely essential for creating a flaky pastry texture, as it melts slowly during frying, creating distinct pockets of air that result in those highly desirable bubbles and an unparalleled crispness in the shells.
- Large Egg – A large egg is vital as a binder for the dough, providing both structure and richness. You will also need a little extra egg white, reserved for securely sealing the cannoli shells around their metal forms just before frying.
- Marsala Wine – This fortified wine is a cornerstone of authentic cannoli shell flavor, imparting a unique, nuanced sweetness and a deep, complex aroma. Crucially, its alcohol content helps prevent the dough from absorbing too much oil during frying, which is a key factor in achieving a truly crisp and non-greasy shell. If authentic Marsala is not an option, a dry white wine can be used as a substitute, though the final flavor will have a slightly different character.
- White Wine Vinegar – This might seem like an unexpected addition, but a small amount of white wine vinegar is a “secret weapon” for achieving incredibly light and crispy cannoli shells. The acidity interacts with the gluten in the flour, helping to relax it and making the dough significantly easier to roll thinly, while also contributing to the delightful bubbly texture when fried.
- Fresh Ricotta Cheese – You’ll need a substantial quantity of high-quality fresh ricotta (approximately 4 cups or 1 kg) for the filling. The absolute most crucial step with ricotta is to drain it thoroughly in advance – ideally for at least 4 hours, or even better, overnight, in a fine-mesh sieve set over a bowl in the refrigerator. Undrained ricotta will be too watery and result in a runny, disappointing filling that will also make your shells soggy.
- Powdered Sugar (Confectioners’ Sugar) – This finely milled sugar blends seamlessly and smoothly into the ricotta, creating a perfectly sweet and creamy filling without any grainy texture. The amount can be easily adjusted to your personal taste preference, allowing for a perfectly balanced sweetness.
- Fresh Citrus Zest – For an extra layer of bright, aromatic flavor that truly elevates the creaminess of the filling, consider adding the finely grated zest of a fresh lemon or orange. This is an optional but highly recommended touch that adds a delightful zing.
- Traditional Garnishes (Candied Orange Peel & Chopped Pistachios) – Sicilian cannoli are most traditionally garnished with thin, elegant strips of candied orange peel at each end, offering a vibrant contrast. Alternatively, they are often finished with finely chopped pistachio nuts (especially the premium Bronte pistachios from Sicily). These additions provide essential contrasting textures and complementary flavors.
- Neutral Frying Oil – For deep frying the delicate shells, it is imperative to use a flavorless oil with a high smoke point, such as sunflower oil, vegetable oil, or canola oil. This ensures the pure, exquisite taste of the cannoli shines through without any unwanted oil flavors or burning.
Equipping Your Kitchen: Tools for Cannoli Success
Having the right tools at hand can make the process of making cannoli significantly smoother and more enjoyable, ensuring you achieve professional-looking and tasting results. Here’s a list of essential equipment you’ll need to gather:
- Cannoli Tubes – These indispensable metal forms are what give cannoli their distinctive, elegant tubular shape. I highly recommend using sturdy metal cannoli tubes, which are widely available online. It’s beneficial to have enough tubes to work in several batches without constantly cooling and re-using hot tubes, which can slow down the process.
- Candy Thermometer (or Deep-Fry Thermometer) – Maintaining a consistent oil temperature is paramount for achieving perfectly crispy, non-greasy cannoli shells. A reliable candy or deep-fry thermometer is an absolute must-have. Oil that is too hot will quickly burn the shells before they cook through, while oil that is too cool will result in greasy, heavy, and unappetizing cannoli.
- Pasta Machine or Rolling Pin – While a hand-cranked or electric pasta machine significantly streamlines the process of rolling the dough to the required, uniform thinness, a good old-fashioned rolling pin can certainly do the job with a bit more elbow grease and patience. The ultimate goal, regardless of the tool, is achieving a uniformly very thin dough for maximum crispness.
- Kitchen Paper (Paper Towels) – After frying, cannoli shells need to drain thoroughly to remove any excess oil. A stack of kitchen paper on a wire rack is perfect for absorbing residual oil, ensuring your shells remain light, crisp, and delightful.
- Long-Handled Tongs or Slotted Spoon – You’ll need sturdy, long-handled tongs or a reliable slotted spoon to safely add and remove the cannoli shells from the hot oil during frying. This keeps your hands a safe distance from any splattering oil and allows for easy handling.
- Large Mixing Bowls – Essential for combining and preparing both the cannoli dough and the creamy ricotta filling. Having a few sizes readily available is always helpful.
- Fine-Mesh Sieve – Absolutely essential for thoroughly draining the ricotta cheese effectively, as highlighted in the ingredients section. A large one will make the process quicker.
- Piping Bag with a Wide Star Tip – For elegantly and efficiently filling the cannoli shells with the ricotta cream, a piping bag with a wide star tip creates a beautiful presentation and ensures even distribution.
- 4-5 Inch Round Cookie Cutter – For cutting uniform dough rounds, ensuring consistency in your cannoli size. If you don’t have one, a sharp knife can also be used to cut squares or rectangles, which can then be wrapped.
Step-by-Step Guide: How to Make Authentic Sicilian Cannoli from Scratch
Follow this comprehensive visual walk-through with helpful step-by-step photos to guide you through the intricate yet rewarding cannoli-making process. For the complete written recipe, precise measurements, and all our expert tips and tricks, please refer to the detailed recipe card at the end of this article.
Important Tip for Ricotta Preparation! Before you begin any other steps in your cannoli journey, it is absolutely crucial to prepare your ricotta cheese. Place the fresh ricotta cheese in a fine-mesh sieve set over a deep bowl. Cover it and store it in the refrigerator for a minimum of 4 hours, or ideally, overnight (up to 24 hours). This step is non-negotiable and cannot be skipped; thoroughly draining the ricotta removes all excess moisture, preventing your cannoli filling from becoming runny and ensuring it achieves that perfectly rich, thick, and pipes-beautifully consistency once mixed with sugar.
Forging the Foundation: Preparing the Cannoli Dough
In a large mixing bowl, combine your measured all-purpose or 00 flour, granulated sugar, a delicate pinch of cinnamon, and the unsweetened cocoa powder. Using a whisk or a spoon, mix these dry ingredients together thoroughly until they are uniformly combined and evenly distributed (photo 1).
Next, take your very cold butter, cut into small cubes, and add it directly to the flour mixture. Using your fingertips, quickly work the cold butter into the flour until the mixture resembles coarse breadcrumbs. The key here is to work swiftly to keep the butter as cold as possible, preventing it from melting too early. This technique is essential for creating a flaky pastry texture that will yield those desirable bubbles and crispness in the finished shells (photos 2 & 3).
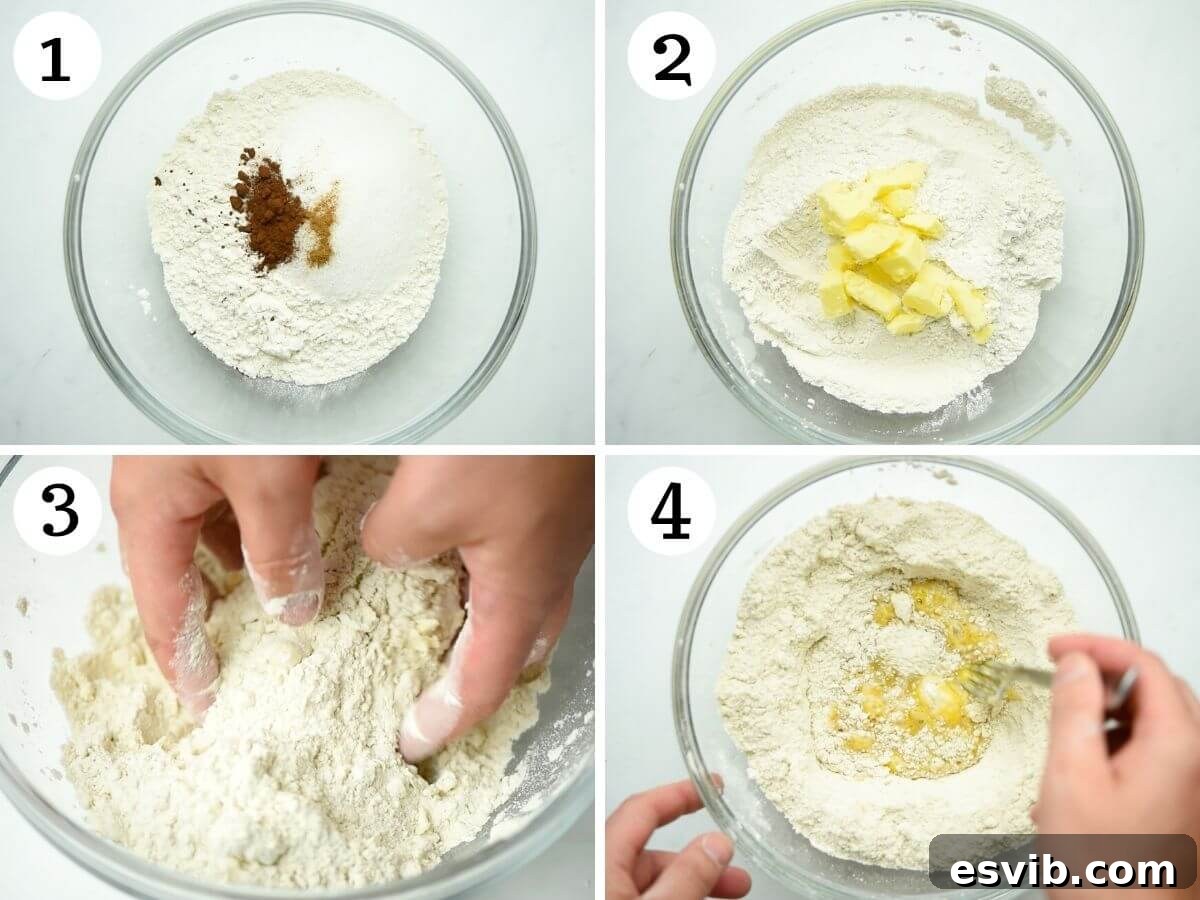
Form a well in the very center of your flour and butter mixture. Into this well, pour the beaten large egg, the white wine vinegar, and the Marsala wine. Gradually incorporate the wet ingredients into the dry using a fork, mixing until a rough, shaggy dough begins to form. At this stage, it will look quite crumbly and not yet cohesive (photo 4).
Turn the shaggy dough out onto a clean, lightly floured work surface. Now, knead the dough vigorously and continuously for 7-10 minutes. This extended kneading is the “secret weapon” to developing the gluten in the flour and creating those characteristic tiny air bubbles that will expand and crisp up beautifully when the cannoli shells are fried, resulting in an exceptionally bubbly and flaky texture that is the hallmark of authentic cannoli (photo 5).
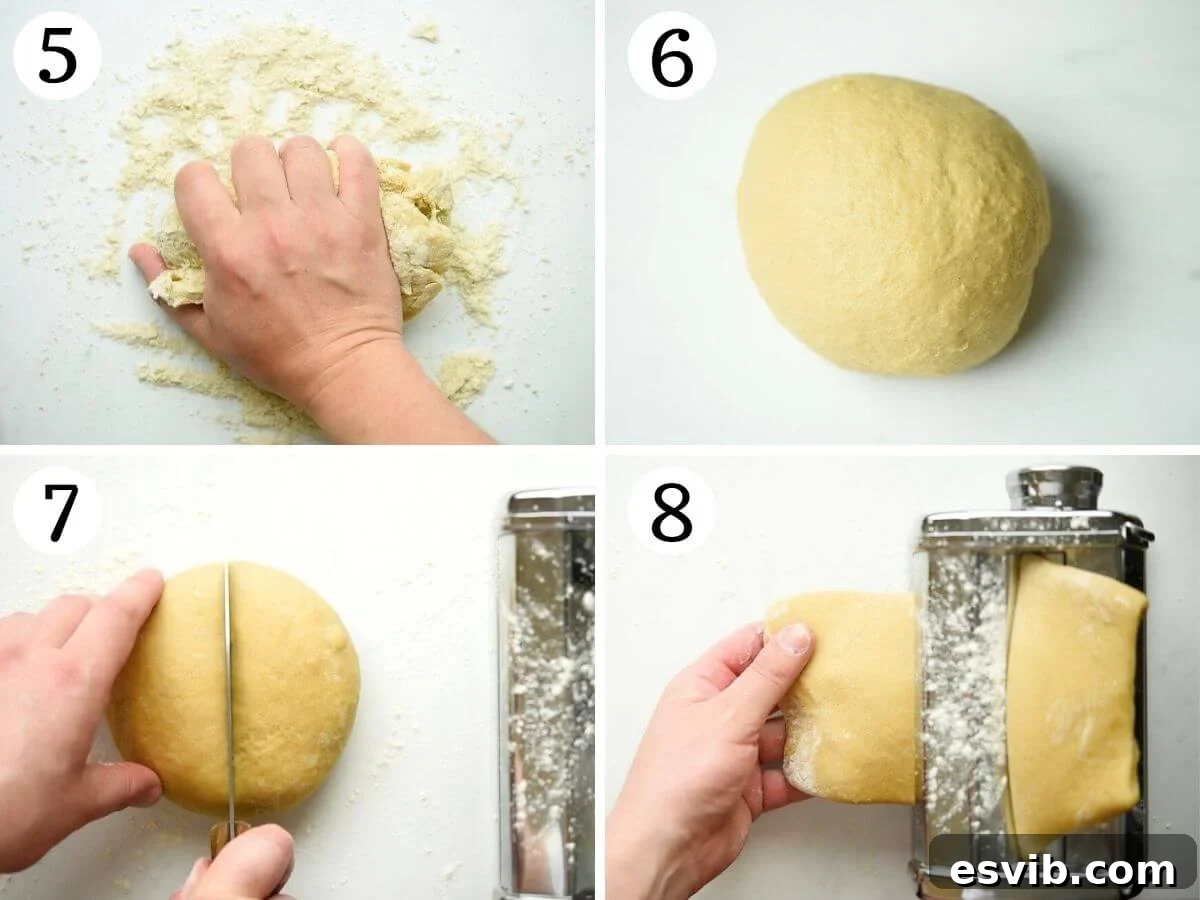
Once the dough is smooth, elastic, and well-kneaded (it should bounce back when gently poked), wrap it tightly in plastic wrap to prevent it from drying out. Place the wrapped dough in the refrigerator to chill for at least 30 minutes to 1 hour. This resting period is crucial as it allows the gluten to relax, making the dough much easier to roll out incredibly thinly without tearing or shrinking. For even better results and if preparing ahead, you can leave the dough to chill overnight, enhancing its workability (photo 6).
While the dough chills, prepare your frying station. Set up your pasta machine if you intend to use one. In a large, heavy-bottomed pot or a deep fryer, fill with 2-3 inches of neutral oil (such as sunflower or vegetable oil). Heat the oil to a precise and consistent temperature of 356°F (180°C), monitored with a reliable candy or deep-fry thermometer. Maintaining this exact temperature is absolutely crucial for producing perfectly crisp, golden, and non-greasy shells.
Lightly dust your work surface and the pasta machine rollers with flour to prevent sticking. Divide your chilled dough in half to make it more manageable. Take one half and flatten it into an oblong shape so it can easily fit through the widest setting of your pasta machine (this is usually setting number 0 or 1, depending on your machine) (photo 7).
The Art of Thinness: Expertly Rolling Out the Dough
Pass the flattened dough through the widest setting of your pasta machine. Once it emerges, gently fold one end of the dough over the other, creating a neater, more uniform strip (photos 8 & 9). Pass the folded dough through the widest setting again, and repeat this essential folding and passing process 3-4 times. This technique is important as it helps to further develop the gluten and create a perfectly smooth, elastic dough that will yield super crispy and bubbly shells (photo 10).
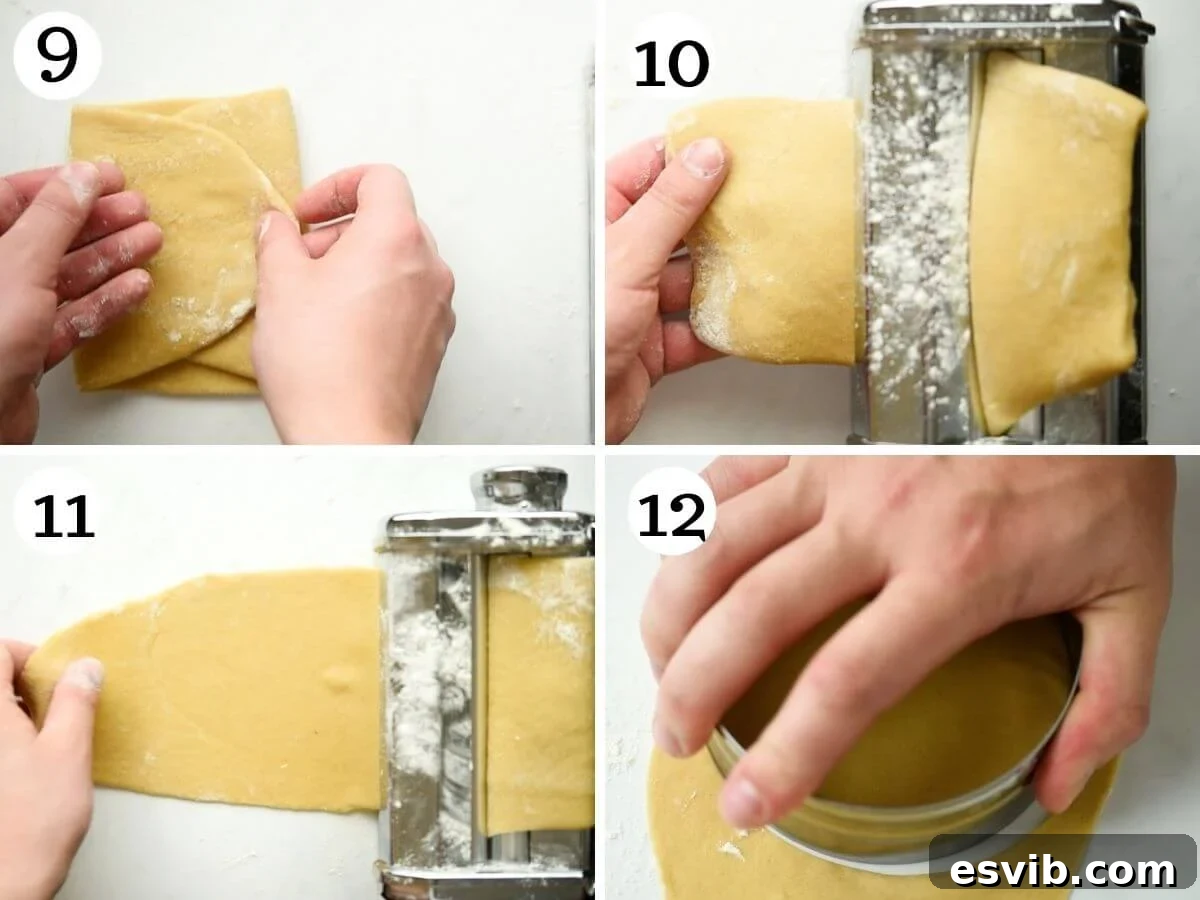
Now that your dough is well-conditioned and elastic, begin progressively rolling it thinner. Pass the dough through the second widest setting (usually number 1 on most machines) and continue to pass it through increasingly narrower settings until the dough is incredibly thin – aiming for approximately ⅛ inch (2mm) thick. The dough should be almost translucent. If you are using a Marcato Atlas pasta machine, this ideal thinness typically corresponds to setting number 6 (photos 10 & 11). Remember, the thinner the dough, the crisper, more delicate, and authentic your cannoli shells will be!
Traditional Method: Rolling with a Rolling Pin (Optional)
If you don’t possess a pasta machine, don’t worry – you can still achieve excellent results with a traditional rolling pin. Simply roll the dough out on a lightly floured surface, working steadily and evenly, until it is exceedingly thin. Your goal is to reach that same approximate ⅛ inch (2mm) thickness as you would with a pasta machine. Patience and consistent pressure are key here to achieve the desired uniform thinness and subsequent crispness.
Shaping and Frying: Creating the Perfect Shells
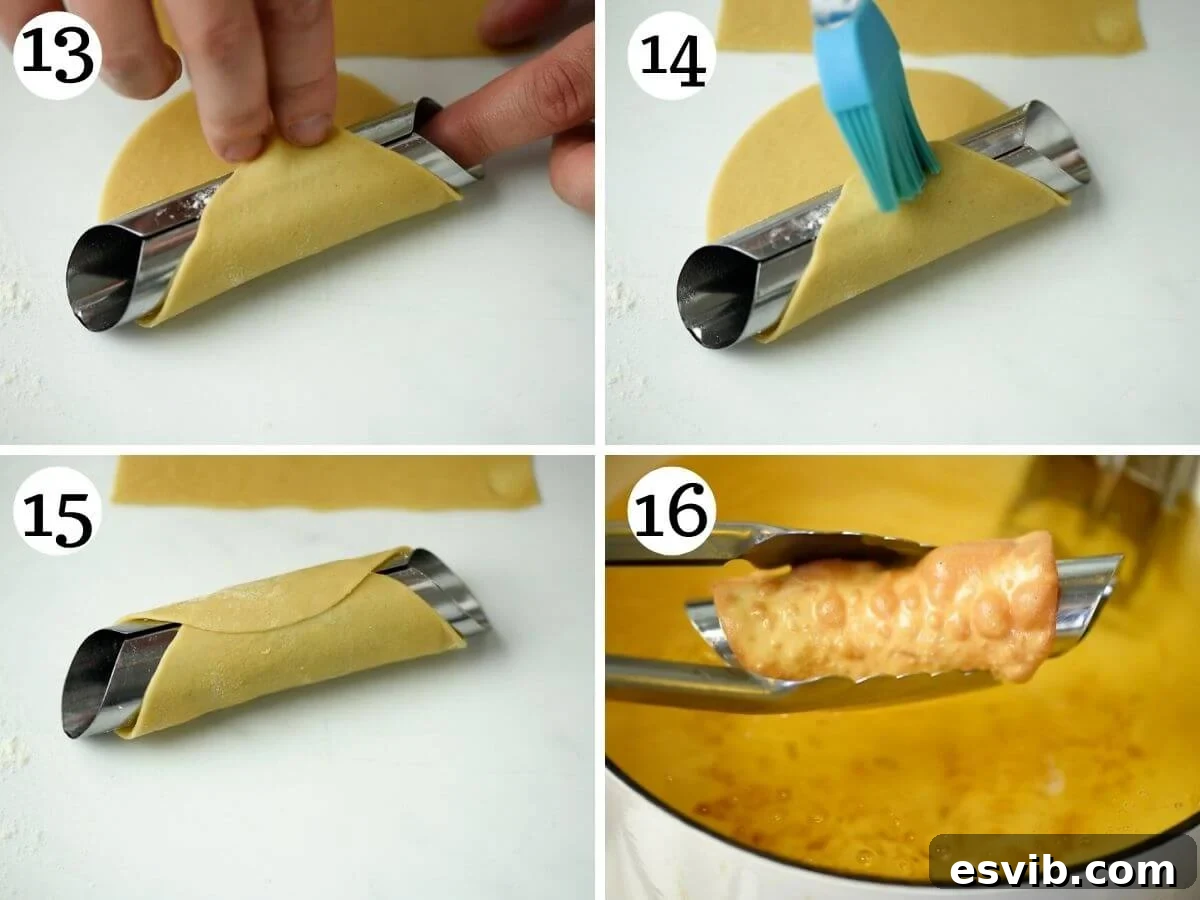
Using a 4-5 inch round cookie cutter, cut out uniform circles from your thinly rolled dough. You have the flexibility to make your cannoli smaller (using a 3-inch cutter for mini cannoli) or larger by adjusting the cutter size according to your preference. Working in small batches to prevent the dough from drying out, gently wrap each cut-out dough round around a cannoli tube. To securely seal the dough, dab a tiny amount of egg white along one edge of the dough before pressing it firmly to overlap with the other side. Be extremely careful not to get any egg white on the metal tube itself, as this can cause the fried shell to stick to the tube, making removal difficult (photos 12-14).
Carefully lower the wrapped cannoli tubes into the preheated hot oil (remember, maintain a precise 356°F/180°C). Fry them in small batches, ensuring you don’t overcrowd the pot, which would drastically lower the oil temperature and lead to greasy shells. Fry until they are beautifully golden brown and visibly puffed up with those desirable characteristic bubbles. Once perfectly fried, remove the cannoli from the oil using tongs and immediately transfer them to a wire rack lined with several layers of kitchen paper to absorb any excess oil. Once the shells are cool enough to handle (but still warm), gently slide them off the tubes. If you only have a few cannoli tubes, allow them to cool slightly between batches before re-using them to prevent the dough from cooking too quickly or sticking (photos 15 & 16).
The Sweet Heart: Crafting the Classic Ricotta Filling
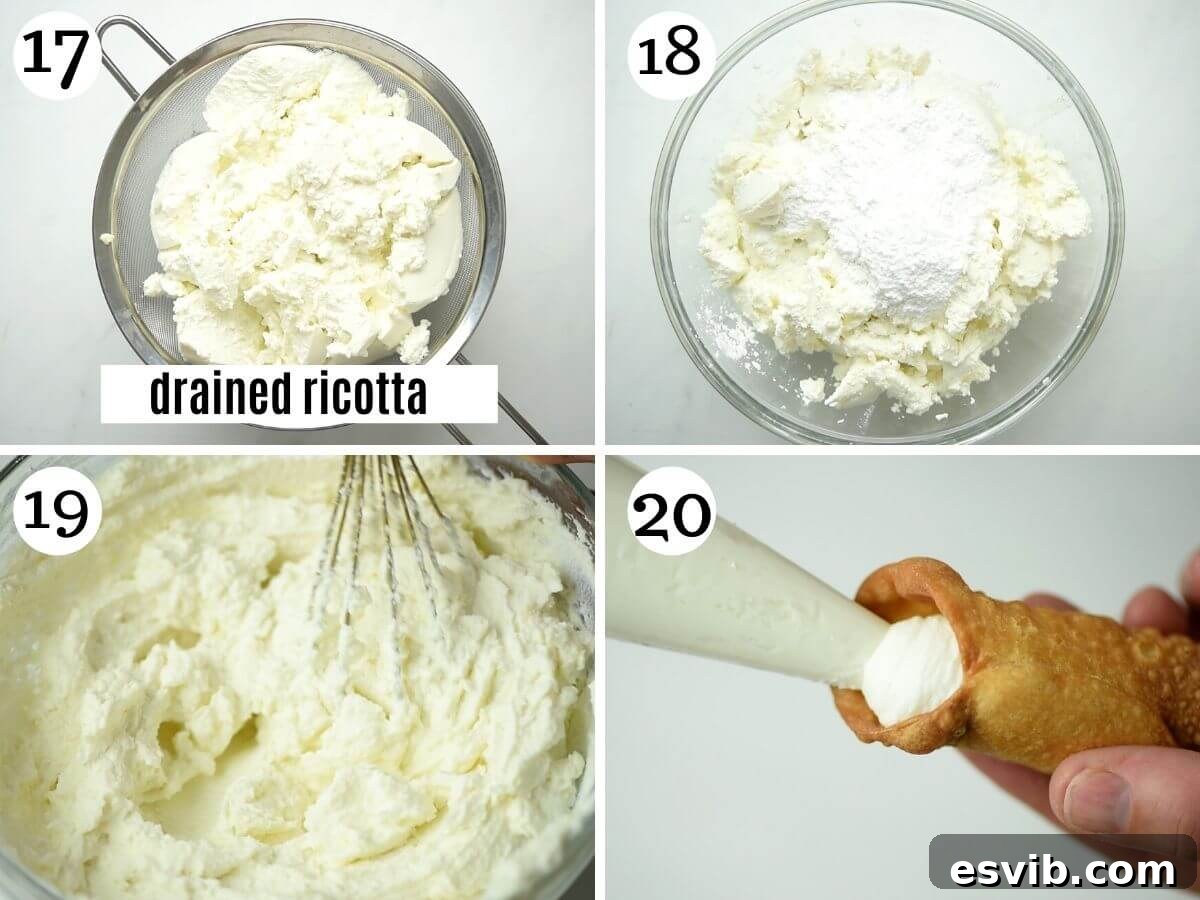
With your perfectly crispy shells ready and cooled, it’s time to prepare the star of the show: the rich, creamy ricotta filling. In a large mixing bowl, combine your thoroughly drained ricotta cheese with the powdered sugar. Using a spatula or a hand mixer on low speed, mix them together gently until the mixture is completely smooth, wonderfully creamy, and well combined. Taste the filling and adjust the amount of powdered sugar if you prefer a sweeter or less sweet filling, ensuring a perfectly balanced sweetness (photos 17-19).
Transfer the luscious ricotta mixture into a piping bag fitted with a wide star tip for an elegant presentation. Pipe the filling generously into each cannoli shell from both ends, ensuring it is completely and evenly filled from end to end. For a truly authentic Sicilian presentation and an added burst of flavor, gently press a delicate slice of candied orange peel into each end of the filled cannoli, or sprinkle with finely chopped pistachios. Serve immediately to enjoy the ultimate textural contrast between the crisp shell and the creamy filling (photo 20).
Customizing Your Cannoli: Creative Filling Options and Garnishes
While the classic sweet ricotta filling is undeniably delicious and a favorite for many, there are numerous delightful ways to customize your homemade cannoli to suit various tastes and occasions. Our preferred version features the creamy ricotta with just a subtle hint of vibrant orange or lemon zest folded in, allowing the natural creaminess and freshness to shine through. However, feel free to get creative and explore these tempting variations:
- Chocolate Chips: For a delightful textural contrast and a rich burst of flavor in every bite, gently fold in mini chocolate chips (dark, semi-sweet, or even milk chocolate) into your prepared ricotta filling. This is an incredibly popular and beloved variation, especially outside of Sicily.
- Chopped Candied Fruit: Beyond the traditional candied orange peel for garnish, you can incorporate finely chopped mixed candied fruit directly into the ricotta for a more festive, colorful, and intensely fruity filling.
- Variety of Nuts: Instead of, or in addition to, pistachios, consider folding in finely chopped hazelnuts, almonds, or even walnuts into the ricotta cream for added crunch and nutty depth.
- Flavored Ricotta: Experiment with a touch of vanilla extract, a hint of coffee liqueur, or even a tiny amount of almond extract in the ricotta for different flavor profiles.
For an extra touch of decadence, visual appeal, and even a practical barrier against sogginess, you can also dip the ends of your crispy cannoli shells in melted chocolate. Just like we demonstrated in our popular mini cannoli recipe, this creates a delicious protective layer. After dipping in chocolate, you can then roll the chocolate-coated ends in finely chopped nuts, such as pistachios or toasted hazelnuts, or even colorful sprinkles for a playful and eye-catching twist, perfect for parties and celebrations.
Frequently Asked Questions About Homemade Cannoli
The secret to achieving those characteristic bubbly, beautifully crisp cannoli shells lies primarily in two key techniques. Firstly, you must knead the dough vigorously for approximately 7-10 minutes, much like you would with homemade pasta dough. This extended kneading process develops the gluten, creating tiny pockets of air throughout the dough that expand and bubble up dramatically when introduced to the hot frying oil. Secondly, the strategic addition of white wine vinegar also plays a crucial role, as its acidity aids in creating a lighter, more tender dough that is inherently more prone to bubbling when it hits the precise temperature of the hot oil.
Absolutely! You can certainly prepare many individual components in advance, which significantly streamlines your cannoli-making process, especially when entertaining. The cannoli dough can be made a day ahead and stored tightly wrapped in plastic in the refrigerator. The ricotta filling, after being thoroughly drained, can also be prepared up to 3 days in advance and stored in an airtight container in the fridge. Furthermore, the fried cannoli shells can be made 1-2 weeks ahead of time; once completely cooled, store them in a sealed airtight container at room temperature. However, it is an absolute golden rule that you must not fill the cannoli shells more than 30 minutes to 1 hour before serving. If filled too far in advance, the inherent moisture from the ricotta will inevitably soften the delicate, crispy shells, leading to a disappointing, soggy texture.
Unfilled cannoli shells, once completely cooled after frying and stored in a well-sealed, airtight container at room temperature, will retain their remarkable crispness and freshness for a surprisingly long duration – typically 1 to 2 weeks. This excellent shelf life makes them an ideal make-ahead component, allowing you to prepare them well in advance for parties or spontaneous dessert cravings.
Soggy cannoli shells are indeed the ultimate disappointment, detracting from the authentic experience! To ensure your shells remain extra crispy and delightfully crunchy, always follow our detailed recipe for both the dough preparation and the frying process, paying close attention to oil temperature. However, the single most critical step in preventing sogginess is to fill the cannoli right before serving. The very moment the moist, creamy ricotta filling comes into contact with the delicate, crispy shell, moisture transfer begins. For maximum crispness, we recommend keeping your ricotta filling in a piping bag in the fridge, ready to fill shells just minutes before you plan to serve and enjoy them. This guarantees the best possible textural contrast and a truly authentic experience.
While Marsala wine is a traditional and highly recommended ingredient for its unique flavor profile in authentic cannoli shells, a suitable substitute can be a dry white wine (such as Pinot Grigio or Sauvignon Blanc) or even a small amount of apple cider vinegar mixed with a touch of sugar. The acidity and alcohol (if using wine) are important for the dough’s workability, texture, and crispness during frying. The flavor will be slightly altered from the traditional Marsala, but you will still achieve delicious and crispy results.
Traditional cannoli shells are always deep-fried, and this method is what imparts their signature bubbly, incredibly crispy texture and rich, deep flavor. While you can technically bake cannoli shells as an alternative, they will not achieve the same characteristic crispness, delicate bubbles, or profound flavor as their fried counterparts. Baked shells tend to be more cracker-like, denser, and less airy. For the most authentic taste and texture experience, we strongly recommend and advocate for frying your cannoli shells.
It is important to understand that leftover filled cannoli do not store well at all. The moisture from the ricotta filling will very quickly penetrate and soften the crispy shell, making them soggy, limp, and significantly less enjoyable within a few hours. It is always best culinary practice to fill only the number of shells you intend to serve and consume immediately. If you do happen to have any filled cannoli leftovers, they should be eaten within a few hours of filling, though they will not retain their optimal crisp texture.
Explore More Authentic Italian Dessert Delights
If you’ve fallen in love with the rewarding process of making homemade cannoli, we warmly invite you to explore more exquisite and authentic Italian dessert recipes from our carefully curated collection. Each recipe brings a taste of Italy to your home:
- Cenci di Carnevale (Chiacchiere, Crostoli, Bugie) – Classic Italian Fried Pastries
- Struffoli – Traditional Italian Honey Balls (A Neapolitan Christmas Specialty)
- Tiramisu – Our Authentic, Best-Ever Recipe!
- Crostata di Frutta (Italian Fruit Tart) – A Colorful and Fresh Dessert
- White Chocolate Panna Cotta – A Silky Smooth Italian Custard
- Pignoli Cookies (Biscotti ai Pinoli) – Delicious Italian Pine Nut Cookies
Homemade Sicilian Cannoli: The Full Recipe
Homemade Sicilian Cannoli
By Emily
1 hr
15 mins
1 hr (plus 4+ hrs for ricotta)
2 hrs 15 mins (active)
20 cannoli
Equipment
- Cannoli tubes, for shaping (approx. 10-12 recommended)
- Pasta machine or rolling pin
- Candy thermometer (or deep-fry thermometer)
- Kitchen paper (paper towels), for draining
- Long-handled tongs or slotted spoon
- Fine-mesh sieve
- Piping bag with wide star tip
- 4-5 inch round cookie cutter
- Large mixing bowls
Ingredients
For the Cannoli Shells:
- 1 ¾ cups plus 1 tablespoon (250g) Italian 00 flour or all-purpose flour
- 4 tablespoons (55g) cold unsalted butter, cubed
- 1 large egg, beaten (plus 1 egg white for sealing the cannoli)
- ¼ cup (50g) granulated or caster sugar
- ¼ cup (60ml) Marsala wine (or dry white wine)
- Pinch of ground cinnamon
- ½ teaspoon unsweetened cocoa powder
- 1 tablespoon white wine vinegar
- Sunflower oil or vegetable oil, for deep frying
For the Ricotta Filling:
- 4 cups (1 kg) fresh ricotta cheese, thoroughly drained
- 1 cup powdered sugar (confectioners’ sugar), adjust to taste
- Zest of 1 lemon or orange (optional, for extra flavor)
- Candied orange peel, chopped pistachios, or mini chocolate chips for garnish (optional)
Instructions
Preparation (Essential First Step):
- Drain the Ricotta: Place the ricotta in a fine-mesh sieve over a bowl, cover, and refrigerate for at least 4 hours, or ideally, overnight (up to 24 hours). This is crucial to remove excess moisture for a firm filling.
Making the Cannoli Dough:
- In a large bowl, whisk together the flour, granulated sugar, cinnamon, and cocoa powder until well combined.
- Cut the cold butter into small cubes and add to the flour mixture. Using your fingertips, quickly rub the butter into the flour until it resembles coarse breadcrumbs.
- Make a well in the center. Add the beaten egg, white wine vinegar, and Marsala wine. Mix with a fork until a shaggy dough forms.
- Turn the dough out onto a clean work surface and knead vigorously for 7-10 minutes until smooth and elastic. This develops gluten for crispy, bubbly shells.
- Wrap the kneaded dough tightly in plastic wrap and chill in the refrigerator for 30 minutes to 1 hour. For best results, it can chill overnight.
Rolling Out the Dough:
- Set up your pasta machine. In a large, heavy-bottomed pot, heat 2-3 inches of oil to 356°F (180°C) using a candy thermometer.
- Lightly dust your work surface and pasta machine with flour. Divide the chilled dough in half. Flatten one half into an oblong shape to fit the widest setting of your pasta machine (usually #0 or #1).
- Pass the dough through the widest setting. Fold one end over the other and pass it through the widest setting again. Repeat this folding and passing 3-4 times.
- Gradually pass the dough through increasingly narrower settings until it is about ⅛ inch (2mm) thick. (On a Marcato Atlas, this is typically #6).
Rolling Pin Method (Optional):
- If using a rolling pin, roll the dough on a lightly floured surface until it is very thin, approximately ⅛ inch (2mm) thick. Ensure even thinness across the entire sheet.
Shaping and Frying the Shells:
- Using a 4-5 inch round cookie cutter, cut out circles from the thin dough.
- Working in batches, gently wrap each dough circle around a cannoli tube. Dab a tiny amount of egg white on one edge and press firmly to seal the dough. Be careful not to get egg white on the metal tube itself.
- Carefully fry the cannoli (still on their tubes) in the hot oil until golden brown and puffed up, about 30-60 seconds per side. Do not overcrowd the pot.
- Remove from oil with tongs and drain on a wire rack lined with kitchen paper. Once cool enough to handle, gently slide the shells off the tubes. Allow tubes to cool slightly before re-using.
Making and Filling the Ricotta Cream:
- In a mixing bowl, combine the thoroughly drained ricotta and powdered sugar. Mix until smooth and creamy. Fold in citrus zest if using.
- Transfer the filling to a piping bag fitted with a wide star tip.
- Just before serving, pipe the ricotta filling generously into each cannoli shell from both ends until fully packed.
- Garnish with candied orange peel, chopped pistachios, or mini chocolate chips as desired. Serve immediately to enjoy the best texture.
Chef’s Notes for Perfect Cannoli
- Measuring Flour Accurately: For best results, especially with baking, it’s always recommended to measure flour by weight using a kitchen scale. If using measuring cups, spoon the flour gently into the cup and then level it off with a straight edge (like a knife). Scooping directly with the cup can compact the flour, leading to too much flour and a tough, dense dough.
- Dough Resting is Key: Do not skip the chilling period for the dough! Resting the dough in the fridge for at least 30 minutes to 1 hour (or ideally, overnight) allows the gluten to relax. This makes the dough significantly easier to roll out incredibly thin without snapping back or tearing, which is absolutely vital for creating those crispy, airy shells.
- Roll Dough Super Thin: The ultimate texture of your cannoli shells directly correlates to the thinness of your rolled dough. Aim for a thickness of about ⅛ inch (2mm) – the dough should be almost translucent. If the dough is too thick, the shells will be dense, chewy, and soft rather than delightfully airy and crispy.
- Size and Shape Flexibility: While a 4-5 inch round cutter is standard for medium-sized cannoli, you have the flexibility to adjust. If you don’t have a round cutter, you can effectively cut the thinly rolled dough into squares (approximately 4×4 inches or 5×5 inches) and then wrap them around the tubes. This often results in a slightly more rustic look.
- Sealing Edges Properly: When wrapping the dough around the cannoli tubes, use only a minimal amount of egg white to seal the edges. Too much can create an overly strong seal, potentially causing the dough to stick to the metal cannoli tubes during frying, making removal difficult. Ensure no egg white gets on the actual metal tube itself.
- Fry in Small Batches: Resist the temptation to overcrowd your frying pot. Frying too many cannoli at once will drastically lower the oil temperature, leading to greasy, undercooked, and less crispy shells. Always fry in small batches to maintain a consistent oil temperature for optimal crispness and perfect browning.
- Prepare Components in Advance: You can prepare the dough a day ahead and store it wrapped in the fridge. The ricotta filling can be made up to 3 days in advance (after draining) and kept refrigerated. Fried, unfilled cannoli shells store beautifully for 1-2 weeks in an airtight container at room temperature.
- Fill Just Before Serving: This is the single most crucial tip for preserving the glorious crispness of your cannoli. The moment the moist ricotta filling meets the delicate shell, the shell begins to absorb moisture. For the best, most authentic experience, fill your cannoli no more than 30 minutes to 1 hour before you plan to serve them.
- Leftovers (Unfilled Shells): Leftover cannoli shells that have not been filled will keep remarkably well for up to 2 weeks in an airtight container stored at room temperature, ready for future use.
- Leftovers (Filled Cannoli): Filled cannoli do not store well due to immediate sogginess. They are best enjoyed fresh. If you happen to have any filled cannoli leftovers, consume them within a few hours of filling, although their crisp texture will diminish significantly.
Helpful Information for All Our Recipes
- I consistently use extra virgin olive oil in all my recipes unless a different type of oil is specifically stated for optimal flavor and quality.
- For canned or jarred tomatoes of any kind, I exclusively use high-quality Cirio or Mutti brands to ensure the highest quality results and authentic Italian flavor in all my dishes.
- Unless otherwise specified, all vegetables referred to in our recipes are assumed to be of medium size.
- All recipes featured on this blog are carefully tested and developed using a fan (convection) oven for consistent results.
- Find out more about how nutrition information is calculated on our site, which serves as an approximation.
- Explore our comprehensive guide to must-have Italian Pantry Staples to stock your kitchen with authentic ingredients.
- Discover all our recommended Essential Kitchen Tools for Italian Cooking to equip your culinary space.
Nutrition Information (per serving)
Calories: 317kcal | Carbohydrates: 20g | Protein: 7g | Fat: 23g | Saturated Fat: 7g | Trans Fat: 1g | Cholesterol: 40mg | Sodium: 65mg | Potassium: 73mg | Fiber: 1g | Sugar: 9g | Vitamin A: 303IU | Vitamin C: 1mg | Calcium: 108mg | Iron: 1mg
Nutrition information provided is automatically calculated and should be used as an approximation only. Individual results may vary significantly based on specific ingredient brands, exact measurements, and preparation methods.
Did you try this authentic Cannoli recipe?
We would absolutely love to hear from you! Please take a moment to leave a comment below and share your experience and creations. Your valuable feedback genuinely helps our growing community of home bakers!
Connect With Us!
If you’ve tried this Authentic Homemade Sicilian Cannoli recipe or any other delightful recipe on our blog, don’t forget to rate the recipe and let me know how you got on in the comments below – I absolutely love hearing from you and seeing your culinary creations! You can also FOLLOW US on FACEBOOK, INSTAGRAM, and PINTEREST for daily inspiration, behind-the-scenes glimpses, and more delicious food photography. Or, sign up to our NEWSLETTER to receive new delicious, authentic recipes directly in your inbox every single week.