
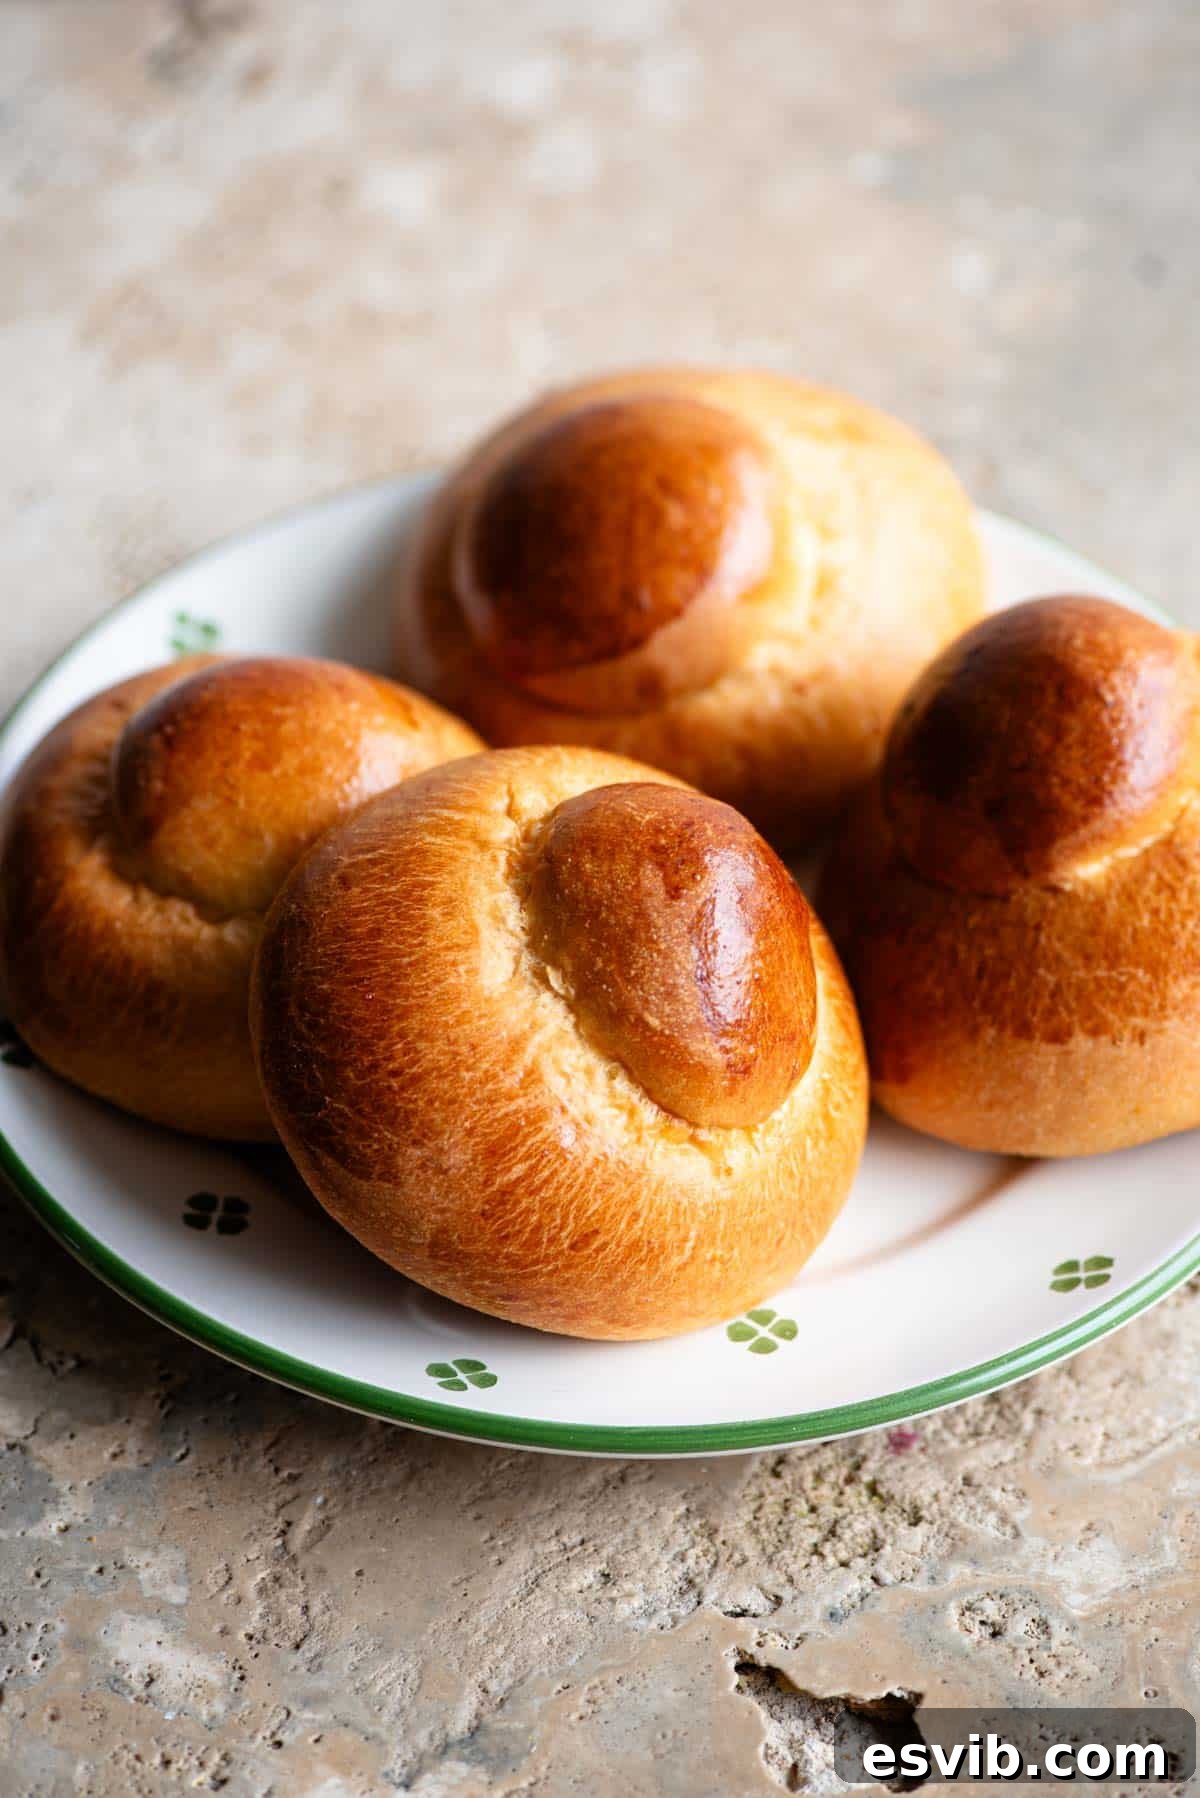
Soft, impossibly buttery, and unbelievably delicious, these Sicilian Brioche Buns, famously known as Brioche col Tuppo, are a true culinary delight. Each bun is a marvel of delicate sweetness, infused with the vibrant aroma of fresh orange zest and warm vanilla. More than just a simple pastry, they are a staple of the traditional Sicilian breakfast, offering a unique pairing that captivates locals and visitors alike. Typically, these golden-brown beauties are served alongside a glass of ice-cold, refreshing Sicilian granita, creating a breakfast experience that is both invigorating and deeply comforting.
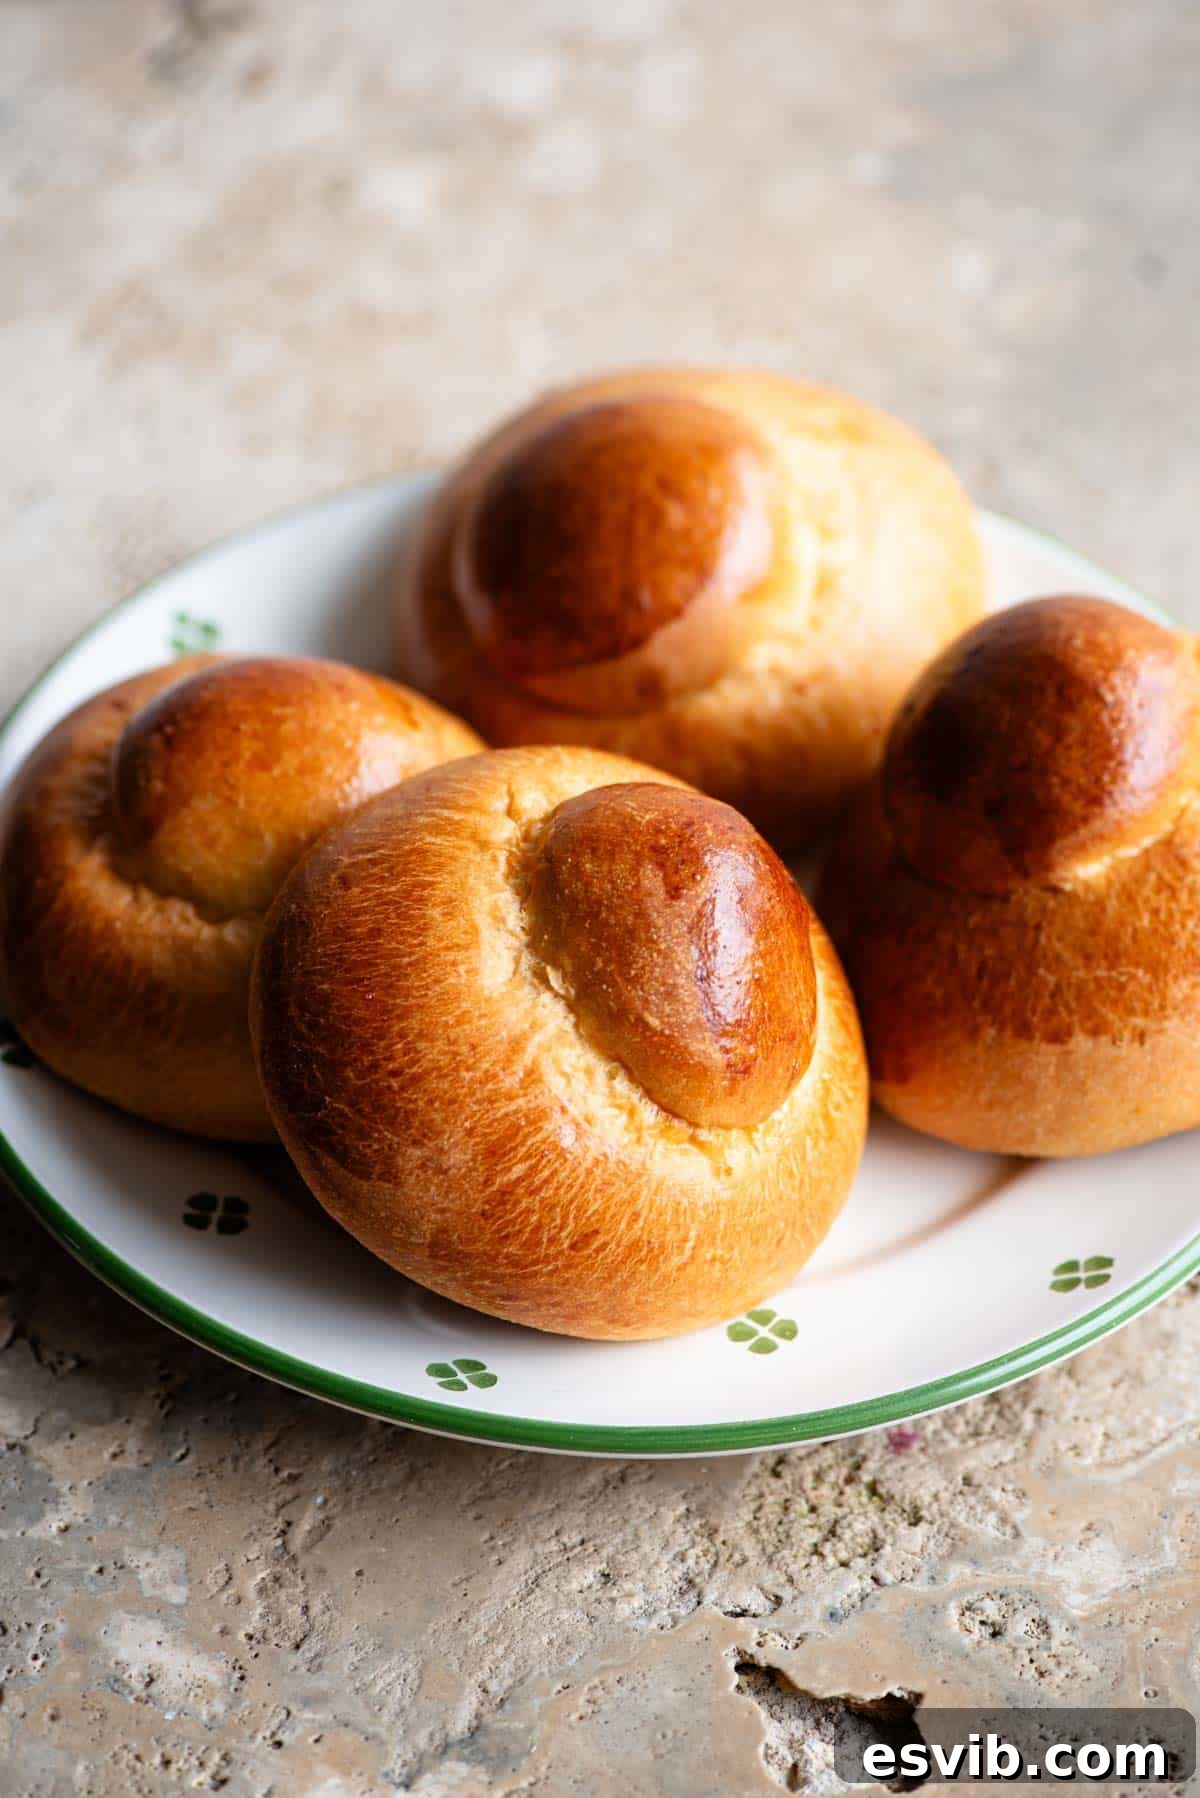
Sicilian Brioche Buns (Brioche col Tuppo): An Authentic Italian Breakfast Delight
Imagine waking up in Sicily, where the sun kisses the horizon, and your day begins with a breakfast that transcends the ordinary. This is precisely the experience that defines a traditional Sicilian breakfast, especially during the sun-drenched summer months. It consists of an exquisite trinity: ice-cold, invigorating granita, often crowned with fresh, ethereal whipped cream, served alongside a wonderfully soft and buttery brioche bun, perfectly designed for dunking. This is not just a meal; it’s a cherished ritual, a moment of pure bliss that truly makes getting out of bed worthwhile.
The first time I experienced this dreamy breakfast in Sicily, I knew instantly that I had to bring that magic home. The combination of textures and temperatures – the icy, flavorful granita melting into the warm, tender brioche – was simply unforgettable. After much experimentation, I am thrilled to share this recipe, which faithfully recreates that authentic Sicilian experience, transporting me back to the island with every single bite.
Why You’ll Love Making Homemade Sicilian Brioche
While the idea of making brioche might sound daunting, these Sicilian brioche buns are surprisingly straightforward to prepare. However, I wholeheartedly recommend using a stand mixer with a dough hook attachment. Brioche dough is notoriously wet and sticky due to its high butter content, requiring extensive kneading to develop its signature light and airy texture. A mixer will save you a lot of effort and ensure a consistently perfect dough, allowing the gluten to develop properly without the mess and strain of hand-kneading. The long kneading process is crucial for achieving that characteristic soft, delicate crumb that distinguishes a truly great brioche.
There’s nothing quite like pulling these brioche buns warm from the oven, their sweet aroma filling your kitchen. While their traditional companion is granita, their versatility knows no bounds. If you’re not serving them with granita, consider slicing them open and filling them with luscious gelato for a unique “gelato sandwich” – a popular Sicilian treat. Alternatively, they are divine simply spread with creamy chocolate hazelnut spread, a dollop of sweetened whipped cream, or a generous layer of fruit jam. No matter how you enjoy them, these brioche buns promise a truly delicious experience.
Table of Contents
- The Essence of Sicilian Brioche: History & Characteristics
- Ingredient Notes and Expert Tips
- Step-by-Step Visual Guide to Making Brioche col Tuppo
- Recipe Tips and FAQs
- Full Sicilian Brioche Buns Recipe
- Granita and Gelato to Serve with Your Brioche
The Essence of Sicilian Brioche: History & Characteristics
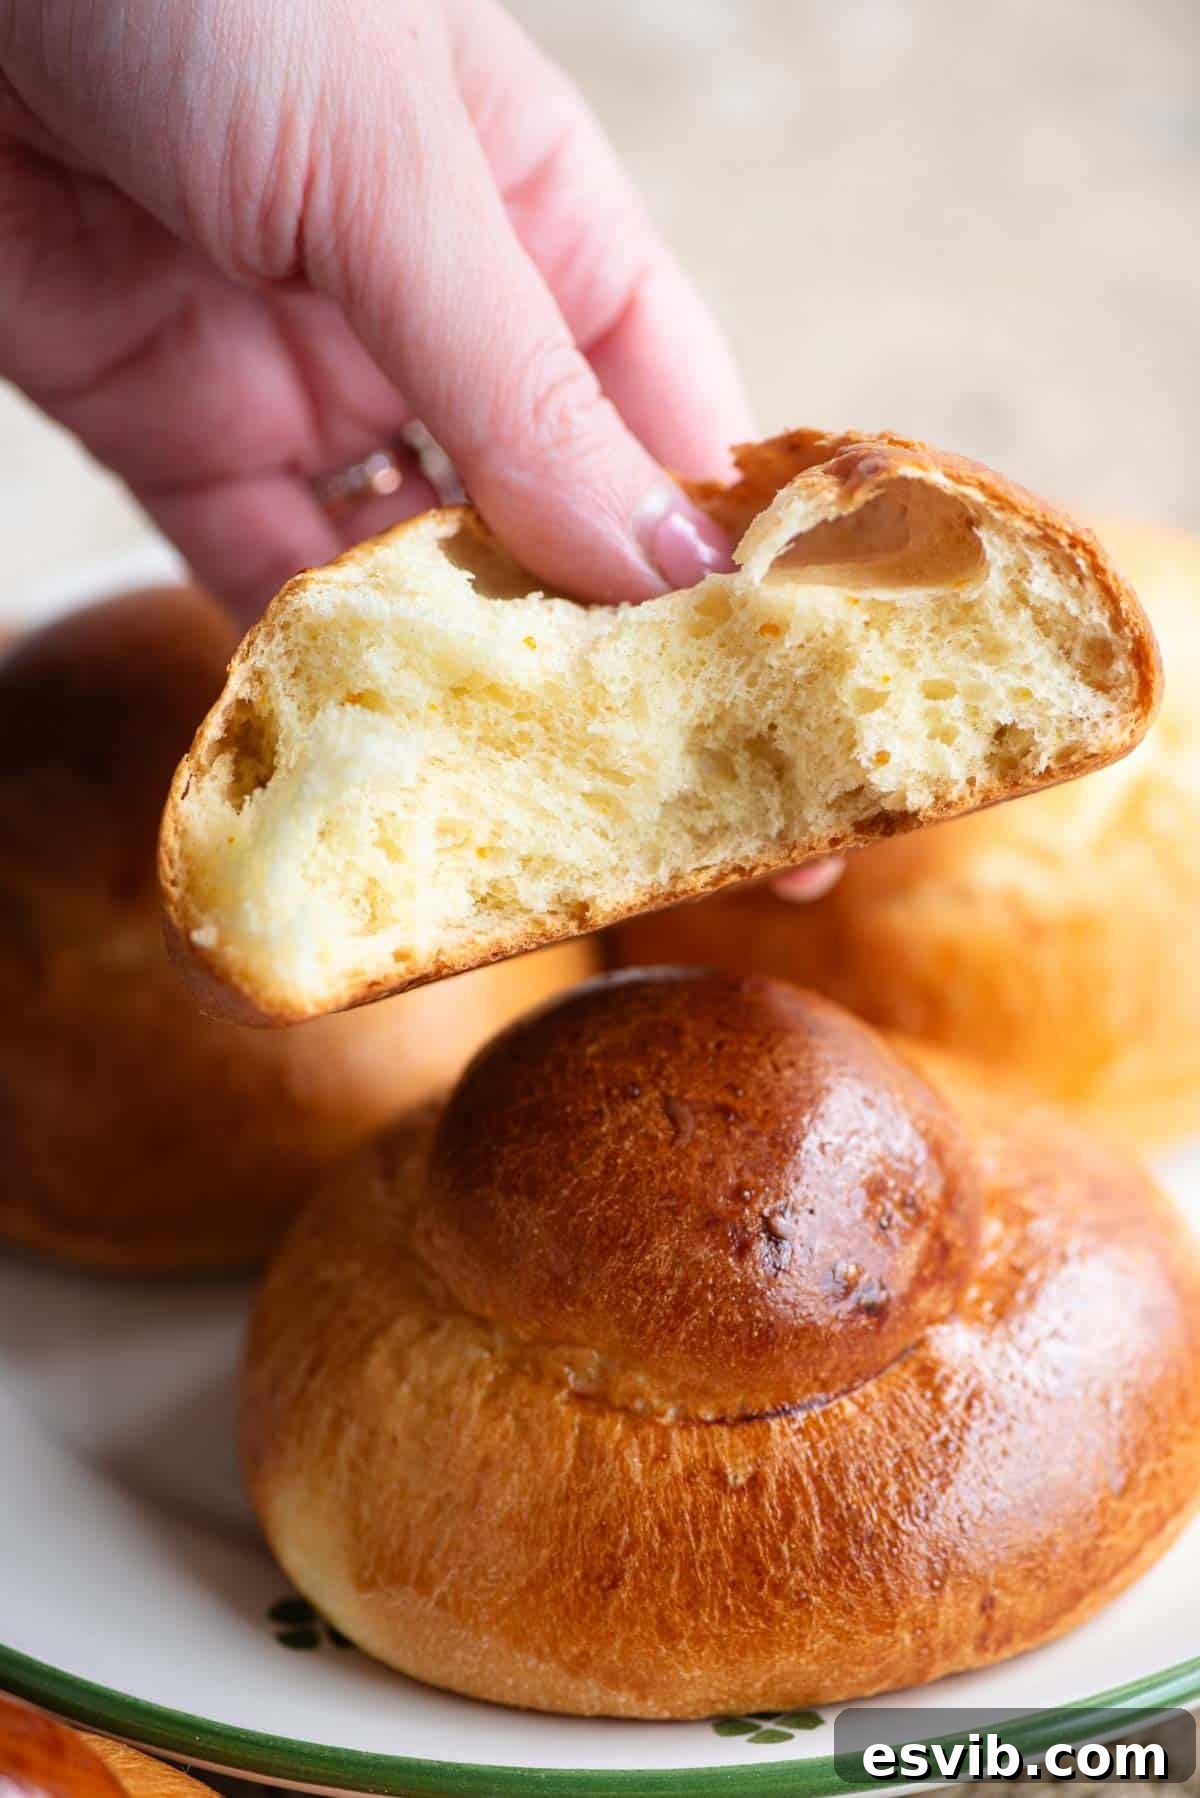
Sicilian brioche, or “Brioche col Tuppo,” holds a special place in Italian culinary tradition, particularly in Sicily. The name “col Tuppo” literally translates to “with a topknot,” referring to the distinctive small ball of dough perched on top of the larger bun. This isn’t just for aesthetics; traditionally, Sicilians would pluck off the “tuppo” and use it to scoop up their granita before diving into the rest of the bun. This unique pastry is believed to have roots in French brioche but evolved with a distinctly Sicilian character, often incorporating local flavors like citrus zest and honey. Its rich, tender crumb is a result of a high fat content (butter and eggs) and a generous amount of kneading, creating a dough that is both incredibly soft and incredibly flavorful.
Beyond breakfast, these brioche buns are a symbol of Sicilian hospitality and enjoyment of life. They embody the island’s love for simple, yet profound, pleasures, marrying sweetness with a delicate aroma that is truly unique. Making them at home allows you to partake in this delightful tradition, bringing a piece of Sicilian sunshine into your kitchen.
Ingredient Notes and Expert Tips for Perfect Brioche
Crafting perfect brioche starts with understanding your ingredients. Here are some essential notes and tips for the best results:
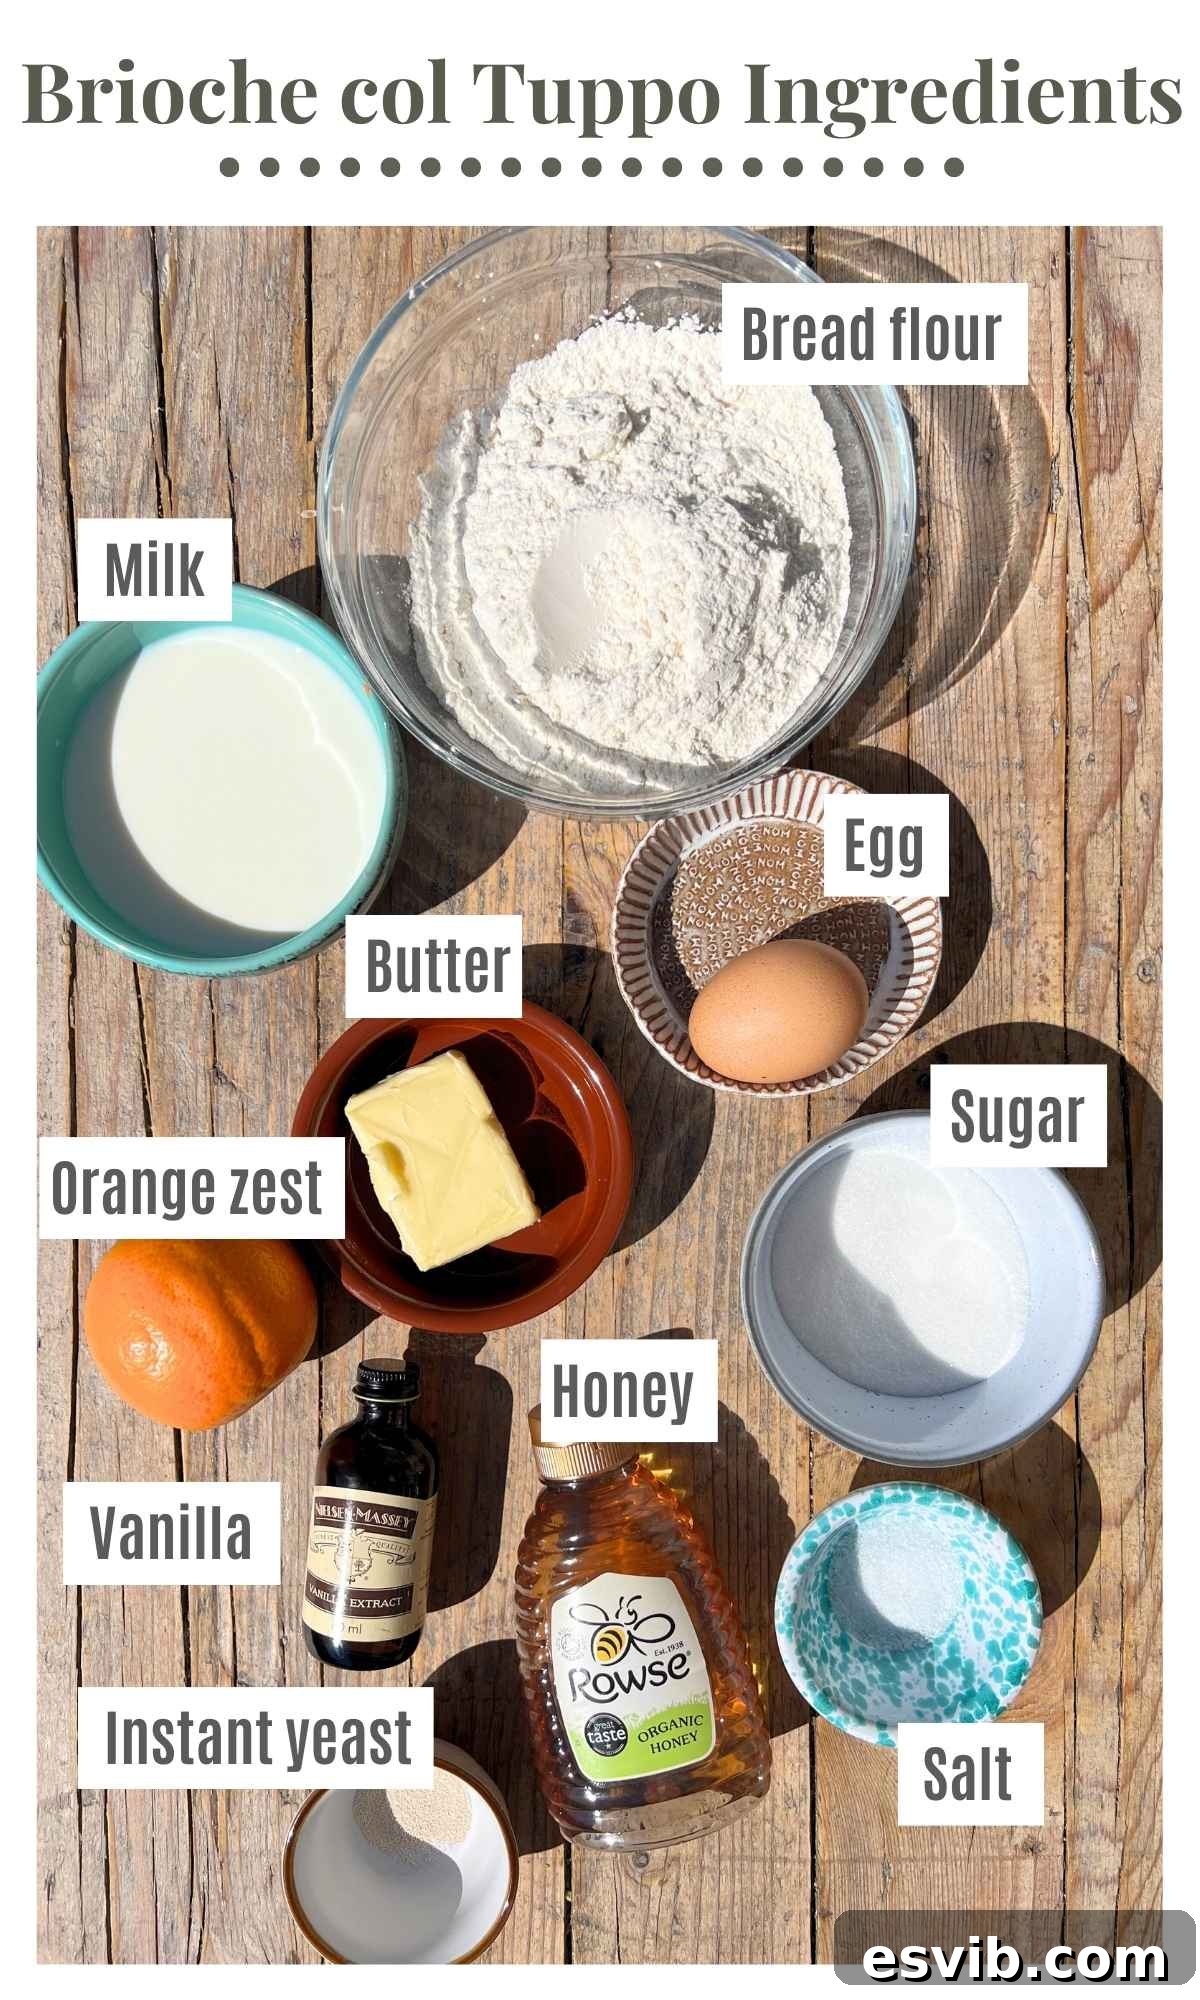
- Unsalted Butter: It is crucial that your butter is at room temperature – truly soft, but not melted. This allows it to incorporate smoothly into the dough, creating that luxurious, tender crumb. If you’re using salted butter, remember to omit the additional salt specified in the recipe. *Please note: this recipe has been developed and tested with unsalted butter for optimal flavor balance.*
- Orange Zest: Freshly grated orange zest is non-negotiable for authentic Sicilian brioche, lending a wonderfully bright and aromatic citrus note. If you prefer, lemon zest makes a lovely alternative, offering a slightly different but equally delightful fragrance. You can also opt to leave it out entirely, though you’ll miss a key characteristic of these buns.
- Vanilla Extract: Always use pure vanilla extract, not artificial vanilla essence. The quality of vanilla makes a significant difference in the final flavor. For an even richer aroma, consider using vanilla bean paste or scraping the seeds from a whole vanilla bean.
- Bread Flour: Using bread flour is highly recommended as its higher protein content helps develop strong gluten, which is essential for the structure and chewiness of brioche, allowing it to hold up to the richness of the butter and eggs.
- Instant Yeast: Ensure your instant yeast is fresh and active. While some recipes require activating yeast in liquid, the instant variety can usually be mixed directly with dry ingredients. Always check your specific yeast packet instructions.
- Milk: Warm the milk slightly before adding it to the dough. It should be lukewarm, not hot, to avoid killing the yeast or scrambling the egg. This helps activate the yeast and creates a better environment for dough development.
- Caster Sugar/Granulated Sugar: Caster sugar dissolves easily, contributing to a smooth dough. Granulated sugar works perfectly fine too. The sugar provides sweetness and aids in crust browning.
Step-by-Step Visual Guide to Making Brioche col Tuppo
Follow these detailed steps to achieve perfect Sicilian Brioche Buns. Patience is key, especially during the kneading and proofing stages, but the delicious results are incredibly rewarding!
Making the Dough: The Foundation of Flavor
Step 1 – Initial Mix: In the bowl of your stand mixer fitted with a dough hook, combine the bread flour, instant yeast, slightly warmed milk, the large egg, honey, fresh orange zest, and vanilla extract. Mix on a low speed until these ingredients come together to form a rough, shaggy dough. At this stage, it will look quite unformed and sticky. Once a rough dough has formed, add the combined caster sugar and fine salt to the mixer. Continue mixing on low speed until these are fully incorporated into the dough. This initial mixing helps hydrate the flour and begin gluten development.
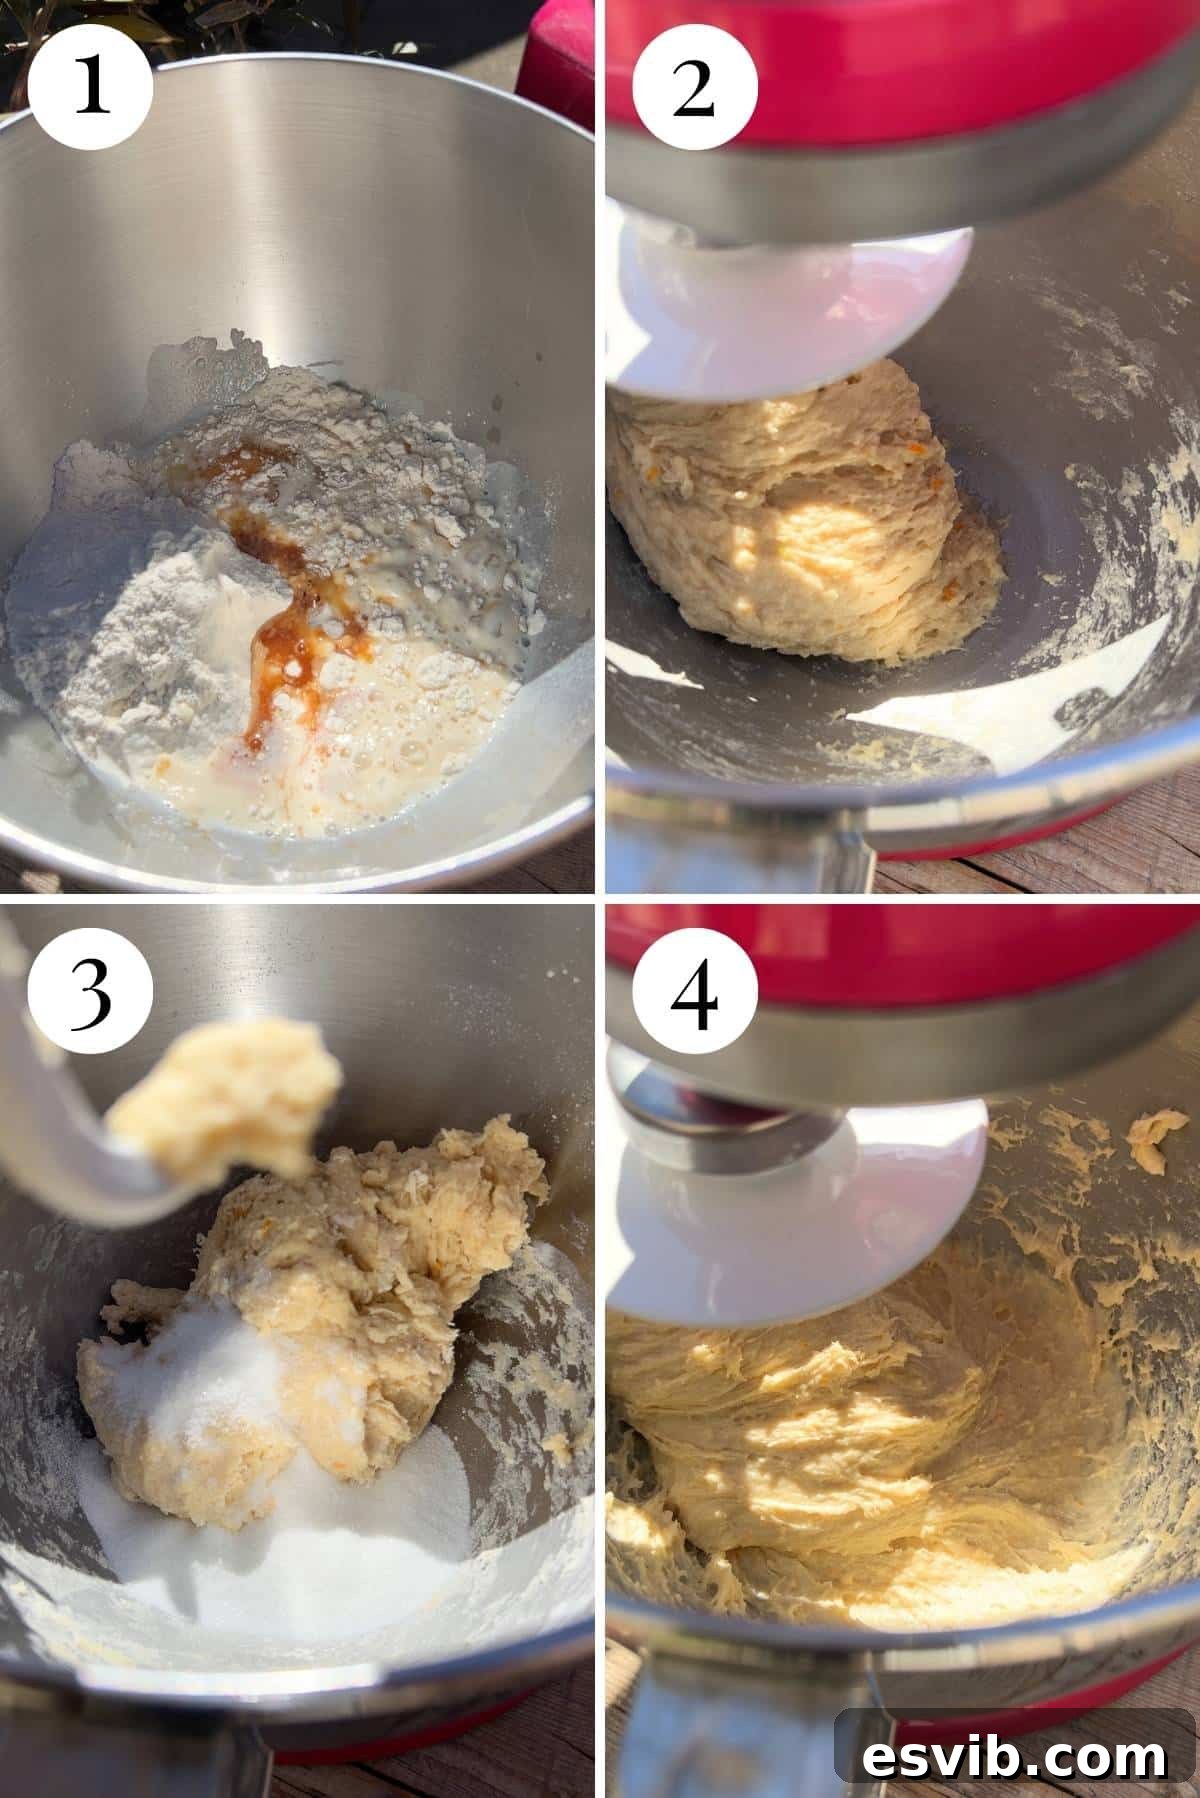
Step 2 – Incorporating Butter and Intensive Kneading: Increase the mixer speed to medium (around setting 4 on a KitchenAid). Begin adding the room-temperature unsalted butter, one tablespoon at a time. It’s vital to wait until each addition of butter is completely absorbed into the dough before adding the next. This process allows the butter to emulsify properly with the dough, leading to a richer, more tender texture. After the final tablespoon of butter has been incorporated, continue kneading the dough on medium speed for a full 20 minutes. *Yes, it truly needs this long!* This extended kneading time is critical for developing strong gluten in this enriched dough. The dough should transform into a smooth, glossy, and elastic mass that pulls away from the sides of the bowl and is tacky to the touch but no longer sticky to your fingers. A good test is the “windowpane test”: gently stretch a small piece of dough; if it stretches thin enough to see light through it without tearing, your gluten is well-developed.
First Proof: Allowing the Flavors to Develop
Step 3 – The First Rise: Lightly grease a large mixing bowl with a tiny amount of olive oil or butter. Transfer the kneaded brioche dough into this bowl. Cover the bowl tightly with plastic wrap to prevent a skin from forming. Allow the dough to proof at room temperature until it has visibly doubled in size. This can take anywhere from 4 to 6 hours, depending on the ambient temperature of your kitchen. A warmer environment will result in a faster rise, while a cooler one will take longer. This first proof is essential for developing flavor and creating an airy structure.
Shaping the Iconic Brioche col Tuppo
Step 4 – Dividing the Dough: After the first proof, gently deflate the dough and turn it out onto a clean, lightly floured work surface. Divide the dough into 6 equal pieces. To create the distinctive “tuppo” (topknot), cut a small piece from each of the 6 main dough portions. For precision, you can weigh them: aim for 6 large balls of approximately 78g each for the base, and 6 smaller balls of about 20g each for the tops.
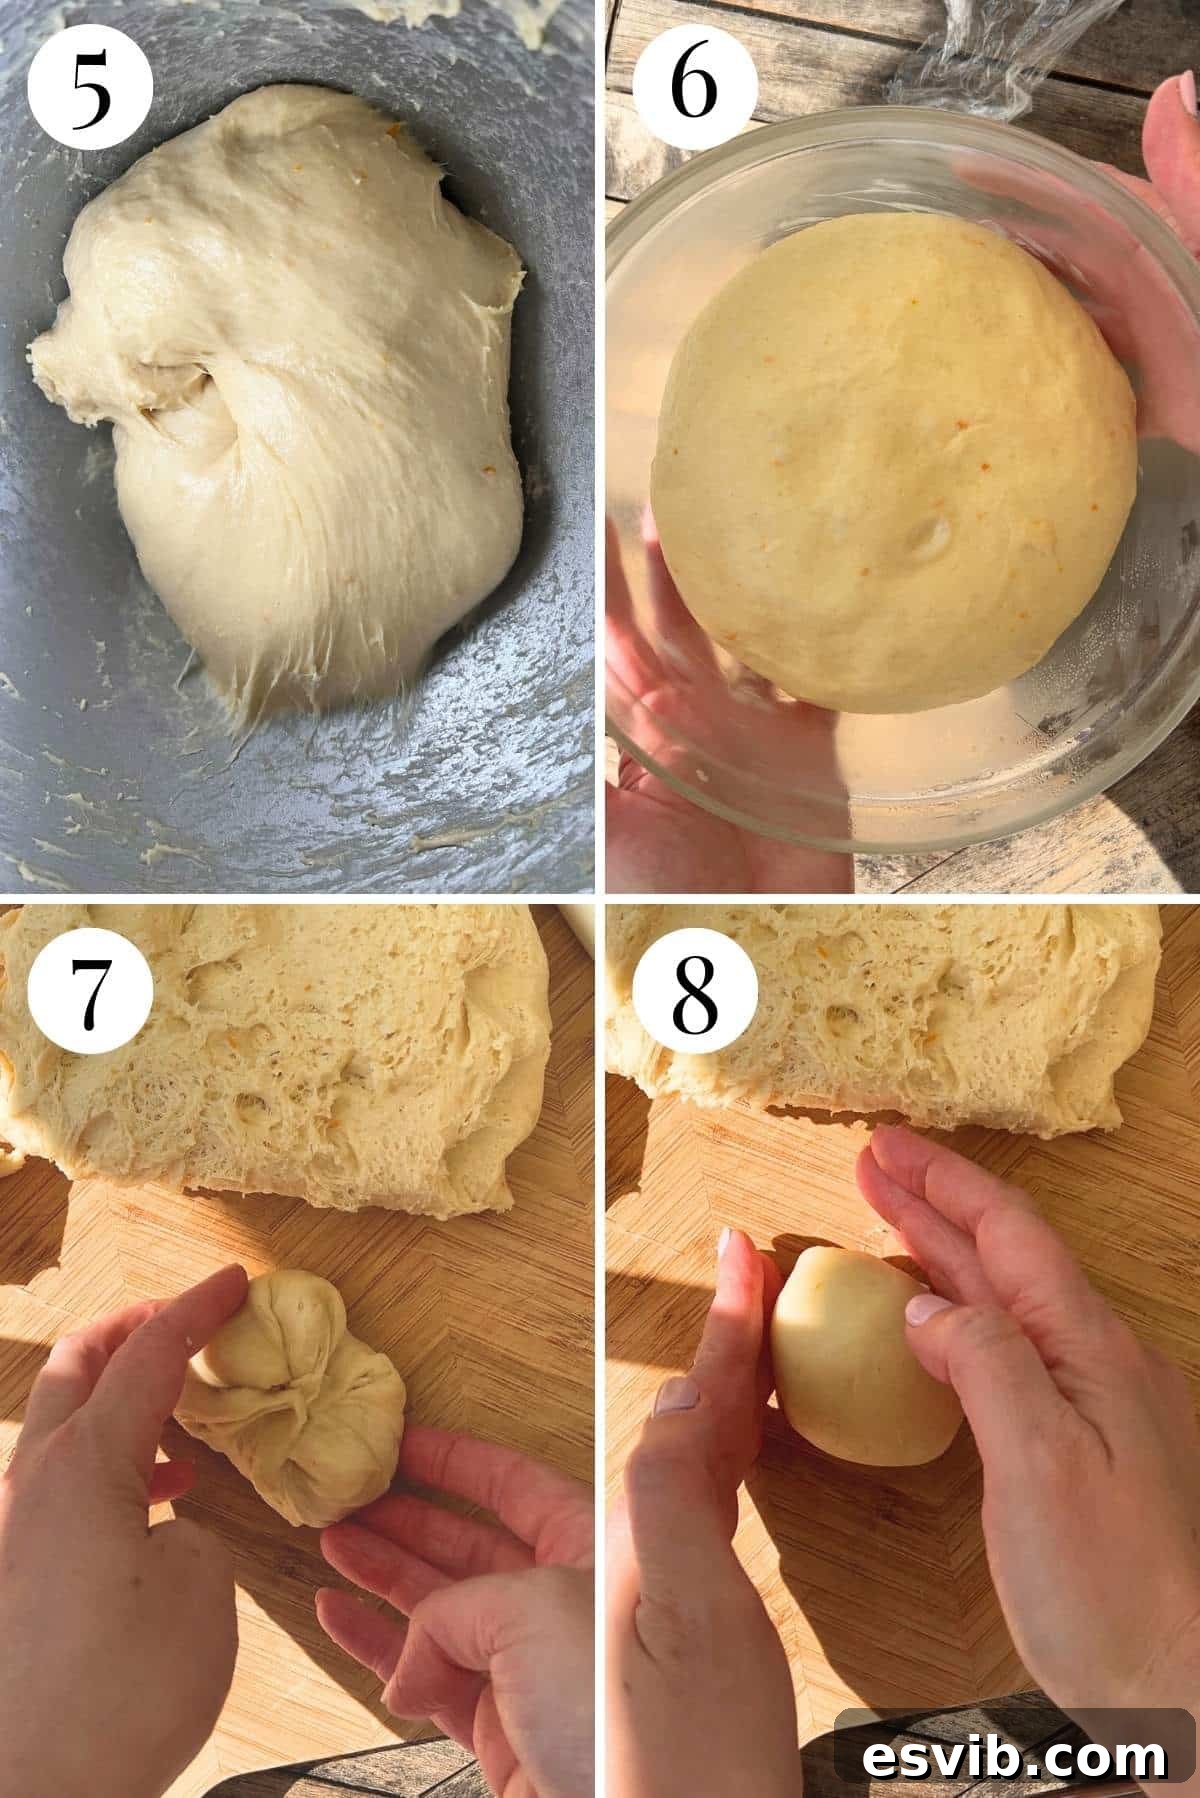
Step 5 – Shaping the Balls: To shape both the large base balls and the small “tuppo” balls, gently take a piece of dough and carefully pinch the edges into the middle. This technique helps to build surface tension underneath the dough, creating a smooth, taut surface. Flip the ball over so the seam is facing down. Cup your hands around the dough and gently rotate it in a circular motion on the work surface, continuing to tuck the edges underneath. This smooths out the dough and forms a perfectly round ball.
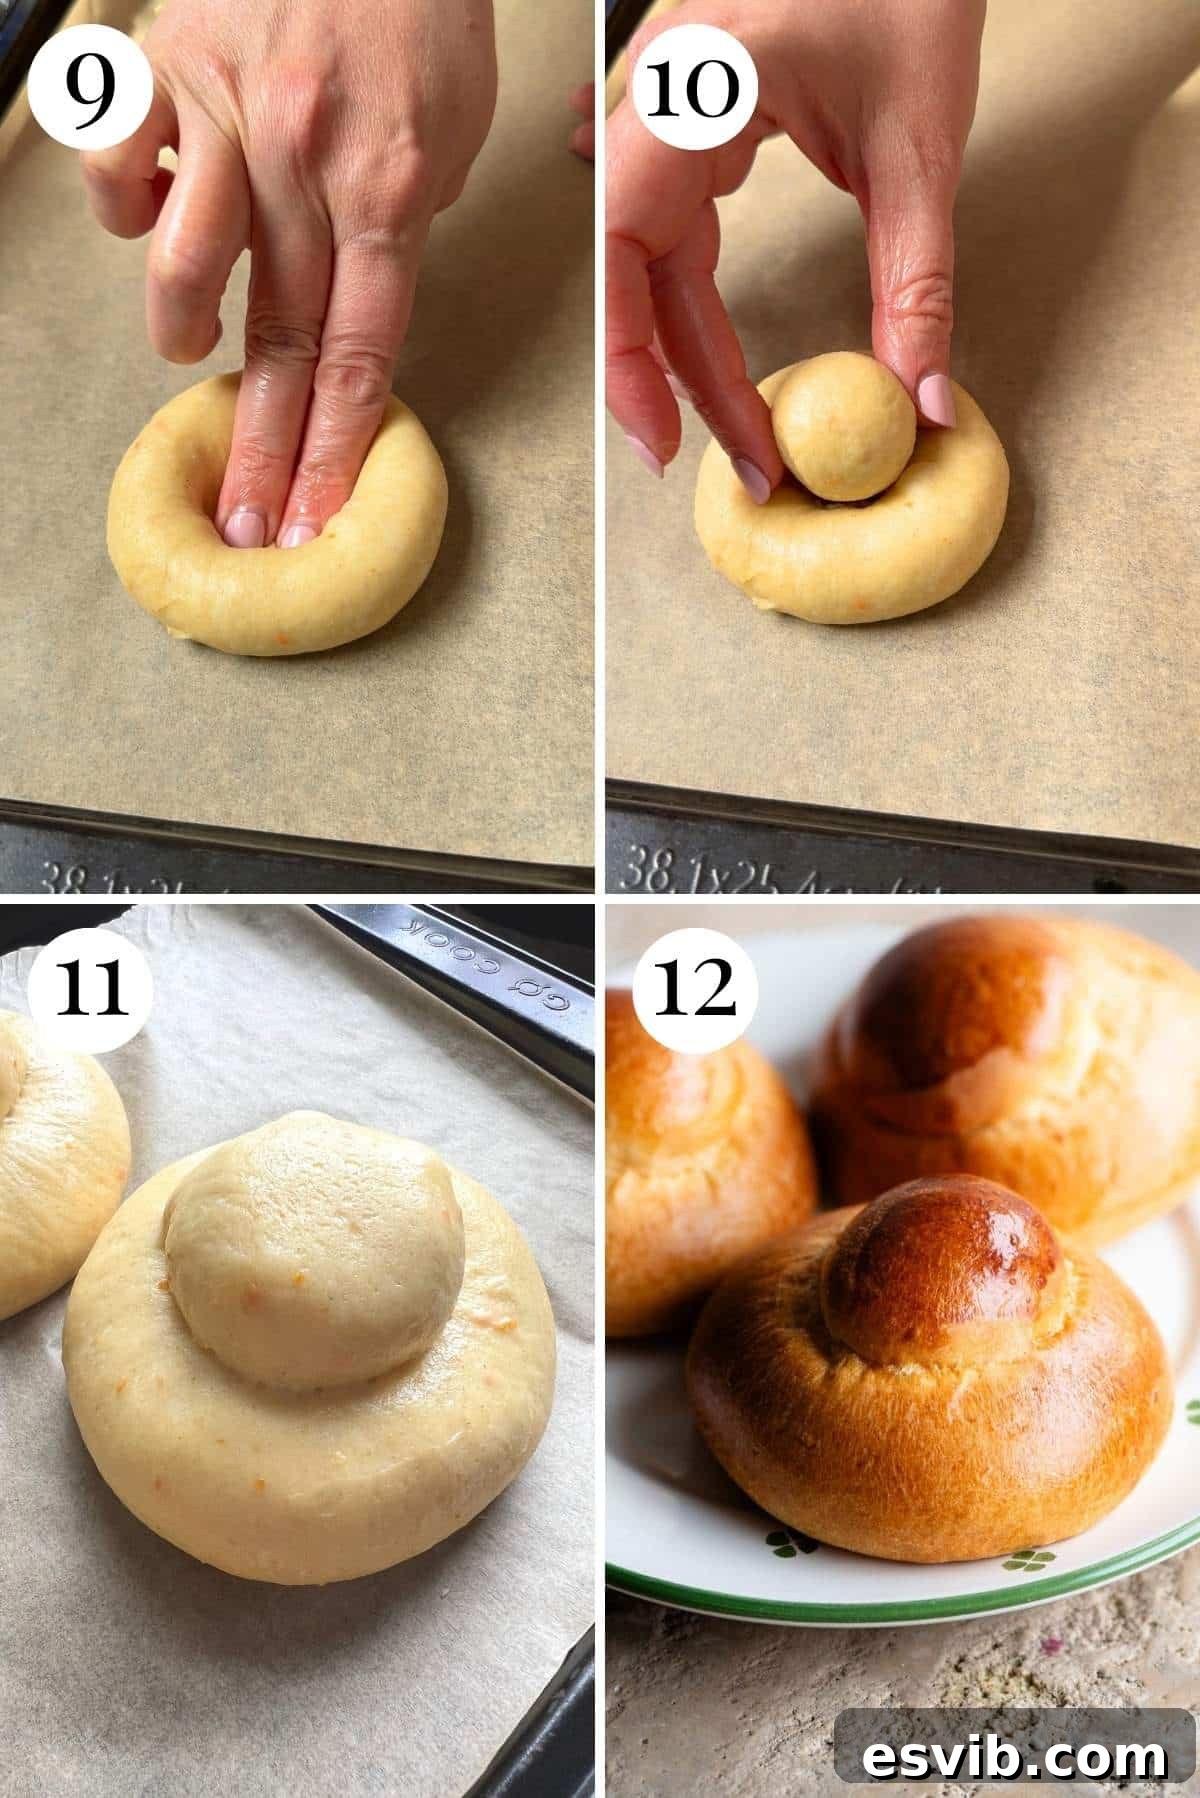
Step 6 – Assembling the Buns: Line a baking tray with parchment paper. Place the larger, shaped dough balls onto the prepared tray, ensuring they have enough space to expand. Using two fingers, gently press down in the center of each large ball to create a distinct indent. Take the smaller, shaped dough balls (the “tuppo”) and carefully place them on top, nestled firmly into the indent of each larger bun. This gives the brioche its classic Sicilian shape.
Second Proof and Baking: The Final Transformation
Step 7 – The Second Rise (Overnight for Best Flavor!): Once shaped, cover the buns loosely with plastic wrap. For superior flavor development and an even softer, more refined texture, I highly recommend allowing the brioche to proof overnight in the refrigerator. The cold fermentation slows down the yeast activity, allowing the flavors to deepen significantly. If proofing overnight, remove the buns from the fridge 1-2 hours before baking to let them come to room temperature and complete their final rise. They should almost double in size during this time. Alternatively, if you’re short on time, you can skip the overnight fermentation and let the buns proof at room temperature for another 1-2 hours, or until visibly doubled in size.
Step 8 – Baking to Golden Perfection: Preheat your oven to 170°C (340°F) for a fan-assisted oven, or 190°C (375°F) for a static oven. Whisk the remaining egg (from your ingredients list, reserved for egg wash) with a tablespoon of water or milk to create an egg wash. Gently brush the tops of the proofed brioche buns with this egg wash; this will give them a beautiful golden-brown color and a lovely shine. Bake in the preheated oven for 15-20 minutes, or until they are puffed up and gloriously golden brown all over. Once baked, remove them from the oven. These buns are absolutely divine enjoyed warm, directly from the oven. If you plan to store them, allow them to cool completely before transferring them to an airtight container.
Recipe Tips and FAQs for Brioche Success
- Embrace the Overnight Proof: Through numerous tests, I consistently found that an overnight fermentation in the fridge yields a far superior brioche. While same-day baking is possible, the texture becomes noticeably softer, and the depth of flavor is significantly enhanced with the cold proof. If you have the time, it is absolutely worth the wait!
- Simplifying the Shaping: If the “tuppo” shaping seems too intricate for your first attempt, don’t worry! You can simply shape the dough into 6 large, smooth round buns without the little topknot. They will still be incredibly delicious and characteristic of brioche.
- Creative Serving Suggestions: Beyond the classic granita, these brioche buns are incredibly versatile.
- Gelato Sandwiches: Slice them horizontally and stuff generously with your favorite gelato for a truly authentic Sicilian treat. Pistachio, hazelnut, or chocolate gelato are fantastic choices.
- Sweet Spreads: Cut them in half and spread with homemade jam, a generous swirl of fresh whipped cream, rich hazelnut chocolate spread (like Nutella), or decadent Italian pistachio cream.
- Savory Pairings: While traditionally sweet, some enjoy brioche with savory fillings like cured meats and cheeses for a delightful contrast.
Yes, it is possible to knead brioche dough by hand, but be aware that it is a very wet and sticky dough, making it quite challenging to handle. To properly develop the gluten by hand, you’ll need to use a “slapping and folding” technique. This involves repeatedly slapping the dough onto your work surface and folding it over itself. It requires significant effort and takes approximately 20-25 minutes of continuous kneading. For a great visual guide on this technique, I recommend checking out this helpful tutorial by Richard Bertinet.
Delicious Pairings: Granita and Gelato to Serve with Your Brioche
Italian Desserts
Sicilian Pistachio Granita
Italian Desserts
Granita al Caffè con Panna (Coffee Granita)
Italian Desserts
Aperol Spritz Granita
Italian Desserts
Pistachio Ice Cream (Gelato al Pistacchio)
If you’ve tried these Sicilian Brioche Buns or any other recipe on our blog, we’d love to hear from you! Please don’t forget to rate the recipe and share your experience in the comments below. Your feedback means the world to us! You can also follow us on Facebook, Instagram, and Pinterest, or sign up for our Newsletter to discover more of our delicious recipes and culinary adventures.
Step By Step Photos Above
Most of our recipes come with step by step photos, helpful tips and tricks to make it perfectly first time and even video!
Sicilian Brioche Buns (Brioche col tuppo)
5 from 2 votes
By Emily
45 mins
20 mins
16 hrs
17 hrs 5 mins
6 brioche buns

Pin Recipe
Print Recipe
Soft, buttery, and unbelievably delicious Sicilian Brioche Buns, also known as Brioche col Tuppo. These buns are beautifully sweet and scented with orange zest and vanilla. Traditionally served with Sicilian granita for breakfast.
Equipment
- Stand mixer
- Dough hook
- Large mixing bowl
- Baking tray
- Parchment paper
- Plastic wrap (cling film)
Ingredients
- 275 g (2 cups) bread flour
- 1 large egg, at room temperature (plus another 1 for egg wash)
- 1 orange zest
- 1 tablespoon honey
- 1 teaspoon vanilla extract
- 125 ml (1/2 cup) milk, slightly warmed
- 70 g (5 tablespoons) unsalted butter, at room temperature
- 1/2 teaspoon fine salt
- 2 g (1/2 teaspoon) instant yeast
- 45 g (scant 1/4 cup) caster sugar (can also use granulated)
Instructions
Important notes before starting
- The instant yeast we used can be added straight to dry ingredients, but not all yeast is the same. Check your packet instructions, and if it needs to be activated in liquid first, do this in some of the milk needed in the recipe.
- I recommend gently warming the milk so it’s not fridge cold. Make sure it’s not hot or too warm, or it’ll scramble the egg and melt the butter.
Make the dough
- Put the flour, yeast, milk, egg, orange zest, honey and vanilla in the bowl of a stand mixer with the dough hook attached and mix on a low speed until a rough dough is formed.
- Combine the sugar and salt and add them to the mixer. Keep mixing until fully incorporated.
- Next, with the mixer on a medium speed (number 4 on a KitchenAid) add around 1 tablespoon of butter at a time, allowing it to fully incorporate into the dough before you add more.
- When all the butter has been added, put a timer on and knead the dough for 20 minutes on a medium speed. After 20 minutes, the dough should be glossy and smooth, tacky but not stick to your hands, and most of the bowl should be clean.
- Lightly grease a large mixing bowl with butter or olive oil and transfer the dough to the bowl. Cover with plastic wrap and let the dough proof at room temperature until doubled in size (about 4-6 hours).
- After the first proof, tip the dough out onto a clean work surface. Cut the dough into 6 equal pieces and cut a small piece off of each for the tops. If weighing the dough, cut 78g for the base and 20g for the tops.
Shaping the dough
- To shape each ball (bottom and tops) gently pinch the edges of the dough into the middle (this helps build tension underneath). Flip it over so it’s seam side down, Cup your hands around the dough and gently rotate it in a circular motion, keeping the edges tucked under to form a smooth ball.
- Place the large balls on a baking tray lined with parchment paper and press them in the middle with two fingers to create an indent. Shape the small balls the same way and place them on top inside the indent.
Second proof
- Cover the tray with plastic wrap. I recommend placing the brioche in the fridge overnight for a second proof, as I found this really improves flavour and texture, but you can let the buns proof again at room temperature until doubled in size and bake on the same day.
- If proofing overnight, remove them from the fridge and let them come to room temperature before baking (1-2 hours). They should double in size in that time.
Baking
- Preheat the oven to 170C/340F fan 190C/375F static.
- Brush the brioche with a beaten egg and bake in the oven for 15-20 minutes until golden brown all over.
Notes
Storage: Once cooled completely, store the brioche buns in an airtight container or ziploc bags for up to 5 days. Brioche tends to dry out quickly within 1-2 days, but these reheat beautifully. Pop them in a preheated oven at 180°C (350°F) for 5-7 minutes, and they will become wonderfully soft and delicious again, almost as good as fresh out of the oven.
Helpful Info for All Recipes
- I always use extra virgin olive oil in all of my recipes unless stated otherwise.
- When I use canned or jarred tomatoes of any kind I always use Cirio or Mutti brands for the best results and flavour.
- All vegetables are medium sized unless stated otherwise.
- All recipes are tested and developed using a fan (convection) oven.
- Find out more about how nutrition is calculated.
- Check out our must-have Italian Pantry Staples.
- You can also find all our Essential Kitchen Tools for Italian Cooking.
Nutrition
Calories: 272kcal
|
Carbohydrates: 46g
|
Protein: 9g
|
Fat: 5g
|
Saturated Fat: 2g
|
Polyunsaturated Fat: 1g
|
Monounsaturated Fat: 2g
|
Trans Fat: 0.003g
|
Cholesterol: 160mg
|
Sodium: 221mg
|
Potassium: 112mg
|
Fiber: 1g
|
Sugar: 12g
|
Vitamin A: 256IU
|
Vitamin C: 3mg
|
Calcium: 56mg
|
Iron: 1mg
Nutrition information is automatically calculated, so should only be used as an approximation.
Did you try this recipe?
Leave a comment below!