
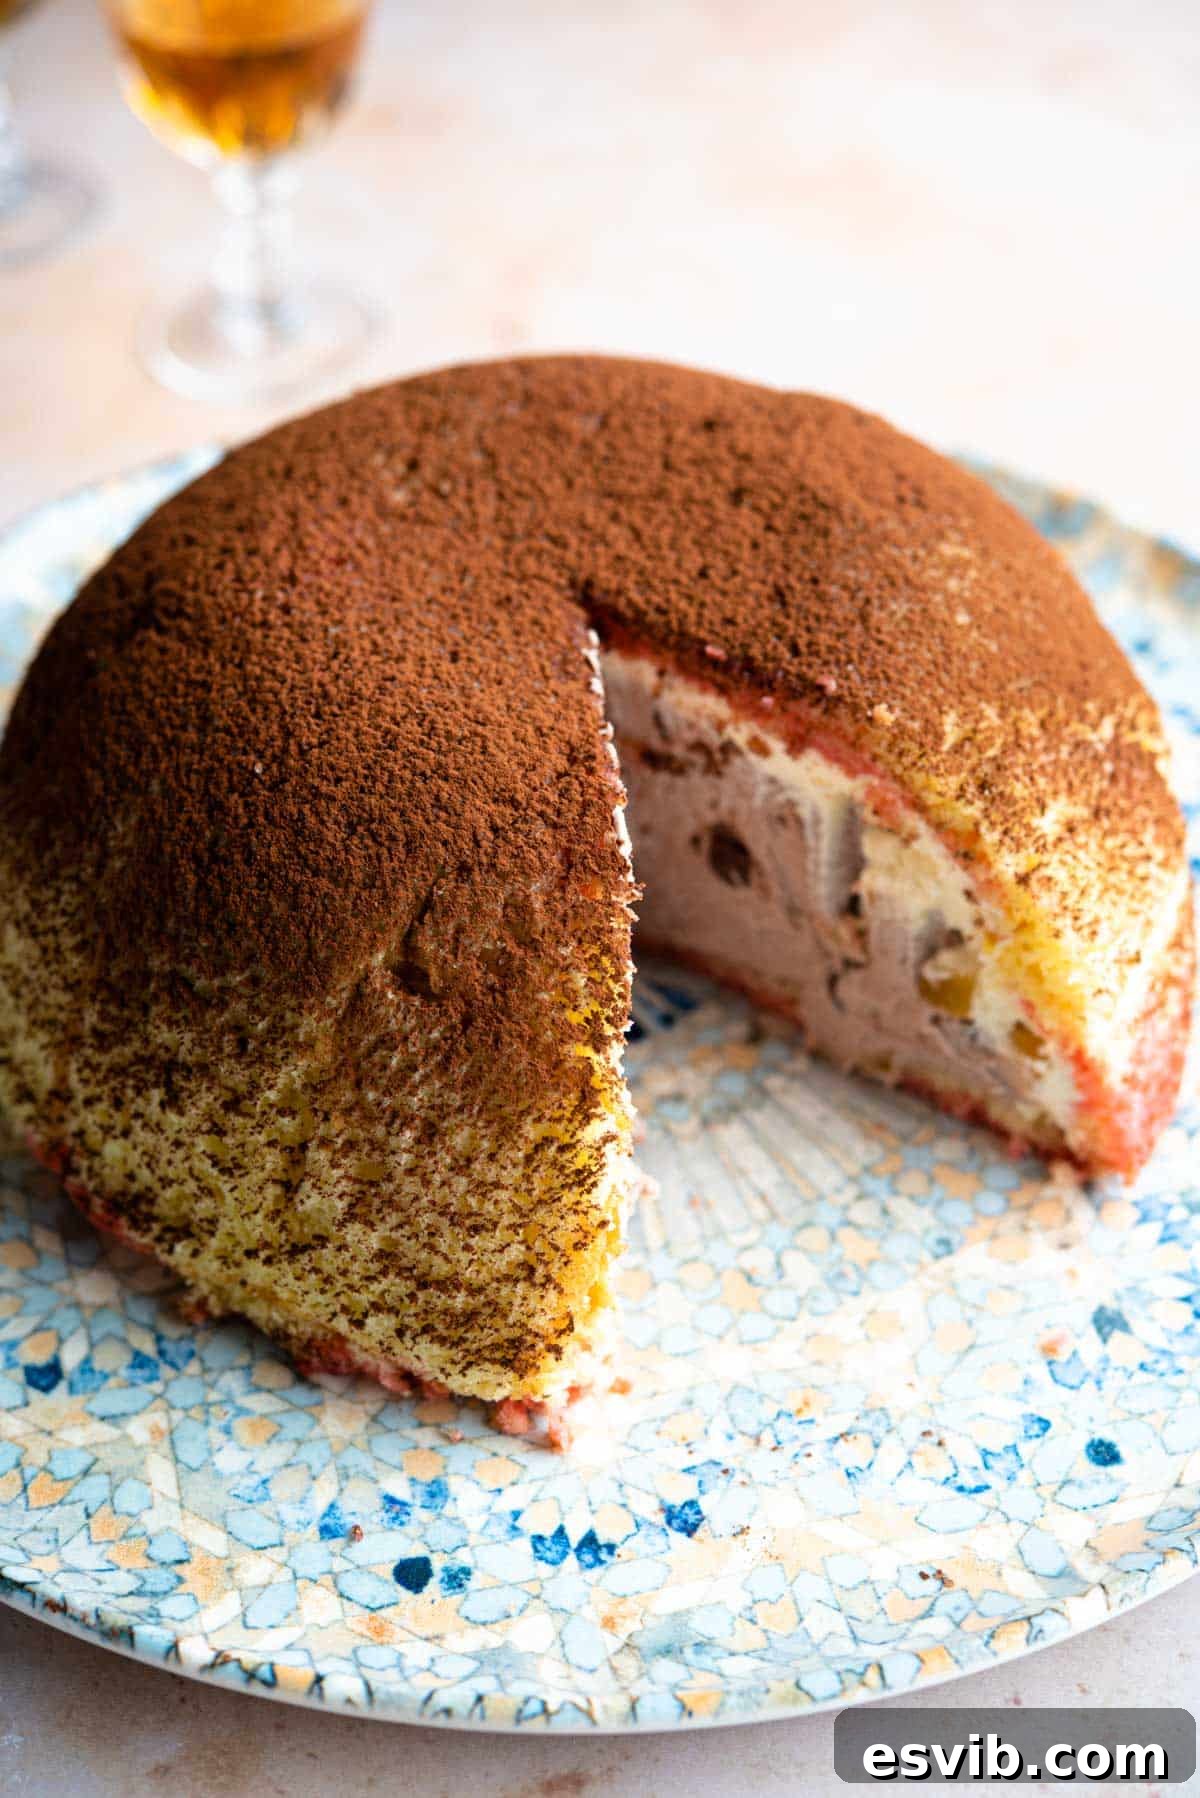
Zuccotto: The Quintessential Florentine Dome Cake
Embark on a culinary journey to the heart of Tuscany with our authentic recipe for **Zuccotto**, a magnificent dome-shaped cake that hails from the illustrious city of Florence. This impressive Italian dessert is a celebration of textures and flavors, featuring a tender Italian sponge cake (Pan di Spagna) generously soaked in a vibrant liqueur, then meticulously filled with two distinct and delectable ricotta cream fillings – one infused with fragrant candied fruits and the other rich with bittersweet chocolate chips. Its stunning appearance and unforgettable taste make Zuccotto a showstopper at any gathering, embodying the elegance and culinary tradition of Florentine patisserie.
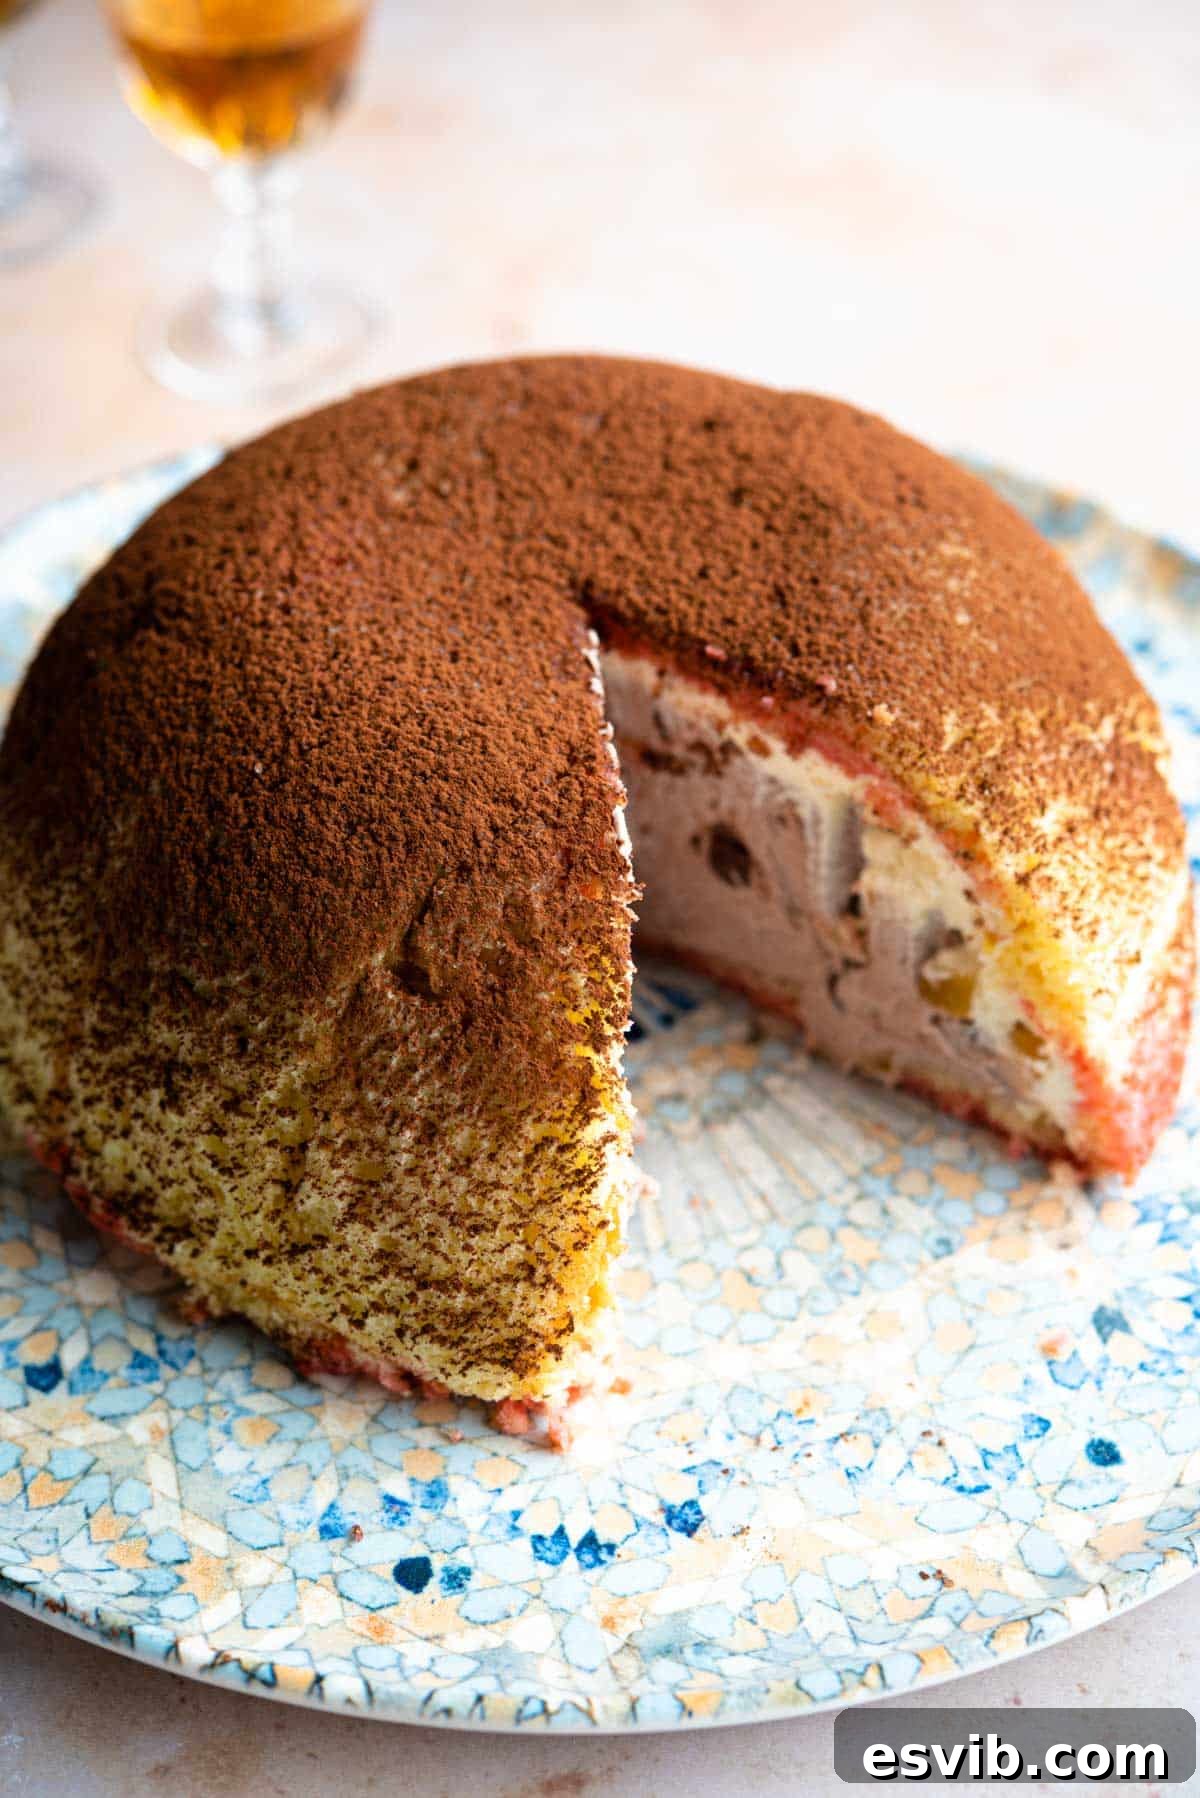
Zuccotto is far more than just a cake; it’s a testament to Italian craftsmanship in the kitchen. While its elaborate structure might suggest a daunting task, this recipe is surprisingly straightforward and incredibly rewarding. The beauty of Zuccotto lies in its components, which can often be prepared in stages, allowing you to manage your time efficiently. The delicate Italian sponge cake, or Pan di Spagna, provides the perfect canvas, its light and airy crumb ready to absorb the rich flavors of the liqueur, creating a moist and flavorful foundation for the creamy fillings within.
One of the key elements that gives Zuccotto its distinctive character and iconic ruby-red hue is **Alchermes liqueur**. This traditional Florentine spirit is a true gem of Italian confectionery, rarely found outside of Italy but essential for an authentic Zuccotto. Alchermes boasts a complex flavor profile, with notes of cinnamon, cloves, rose water, and other aromatic spices, contributing a unique warmth and depth to the cake. It’s also a star ingredient in other classic Italian desserts such as Zuppa Inglese and Ciaramicola. Its intense color and aromatic punch transform the simple sponge into something truly special.
However, don’t let the quest for Alchermes deter you from creating this masterpiece! Should you find it difficult to source, several excellent alternative liqueurs can be used, each imparting its own delightful twist. Consider Amaretto for a sweet almond note, Frangelico for a hint of hazelnut, Strega for its herbaceous complexity, or even a strong, sweetened coffee for a rich, non-alcoholic option. When substituting, remember that the goal is to infuse the sponge with moisture and flavor, so a slight dilution with water might be beneficial for stronger liqueurs.
Table of Contents
- Ingredients for Success
- Step-by-Step Photo Guide and Instructions
- Expert Recipe Tips for Perfect Zuccotto
- Recipe FAQs
- Why is it Called Zuccotto? Exploring its History
- Creative Variations to Try
- More Traditional Italian Desserts to Savor
- Full Zuccotto Recipe Card
Ingredients for Success: Crafting Your Zuccotto
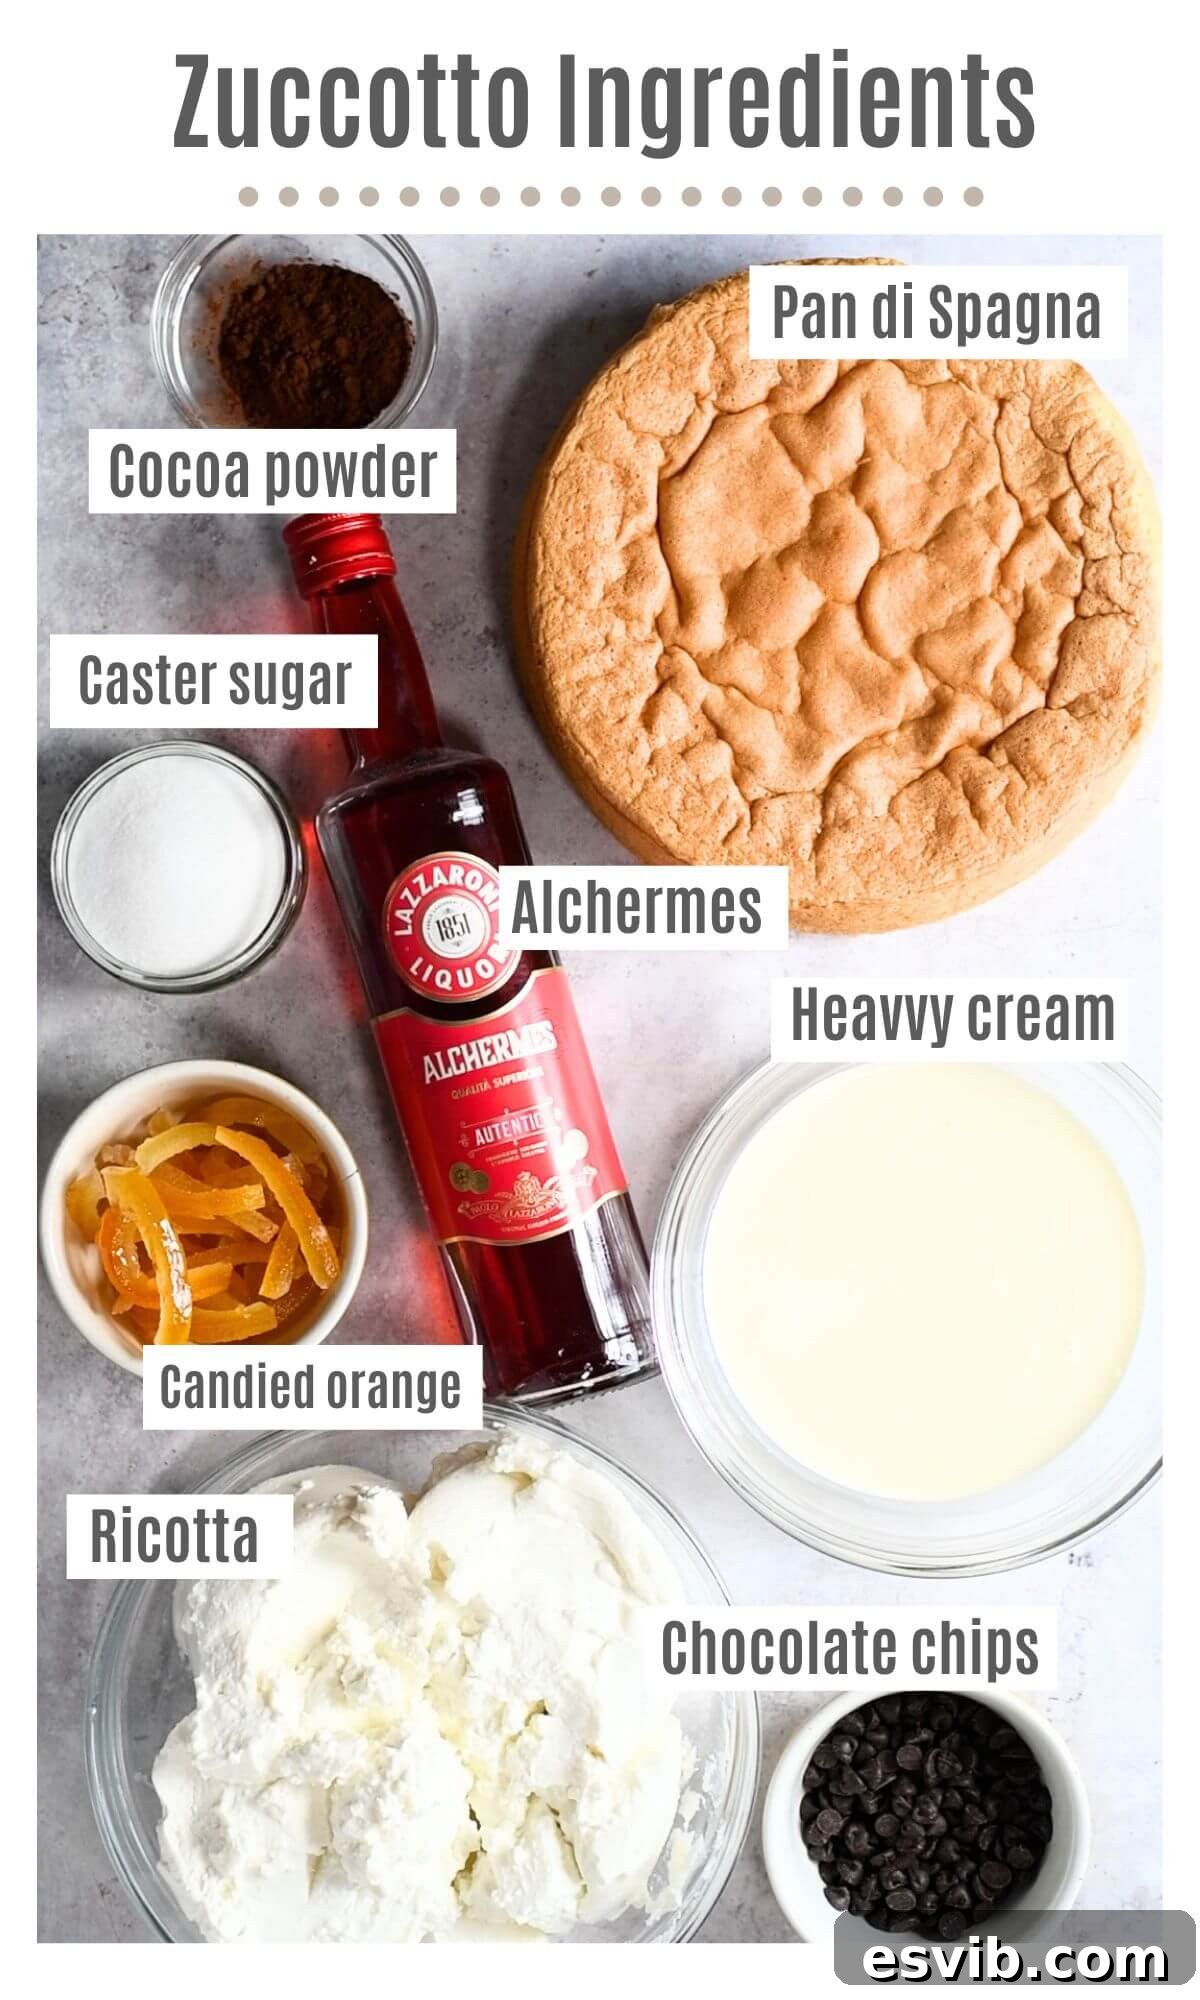
Ingredient Notes and Expert Substitutions
- Pan di Spagna (Italian Sponge Cake): Our recipe uses classic ingredients – eggs, Italian 00 flour (or good quality all-purpose flour), corn starch, and vanilla extract. The secret to its lightness lies in having room-temperature eggs, which whip up to maximum volume. For a quicker alternative, high-quality Savoiardi biscuits (ladyfingers) or even a dense pound cake can be used, eliminating the baking step.
- Alchermes: As discussed, this distinctive red liqueur is traditional. If unavailable, try Amaretto, Strega, Frangelico, or even strong, sweetened coffee for a non-alcoholic option. For liqueurs, a slight dilution with water can prevent the sponge from becoming too strong or overly sweet.
- Ricotta: For the creamiest, dreamiest filling, always opt for fresh, whole-milk ricotta. Crucially, allow the ricotta to drain through a fine-mesh sieve for at least 30-40 minutes (or even overnight in the refrigerator) to remove any excess liquid. This prevents a watery filling and ensures a stable, rich texture.
- Heavy Cream: Use full-fat heavy cream (also known as double cream) for whipping. It’s essential for achieving soft, airy peaks that provide structure and a luxurious mouthfeel to the filling. Low-fat alternatives will not yield the same creamy consistency.
- Candied Orange: While our recipe calls for candied orange, feel free to use a mix of your favorite candied fruits. However, citrus varieties like lemon peel or citron often complement the ricotta and chocolate best, providing a bright contrast to the richness.
- Cocoa Powder: Select a high-quality unsweetened cocoa powder, preferably one with at least 70% cocoa content. This will give the chocolate ricotta filling a deep, intense flavor and a beautiful dark color, balancing the sweetness of the other ingredients.
- Chocolate Chips: Dark chocolate chips are highly recommended. Their slight bitterness perfectly cuts through the sweetness of the ricotta and candied fruit, adding a delightful textural crunch. Bittersweet chocolate chunks, roughly chopped, also work wonderfully.
Step-by-Step Photo Guide and Instructions
How to Make the Italian Sponge (Pan di Spagna)
- If you choose to use store-bought Savoiardi (ladyfingers) or pound cake, you can bypass these steps and proceed directly to preparing the delectable fillings.
- For a visual guide to making the perfect Pan di Spagna, refer to our comprehensive Pan di Spagna recipe video and post.
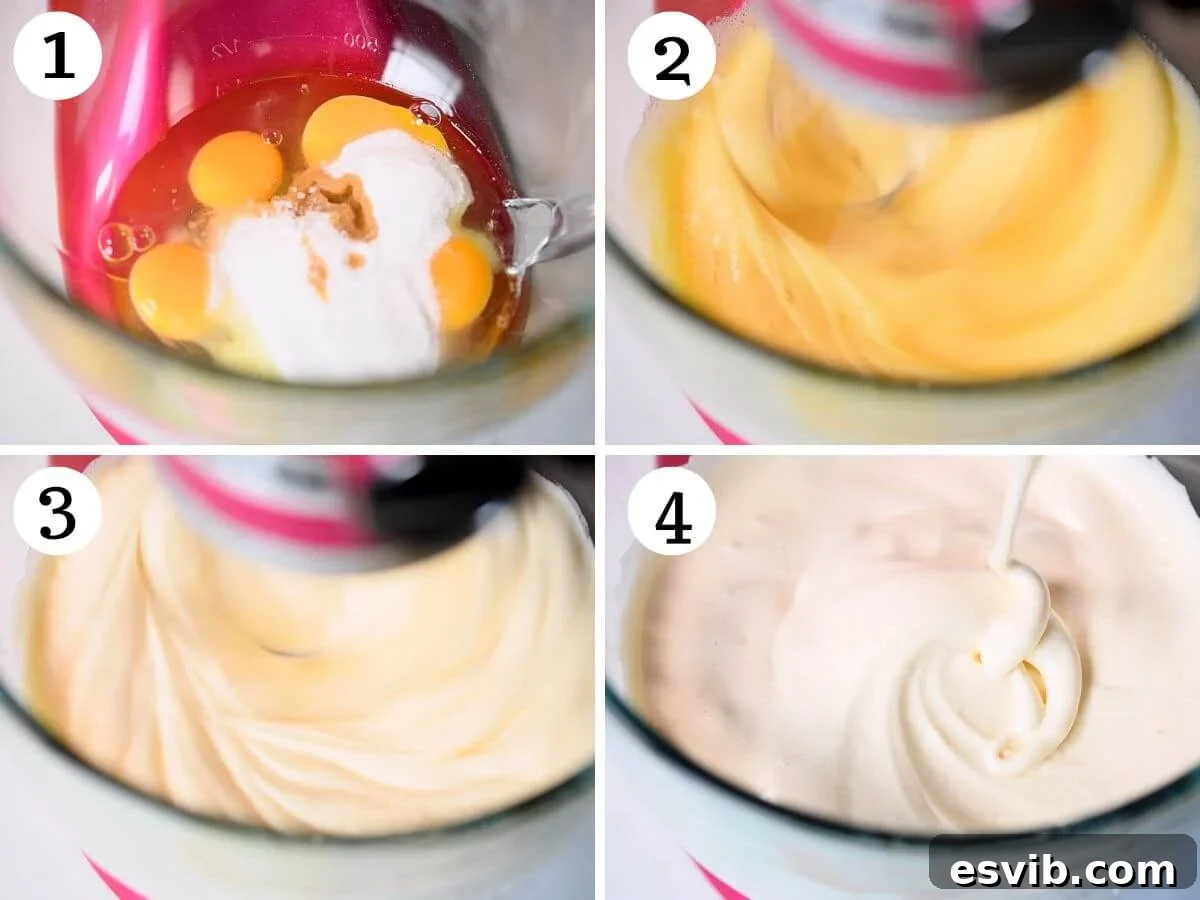
1. Whisk Eggs and Sugar: Begin by preheating your oven to 160°C (325°F) – a static, non-fan oven is ideal for this delicate sponge. Prepare a 9-inch (23cm) springform cake pan by greasing it with butter and lining the bottom with a disk of baking parchment. In the bowl of a stand mixer fitted with a whisk attachment (or using an electric hand mixer), combine the room-temperature large eggs, caster sugar, vanilla extract, and a pinch of salt. Whisk on medium-high speed for an impressive 15-20 minutes. This extended whisking is crucial to incorporate significant air, resulting in a thick, pale, and incredibly fluffy mixture. You’ll know it’s ready when you can lift the whisk and the batter forms a ribbon that slowly dissolves back into the mixture. (See accompanying photos 1-4 for visual guidance).
2. Add Flour: Sift the Italian 00 flour (or all-purpose) and corn starch directly over the whisked egg mixture. It’s imperative to do this in three separate additions, gently folding the flour into the batter with a spatula after each addition. The key here is to maintain as much of the air you’ve incorporated as possible. Fold with a light hand, using a motion that scoops from the bottom and folds over the top, rotating the bowl as you go. This method prevents lumps and keeps the batter airy. (See accompanying photos 5 & 6).
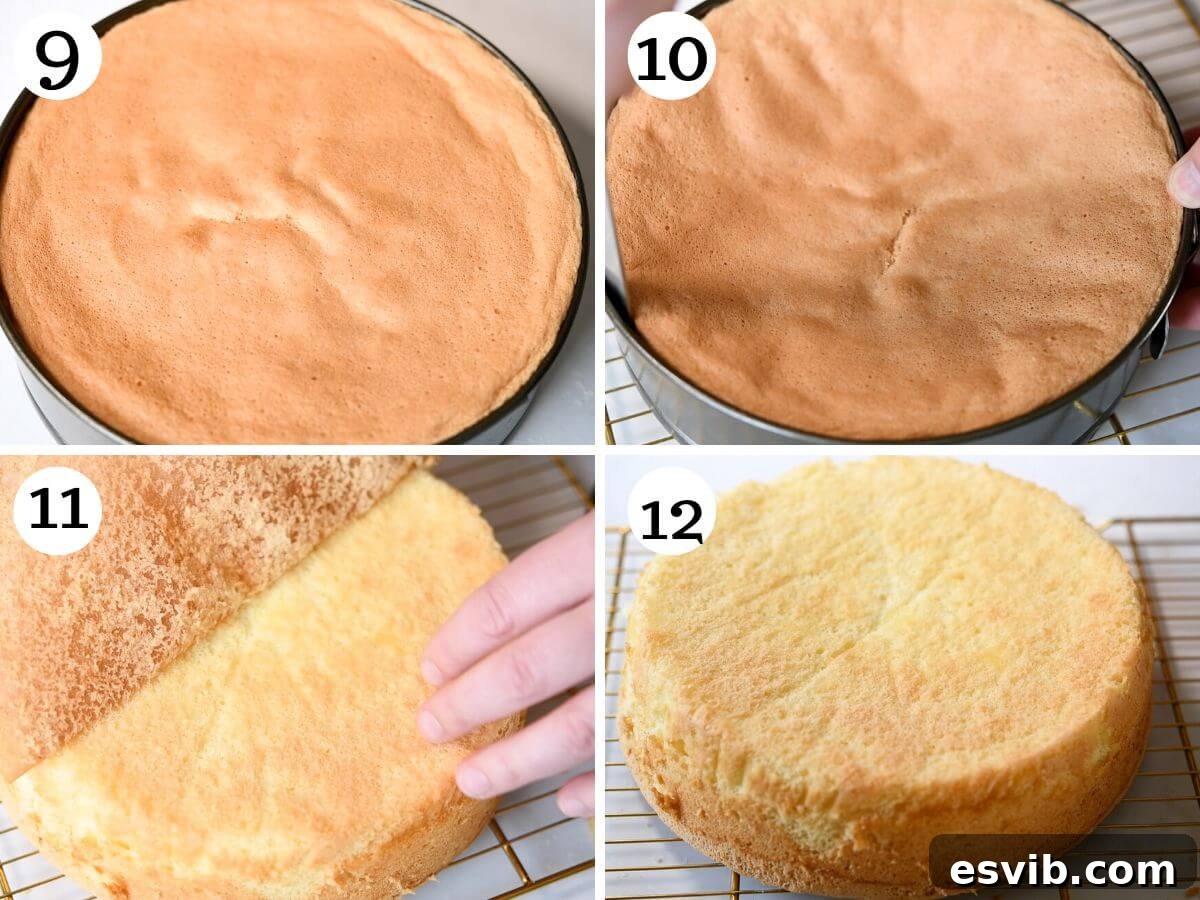
3. Bake: Carefully pour the delicate batter into your prepared cake pan. Gently tap the pan on the counter a couple of times to release any large air bubbles. Bake on the lowest rack of your preheated oven for approximately 35-40 minutes. The sponge is cooked when it springs back lightly to the touch and a wooden skewer or toothpick inserted into the center comes out clean. Avoid opening the oven door too early, as this can cause the delicate sponge to collapse. (See accompanying photos 7-9).
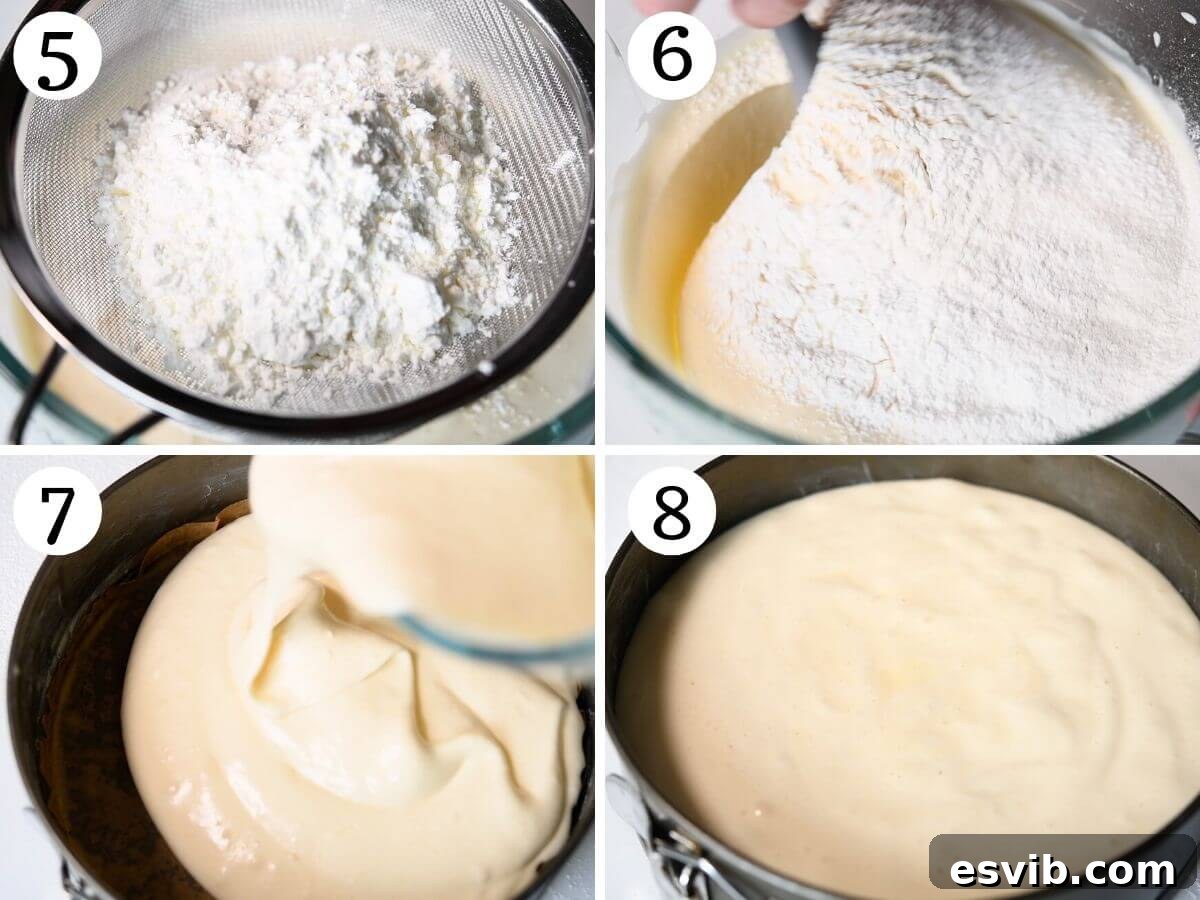
4. Cool: Once baked, remove the cake pan from the oven. Allow the Pan di Spagna to cool in its pan for about 10 minutes, which helps it firm up slightly. Then, carefully invert it onto a wire cooling rack and remove the pan. Let the sponge cool completely to room temperature before proceeding with assembly. A completely cooled sponge is essential for cutting and soaking without crumbling. You can even make the sponge 1-2 days in advance and store it at room temperature, wrapped, to simplify your baking process. (See accompanying photos 10-12).
How to Prepare the Rich Ricotta Fillings
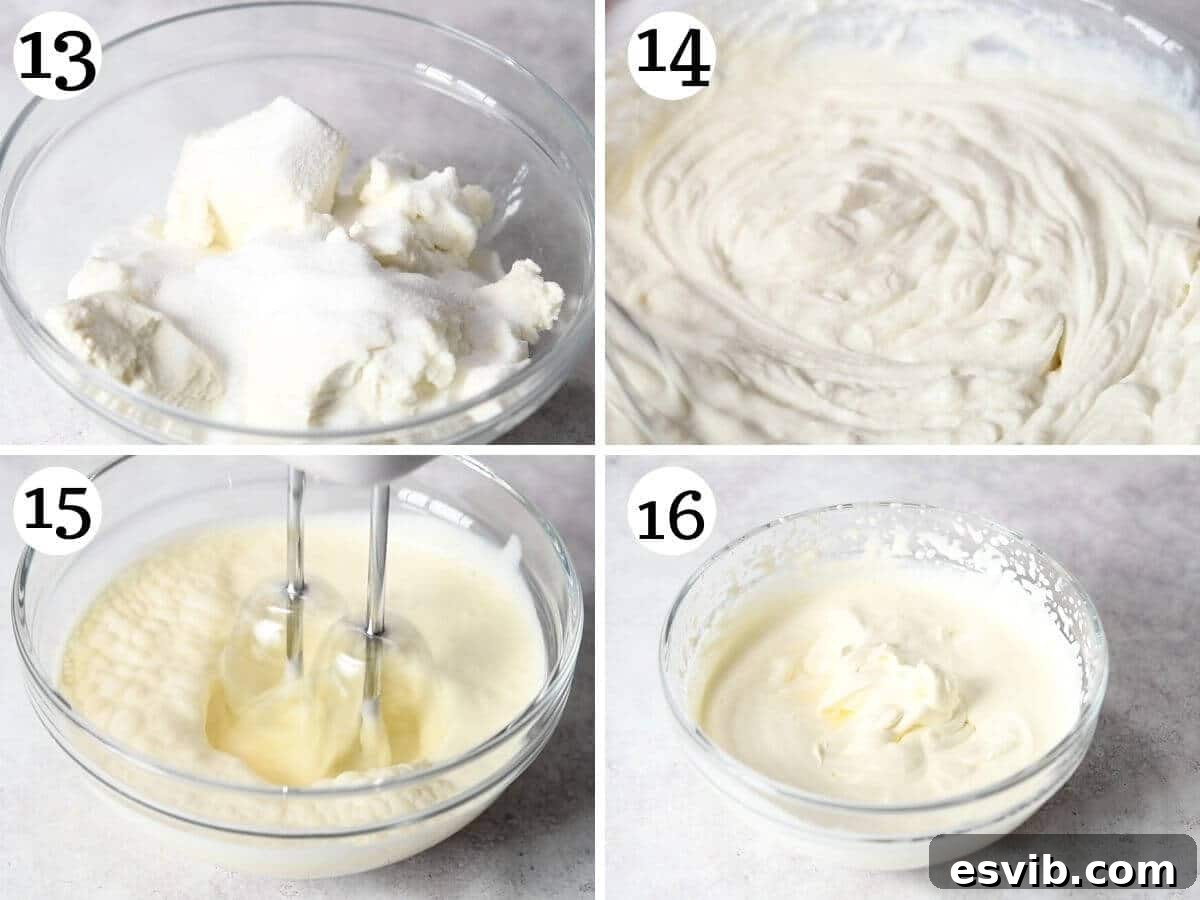
1. Whisk the Ricotta: Prior to this step, ensure your ricotta has been thoroughly drained in a sieve, as instructed in our tips section. Transfer the drained ricotta to a mixing bowl and add the caster sugar. Whisk the ricotta and sugar together until the mixture is beautifully smooth, creamy, and free of any lumps. This creates a sweet, stable base for your fillings. (See accompanying photos 13 & 14).
2. Whip the Cream: In a separate, chilled bowl, using an electric whisk, whip the heavy cream until it forms soft, billowy peaks. Be very careful not to over-whip, as this can lead to a grainy texture. The cream should be smooth, silky, and hold its shape gently. (See accompanying photos 15 & 16).
3. Fold Together: Gently fold the whipped cream into the whisked ricotta mixture. Do this in two or three increments, using a delicate motion to preserve the airiness of the cream. Continue until the cream is just combined with the ricotta, resulting in a unified, light, and fluffy base cream. (See accompanying photo 17).
4. Create White Ricotta Cream: Carefully divide the ricotta-cream mixture. Remove about two-thirds of the mixture to a separate bowl. Into this portion, gently fold in the candied orange (or other candied fruit) until evenly distributed. This will be your vibrant and fruity white ricotta filling. (See accompanying photo 18).
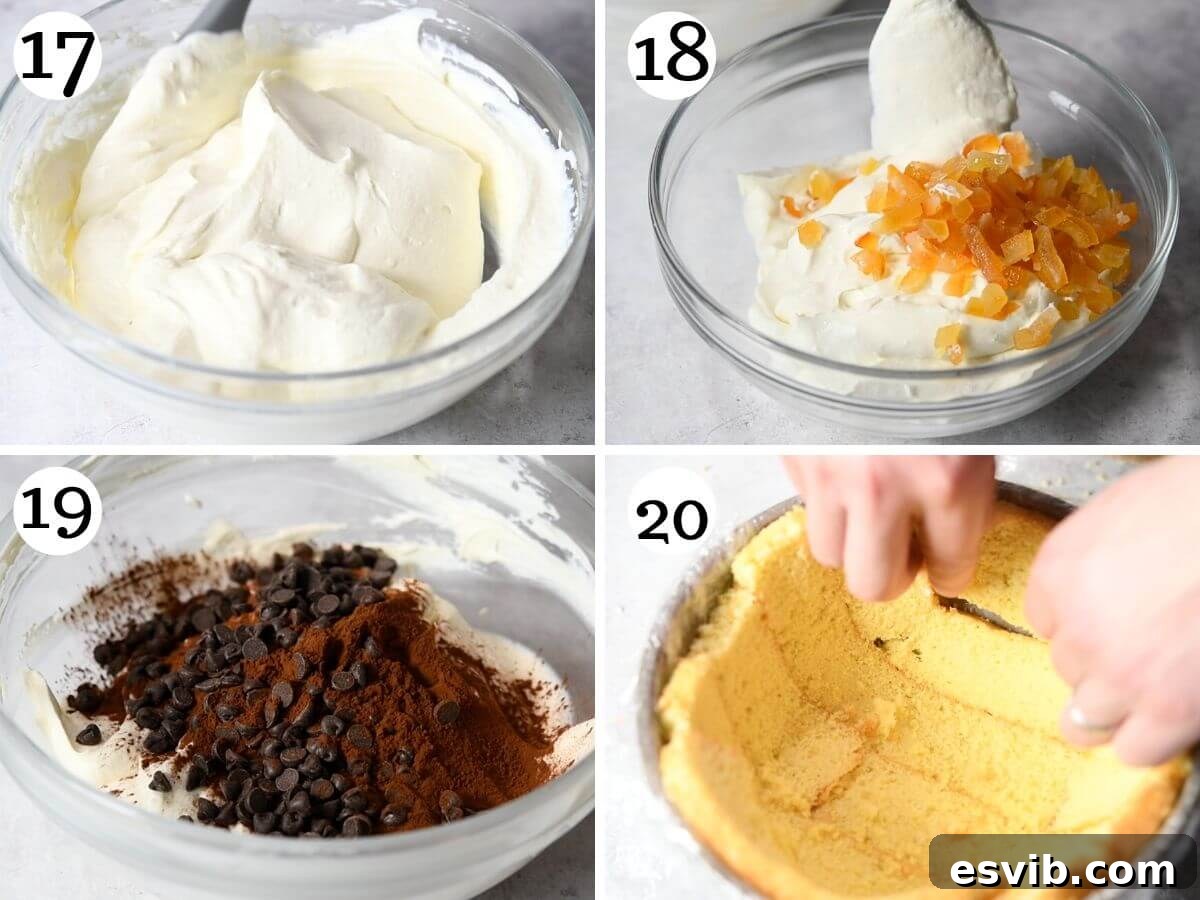
5. Prepare Chocolate Ricotta Cream: To the remaining one-third of the ricotta-cream mixture in the first bowl, sift in the cocoa powder. Add the dark chocolate chips. Gently fold these ingredients together until the cocoa powder is fully incorporated, and the chocolate chips are evenly distributed, creating a rich and indulgent chocolate ricotta filling.
How to Assemble Your Stunning Zuccotto
1. Prepare the Bowl: Select a dome-shaped bowl, approximately 8×4 inches (20×10 cm). Line the entire interior of the bowl generously with plastic wrap (cling film), ensuring there is ample overhang on all sides. This overhang will be crucial for wrapping and sealing the Zuccotto later and, most importantly, for effortless removal once chilled.
2. Layer the Sponge: With a sharp knife, carefully slice off the top golden crust from your cooled Pan di Spagna. You can also gently peel it off with your fingers. Then, cut the sponge cake into even slices, about 1cm (½ inch) thick. Begin arranging these sponge slices inside the plastic-lined bowl, pressing them gently against the sides and bottom to form a continuous, even layer. Don’t be afraid to trim pieces or overlap edges slightly to achieve a snug fit, ensuring there are no gaps. This forms the outer shell of your Zuccotto. (See accompanying photo 20).
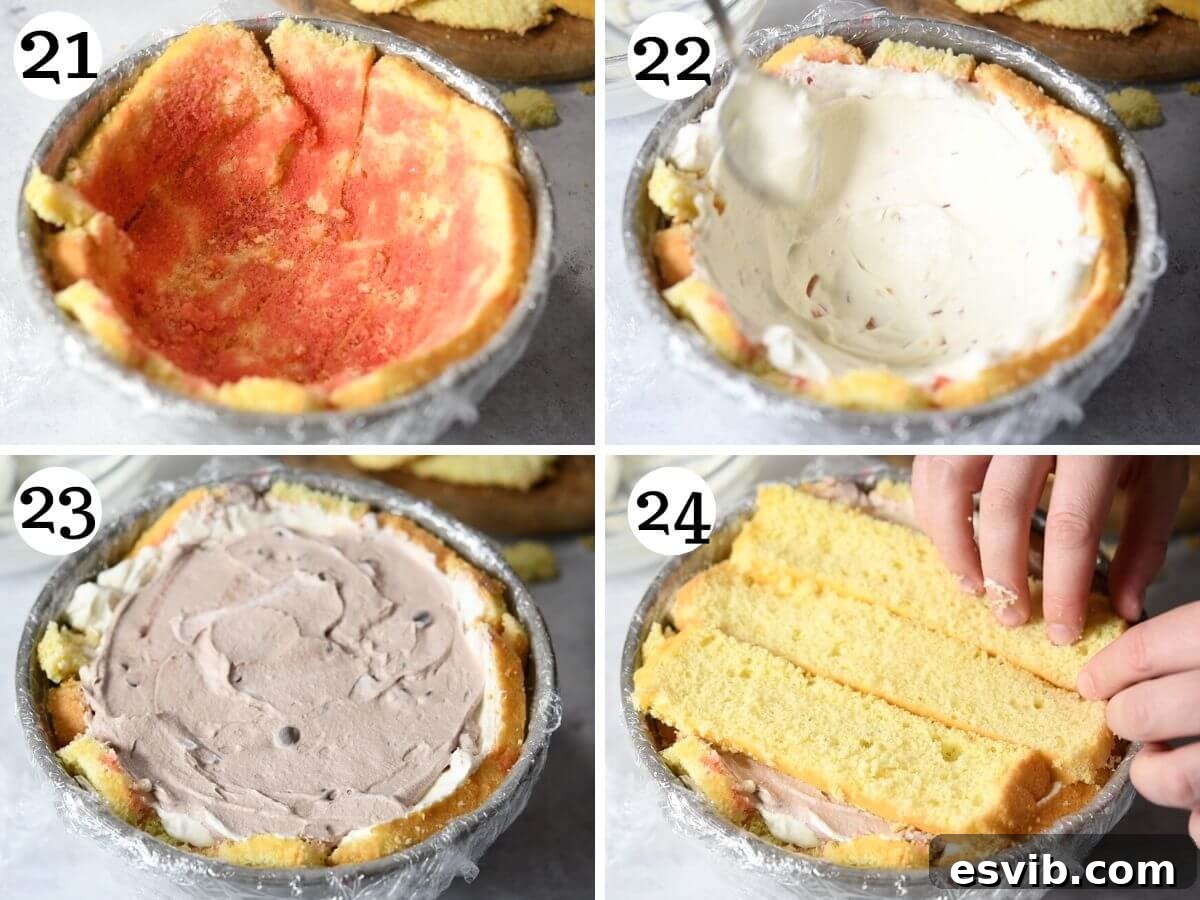
3. First Filling Layer: Using a pastry brush, generously brush the Alchermes liqueur (or your chosen alternative) over the entire sponge cake lining. Ensure the sponge is well-moistened but not soggy. Next, spread the white ricotta cream (with candied fruit) evenly over the liqueur-soaked sponge, creating a smooth, thick layer. This forms the first delicious layer of your Zuccotto. (See accompanying photos 21 & 22).
4. Second Filling Layer and Seal: Now, carefully spoon the chocolate ricotta cream into the center of the Zuccotto, filling the cavity created by the white ricotta layer. Once the chocolate filling is in place, cover the top with more slices of the remaining sponge cake. Trim any overlapping sponge pieces to fit neatly within the bowl, effectively sealing the filling inside. (See accompanying photos 23 & 24).
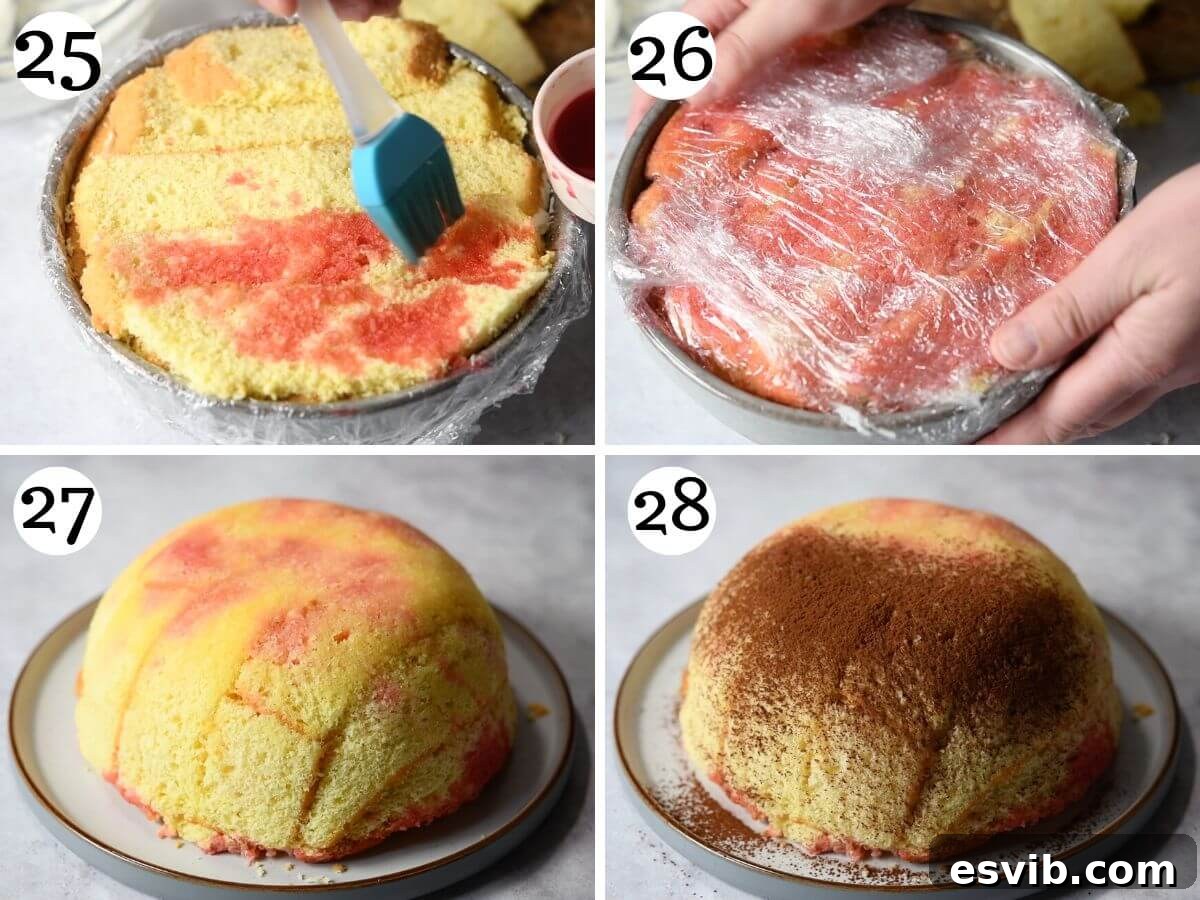
5. Chill and Serve: Brush the top layer of sponge cake with any remaining Alchermes liqueur. Then, gather the overhanging plastic wrap and securely wrap it over the top of the Zuccotto, ensuring it’s completely enclosed. Transfer the bowl to the refrigerator and chill for at least 6 hours, or ideally overnight. This chilling period is crucial for the Zuccotto to firm up, allow the flavors to meld beautifully, and ensure it holds its iconic dome shape. Once thoroughly chilled, remove it from the fridge, unwrap the top plastic wrap, and carefully invert the Zuccotto onto a serving plate. Gently peel off the remaining plastic wrap. For a classic finish, dust generously with cocoa powder before slicing and serving. (See accompanying photos 25-28).
Expert Recipe Tips for Making Zuccotto
- Prepare the Sponge in Advance: Pan di Spagna must be completely cool before you attempt to slice and assemble your Zuccotto. To streamline your baking day, consider preparing the sponge cake 1-2 days ahead of time. Wrap it tightly in plastic wrap once cooled and store at room temperature. As a time-saving alternative, good quality Savoiardi biscuits (ladyfingers) or even a plain store-bought pound cake can be used.
- Drain the Ricotta Properly: This step cannot be emphasized enough. Excess liquid in the ricotta will result in a watery, unstable filling that won’t hold its shape. Place the ricotta in a fine-mesh sieve set over a bowl and let it drain for a minimum of 30-40 minutes. For best results, draining it overnight in the refrigerator is recommended.
- Line Your Bowl Thoroughly: To ensure your Zuccotto releases easily and gracefully from its mold, it is absolutely essential to line your chosen dome-shaped bowl or mold with plastic wrap (cling film). Make sure the plastic wrap extends well beyond the rim of the bowl, providing enough material to wrap over the top of the assembled cake. Without this critical step, removing the Zuccotto will be an extremely challenging and potentially messy endeavor.
Recipe FAQs
Traditional Savoiardi biscuits (Italian ladyfingers) are a very popular and excellent alternative to Pan di Spagna (Italian sponge cake) for Zuccotto. They offer a slightly denser texture and absorb liqueur beautifully. Using ladyfingers will also significantly reduce preparation time, as you won’t need to bake a cake from scratch.
When stored properly in an airtight container in the refrigerator, Zuccotto will maintain its freshness and delightful flavors for up to 5 days. It’s often said that the flavors meld even better on the second day!
Why is it Called Zuccotto? Exploring its History
The intriguing name and unique dome shape of Zuccotto are steeped in Florentine history, with a few fascinating theories vying for origin. Some popular accounts suggest that its distinctive form was inspired by the iconic Duomo of Florence Cathedral, a symbol of the city itself, where this exquisite dessert is believed to have originated.
Another theory links the name to the Italian word ‘Zucca’, meaning ‘pumpkin’ or ‘squash’, perhaps due to its rounded, slightly flattened top, resembling certain gourd varieties. However, extensive historical research points to an even more captivating origin: Zuccotto is believed to be named after the 16th-century Italian Renaissance military helmet. It’s thought that these helmets, with their distinctive rounded shape, were ingeniously repurposed as the very first molds for creating this dessert, giving Zuccotto its instantly recognizable silhouette. While the exact genesis remains a delightful mystery, exploring the rich history behind such traditional dishes always adds an extra layer of appreciation to every bite.
Creative Variations to Try for Your Zuccotto
While our recipe guides you through making a truly traditional Zuccotto, this versatile dessert offers a plethora of opportunities for creative experimentation with different flavors and textures. Don’t hesitate to adapt it to your taste!
Instead of the classic Pan di Spagna or Savoiardi biscuits as the base, consider using other Italian sweet breads. Layers of soft, buttery Brioche, festive Panettone, or airy Pandoro can lend a unique character and flavor profile. For an inspired twist, check out our Panettone Bombe, an ice cream-based version using Panettone, often drizzled with luxurious chocolate sauce, perfect for holiday celebrations.
The filling is another area for endless creativity. Beyond the traditional ricotta, you could experiment with:
- Whipped Cream: A lighter, airier option, often flavored with vanilla or citrus zest.
- Chocolate Pastry Cream (Crema Pasticcera al Cioccolato): For an intensely rich and smooth chocolate experience.
- Semifreddo: A frozen Italian dessert that would transform Zuccotto into a delightful ice cream cake hybrid.
- Ice Cream: Layers of your favorite gelato or ice cream for a refreshing, chilled treat.
You can also play with the liqueur and fruit combinations – perhaps a coffee-soaked sponge with mascarpone cream, or a limoncello-infused cake with berry fillings. The possibilities are truly boundless!
More Traditional Italian Desserts to Savor
Italian Desserts
Pan di Spagna (Italian Sponge Cake)
Italian Desserts
Chocolate Budino (Budino al Cioccolato)
Italian Cookies
Brutti ma Buoni (Ugly but Good Cookies)
Italian Desserts
Tiramisu – Authentic Recipe!
If you’ve tried this **Zuccotto recipe** or any other recipe on our blog, we would love to hear from you! Don’t forget to rate the recipe and share your experience in the comments section below. Your feedback truly helps us create more delicious content! You can also **follow us** on Facebook, Instagram, and Pinterest, or sign up for our Newsletter to receive weekly updates on our latest culinary adventures.
Zuccotto: Traditional Florentine Cake
Most of our recipes include detailed step-by-step photos, helpful tips and tricks for success, and often a video guide!
Zuccotto
By Emily
Print Recipe
Zuccotto is a traditional dome-shaped cake originating in the beautiful city of Florence. It’s made with a classic Italian sponge cake soaked in liqueur and filled with two delicious ricotta fillings including candied fruit and chocolate chips.
Equipment
- 9 inch (23cm) springform cake pan
- 8×4 inch (20×10 cm) dome-shaped bowl (see note 1)
- Baking parchment
- Sieve
- Stand mixer with whisk attachment or electric whisk
- Plastic wrap (cling film)
Ingredients
For the Pan di Spagna (sponge cake)
- 4 large eggs
- 65 g Italian 00 flour (½ cup)
- 65 g corn starch (cornflour, ½ cup)
- 130 g caster sugar (¾ cup)
- 1 teaspoon vanilla extract
- 1 pinch salt
- Butter, for greasing
For the Zuccotto filling
- 1 kg ricotta, drained (4 cups)
- 240 ml heavy (double) cream (1 cup)
- 100 g caster sugar, superfine sugar (½ cup)
- 80 g candied orange (½ cup)
- 1.5 tablespoons cocoa powder, plus extra for dusting
- 4 tablespoons chocolate chips (90g)
- 120 ml Alchermes liqueur, or alternative (½ cup)
Instructions
To make the Pan di Spagna
- Pre-heat the oven to 160°C (325°F). A static oven (no fan) is best for this recipe.
- Grease the cake pan with butter and place a cut-out disk of baking parchment in the bottom of the tin so the cake doesn’t stick.
- Put the eggs, vanilla, and a pinch of salt in a bowl of a stand mixer. Start whisking the eggs on a medium speed and gradually add the sugar in 3 goes.
- Whisk the eggs for 15-20 minutes until thick, pale and fluffy. You’ll know the eggs are whisked enough when you can draw a ribbon in the mixture without it disappearing.
- Sieve both flours (Italian 00 flour and corn starch) into the egg mixture a third at a time, making sure to gently fold the flour into the egg so you don’t remove too much air. Doing this in three goes will also help avoid lumps in the batter.
- Once the flour is fully combined, transfer the batter to the prepared cake pan and bake on the lowest shelf of the oven for 35-40 minutes until an inserted toothpick comes out clean.
- Remove the cake from the oven and let it cool in the tin for 10 minutes, then remove to cool completely on a wire cooling rack.
To make the filling
- Drain the ricotta in a sieve over a bowl to remove the excess liquid for at least 30-40 minutes. You can also leave it to drain in the fridge overnight for best results.
- Once drained, put the ricotta in a bowl and add the sugar. Whisk the sugar and ricotta together until smooth with no lumps.
- In a separate, chilled bowl, whip the heavy cream to soft peaks then gently fold it into the ricotta mixture in ⅓ increments, taking care not to deflate the cream.
- Now it’s time to create two different fillings. Remove about ⅔ of the ricotta mixture and place in another bowl. Add the chopped candied fruit and mix until combined, then set aside. This is your white ricotta cream.
- Sift cocoa powder into the bowl with the remaining third of ricotta, add chocolate chips and mix until thoroughly combined. This is your chocolate ricotta cream.
To Assemble the Zuccotto
- Line an 8×4 inch (20×10 cm) dome-shaped bowl generously with plastic wrap (cling film), ensuring a good overhang on all sides.
- Remove the top golden crust from the cooled sponge cake. You can either thinly slice it off with a knife or gently rub it off with your fingers.
- Cut the cake into 1cm (½ inch) thick slices then arrange them in the lined bowl to create a continuous bottom and side layer. Cut slices to fit your bowl and overlap edges if needed to cover all gaps.
- Next, brush the sponge liberally with the Alchermes or your chosen alternative liqueur (see notes). Spread the white ricotta cream (with candied fruit) all over the inside of the sponge in an even layer. Then, fill the middle of the Zuccotto with the chocolate ricotta cream.
- Use the remaining slices of sponge cake to seal the top of the Zuccotto. Trim any overlapping sponge to fit the bowl snugly. Brush the top sponge layer with more liqueur.
- Wrap the top with the overhanging plastic wrap, sealing the Zuccotto completely. Refrigerate for at least 6 hours to overnight.
- Once thoroughly chilled, remove from the fridge, unwrap the plastic wrap from the top, and carefully overturn the Zuccotto onto a serving plate. Remove the remaining plastic wrap completely.
- Dust generously with cocoa powder before slicing and serving.
Video
A video guide demonstrating the steps for making Zuccotto is available to help you along the way.
Notes
- Size of bowl: You can use a slightly smaller dome-shaped bowl if an 8×4 inch (20×10 cm) bowl is unavailable. Avoid using anything larger, as you may not have enough cake or filling to achieve the desired structure. If you don’t have a suitable dome bowl, you can layer the Zuccotto in a regular casserole dish, similar to how you would assemble a Tiramisu.
- Alchermes Liqueur: If you cannot find Alchermes, which can be a challenging ingredient to source, Amaretto or another preferred liqueur can be used. We recommend diluting stronger liqueurs with a little water (e.g., 1 part liqueur to 1 part water) to prevent the sponge from becoming too overpoweringly alcoholic.
- Non-Alcoholic Option: For a delicious non-alcoholic Zuccotto, you can soak the sponge in strong, sweetened coffee or a simple sugar syrup (equal parts sugar and water, boiled until dissolved and cooled).
- Storage: The assembled Zuccotto keeps exceptionally well in the refrigerator for up to 5 days, making it an excellent make-ahead dessert. It can also be frozen, well-wrapped, for longer storage; thaw slowly in the refrigerator before serving.
Helpful Info for All Our Recipes
- We always use extra virgin olive oil in all of our recipes unless explicitly stated otherwise.
- For canned or jarred tomatoes, we highly recommend using premium brands like Cirio or Mutti for the best flavor and results.
- All vegetables listed in our recipes are assumed to be medium-sized unless otherwise specified.
- All recipes are meticulously tested and developed using a fan (convection) oven. Adjustments may be needed for conventional ovens.
- Find out more about how nutrition information is calculated.
- Explore our must-have Italian Pantry Staples to stock your kitchen.
- Discover all our Essential Kitchen Tools for Italian Cooking for a smooth culinary experience.
Nutrition (per serving)
- Calories: 423 kcal
- Carbohydrates: 44 g
- Protein: 13 g
- Fat: 21 g
- Saturated Fat: 13 g
- Polyunsaturated Fat: 1 g
- Monounsaturated Fat: 5 g
- Trans Fat: 0.01 g
- Cholesterol: 120 mg
- Sodium: 107 mg
- Potassium: 161 mg
- Fiber: 1 g
- Sugar: 31 g
- Vitamin A: 747 IU
- Vitamin C: 0.1 mg
- Calcium: 201 mg
- Iron: 1 mg
Nutrition information is automatically calculated and should be used as an approximation only.
Did you try this recipe?
We’d love to hear your thoughts! Leave a comment below!