

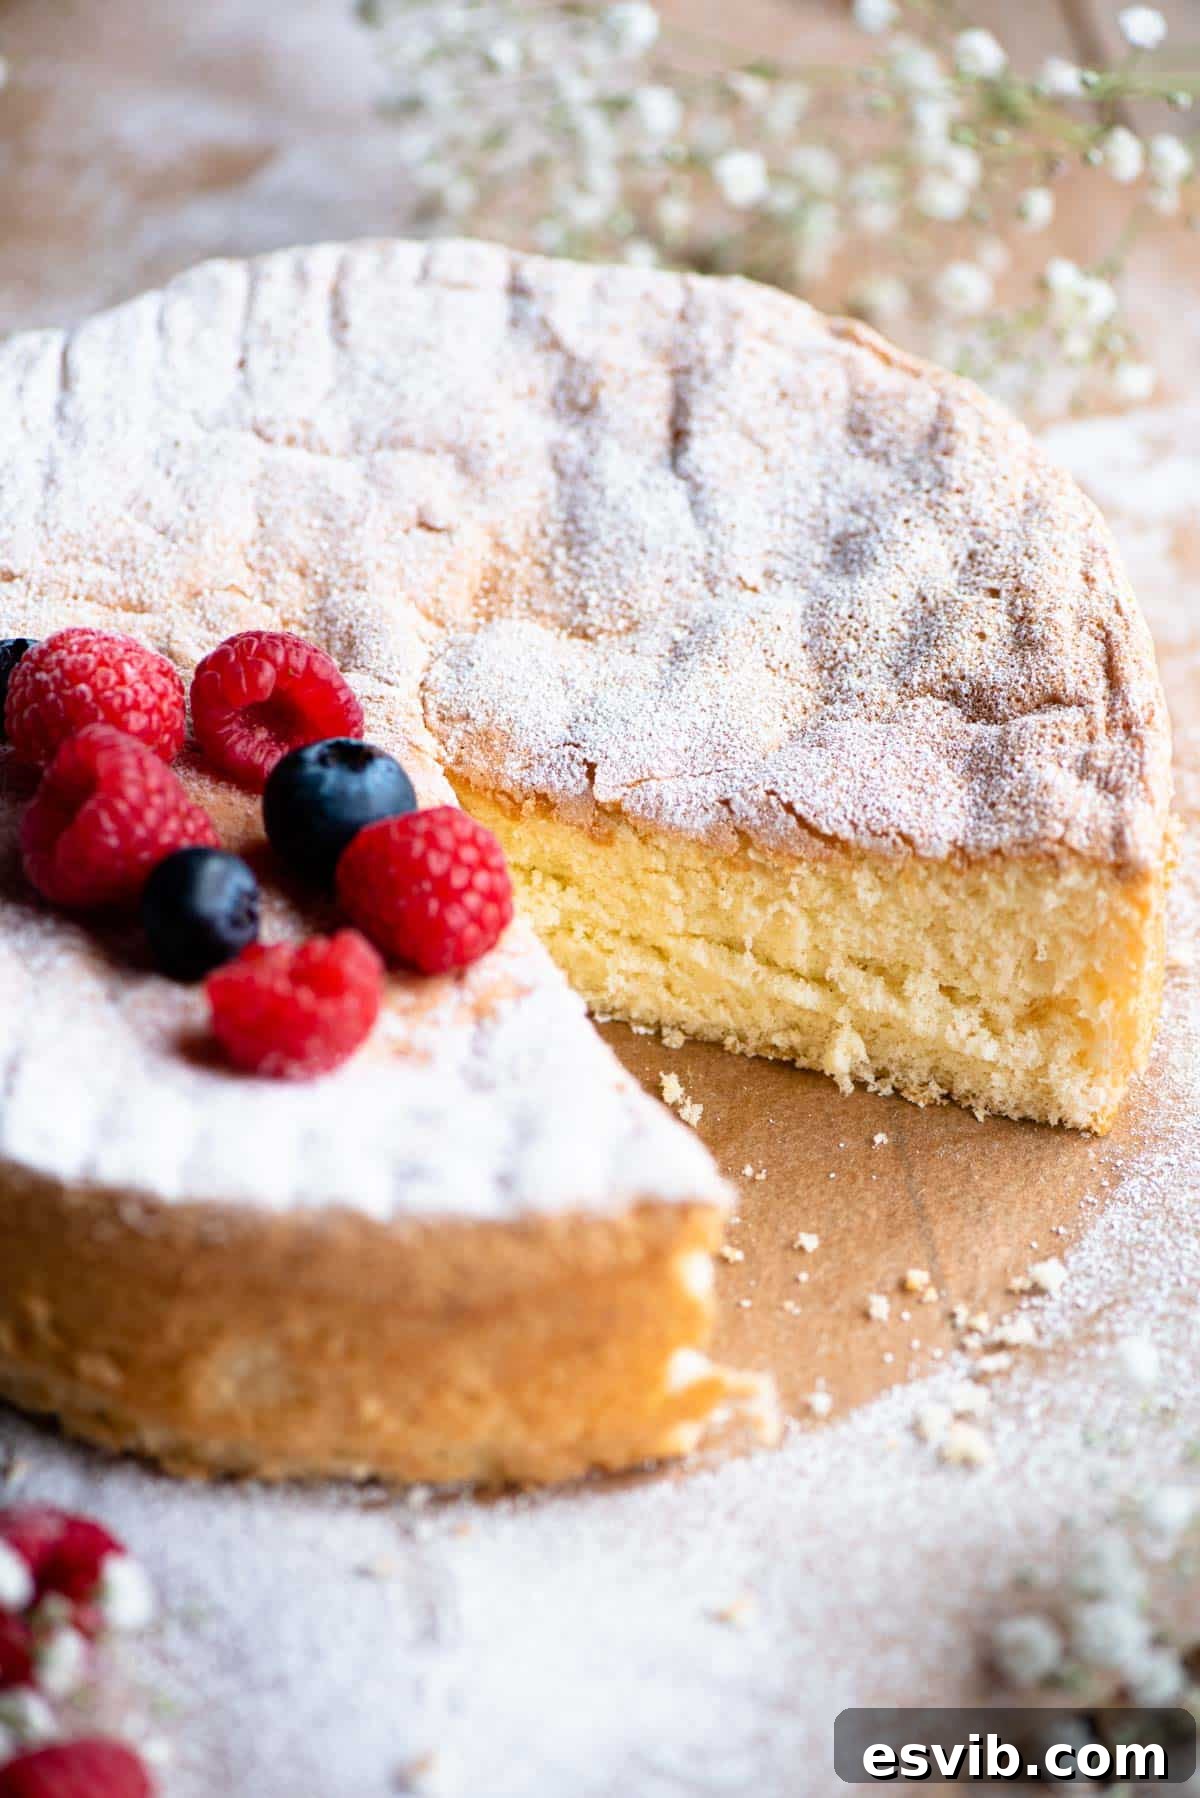
Pan di Spagna, often referred to as “Spanish Bread,” is not bread at all, but a truly exquisite Italian sponge cake. This beloved classic is renowned for its incredibly light, delicate, and airy texture, making it a fundamental component in a myriad of traditional Italian desserts. Crafted from just four essential ingredients—flour, cornstarch, eggs, and sugar—its simplicity belies its remarkable versatility and elegance. Learning to master this foundational sponge cake opens the door to creating show-stopping Italian delicacies like the iconic Zuccotto, the rich Cassata, and even a homemade version of Tiramisu.
What Makes Pan di Spagna So Unique?
In the vast world of cakes, Pan di Spagna stands out for its distinctive characteristics. Unlike many traditional sponge cakes that rely on butter or oil for moisture and baking powder or soda for rise, this Italian marvel is completely fat-free and contains no chemical leavening agents. Its incredible lift and airy consistency are achieved solely through the meticulous whipping of eggs and sugar, creating a stable foam that traps air and forms the cake’s structure. This unique method results in a sponge that is incredibly delicate, almost cloud-like, and wonderfully absorbent, making it the perfect canvas for soaking in liqueurs, syrups, or creamy fillings.
The absence of fat also contributes to its pale, golden hue and a tender crumb that practically melts in your mouth. Whether enjoyed simply dusted with powdered sugar, layered with fresh fruit, or transformed into an elaborate dessert, Pan di Spagna embodies the elegance and simplicity that defines much of Italian baking.
The Simple Magic: Key Ingredients Explained
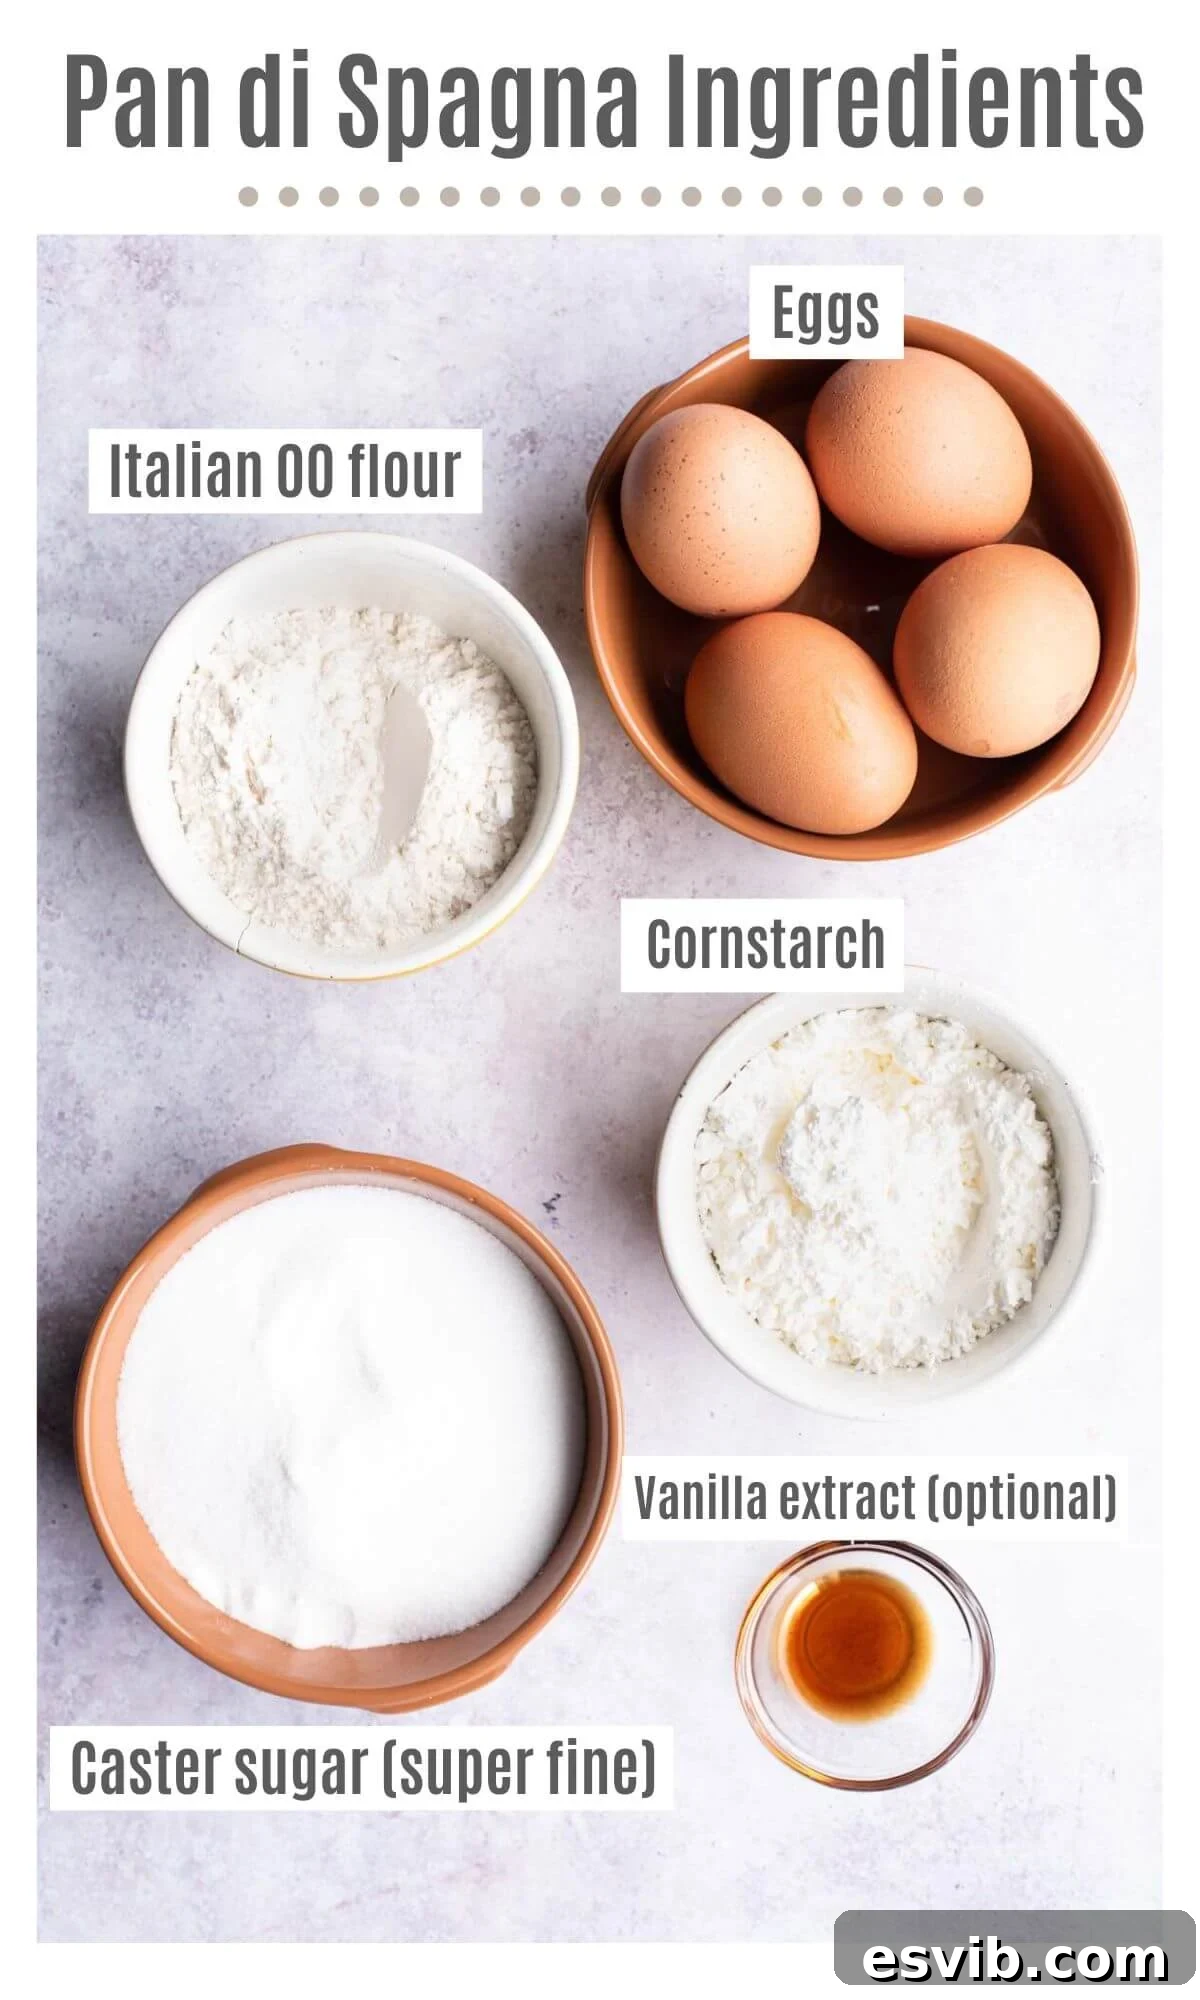
Achieving the perfect Pan di Spagna begins with understanding the role of each of its humble ingredients. Quality and proper preparation are paramount for this seemingly simple recipe.
Eggs: The Heart of the Sponge
- Room Temperature Eggs: This is non-negotiable! Cold eggs do not whip as easily or incorporate as much air as room temperature eggs. Allowing your eggs to sit out for at least 30 minutes (or even longer) before baking ensures they reach their maximum volume when whipped, which is critical for the cake’s rise and light texture. Use large, free-range eggs for the best results.
Sugar: Sweetness and Structure
- Caster Sugar (Superfine Sugar): This finely granulated sugar dissolves quickly into the eggs, helping to create a smooth, stable meringue-like foam. It not only provides sweetness but also helps stabilize the whipped eggs, contributing to the cake’s overall structure and preventing it from collapsing.
Flour & Starch: For Unmatched Tenderness
- Italian 00 Flour: While all-purpose flour (plain flour in the UK) can be used, authentic Italian 00 flour is highly recommended. Its very fine texture and lower protein content contribute to an exceptionally tender and delicate crumb, which is a hallmark of Pan di Spagna.
- Corn Starch (Cornflour UK): This ingredient is key to achieving the signature lightness of Pan di Spagna. Traditionally, Italian recipes often call for Fecola di Patate (potato starch). Since potato starch can be harder to find, corn starch is an excellent and readily available substitute. It softens the flour’s gluten, resulting in a wonderfully airy and soft sponge that isn’t chewy.
A Touch of Flavor: Vanilla and Salt
- Vanilla Extract: While optional, a good quality vanilla extract (or the seeds of a vanilla bean) adds a beautiful aromatic depth that complements the simple flavors of the cake.
- Pinch of Salt: A small amount of salt enhances all the other flavors, balancing the sweetness and making the cake taste even better.
A Glimpse into History: The Origin of “Spanish Bread”
The intriguing name “Pan di Spagna,” which literally translates to “Spanish Bread,” often sparks curiosity about its origins within Italian culinary traditions. While firmly established as an Italian classic, its nomenclature hints at a fascinating historical connection.
The most widely accepted theory traces its lineage back to the mid-18th century, specifically to the Republic of Genoa. It is believed that a talented Genovese chef named Giovan Battista Cabona, who served at the court of Domenico Pallavicini (then ambassador of the Republic of Genoa to Spain), created this extraordinary cake. During a diplomatic visit to Spain, Cabona reportedly presented this innovative sponge cake to King Ferdinand VI and his court. The Spanish royal family and nobility were so captivated by its unprecedented lightness and delicate texture that they enthusiastically dubbed it “Génoise sponge” or “Pan di Spagna,” recognizing its Genovese origin and its Spanish debut. The name stuck, and the recipe quickly spread across Europe, eventually becoming a cornerstone of Italian patisserie.
Whether this delightful anecdote is entirely historically accurate or partly embellished by time, one thing is certain: Pan di Spagna has cemented its place as a beloved staple across all regions of Italy, cherished for its elegant simplicity and endless possibilities in dessert creation.
Crafting Your Perfect Pan di Spagna: Step-by-Step Guide
Creating a flawless Pan di Spagna involves precision and patience, especially when it comes to whipping the eggs and folding the dry ingredients. Follow these steps for a truly exceptional sponge.
Preparation: Setting the Stage for Success
- Pre-heat Oven: Begin by preheating your oven to 320°F (160°C). A static oven (without a fan) is generally preferred for this recipe, as it provides a more even and gentle bake, preventing the cake from drying out or developing a hard crust too quickly.
- Prepare Cake Pan: Grease an 8.5-inch (22cm) springform cake tin thoroughly with butter. Then, line the bottom with a perfectly cut disk of baking parchment. This preparation is crucial to ensure the delicate sponge releases easily from the pan once baked.
Whipping Eggs and Sugar to the “Ribbon Stage”
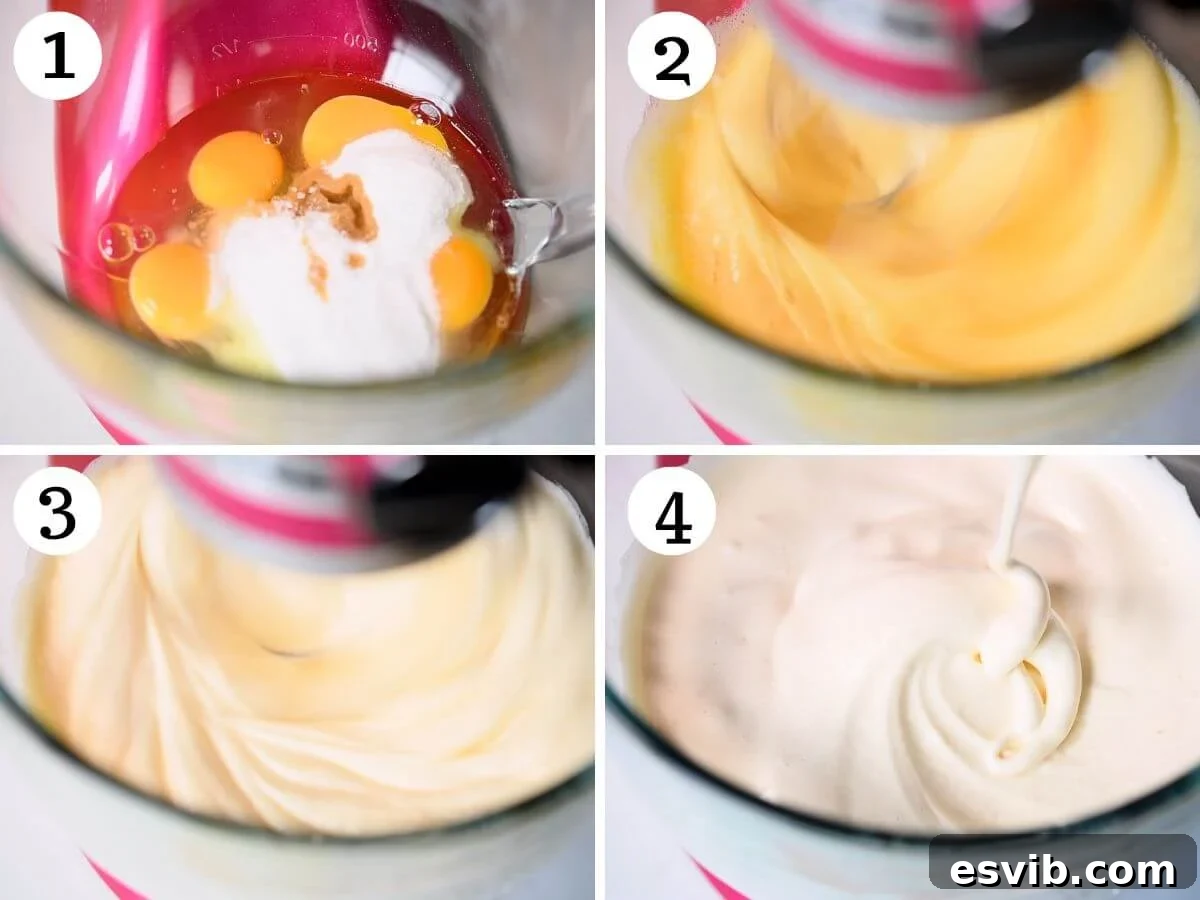
- Combine Ingredients: In the bowl of a stand mixer fitted with a whisk attachment (or using an electric hand whisk), combine the room temperature eggs, caster sugar, vanilla extract (if using), and a pinch of salt.
- Whip Extensively: Begin whisking on medium speed. Gradually increase the speed to medium-high and continue to beat the mixture for an impressive 15-20 minutes. This extended whipping time is fundamental. The mixture will transform from a pale yellow liquid into a thick, pale, and incredibly fluffy foam.
- Achieving the Ribbon Stage: You’ll know the mixture is ready when it reaches the “ribbon stage.” To test, lift the whisk and let the mixture fall back into the bowl. It should form a thick ribbon that holds its shape on the surface for several seconds before slowly disappearing. This indicates that sufficient air has been incorporated and the egg structure is stable. Do not rush this step, as it’s the primary leavening for the cake.
Gently Folding in Dry Ingredients: The Secret to Airiness
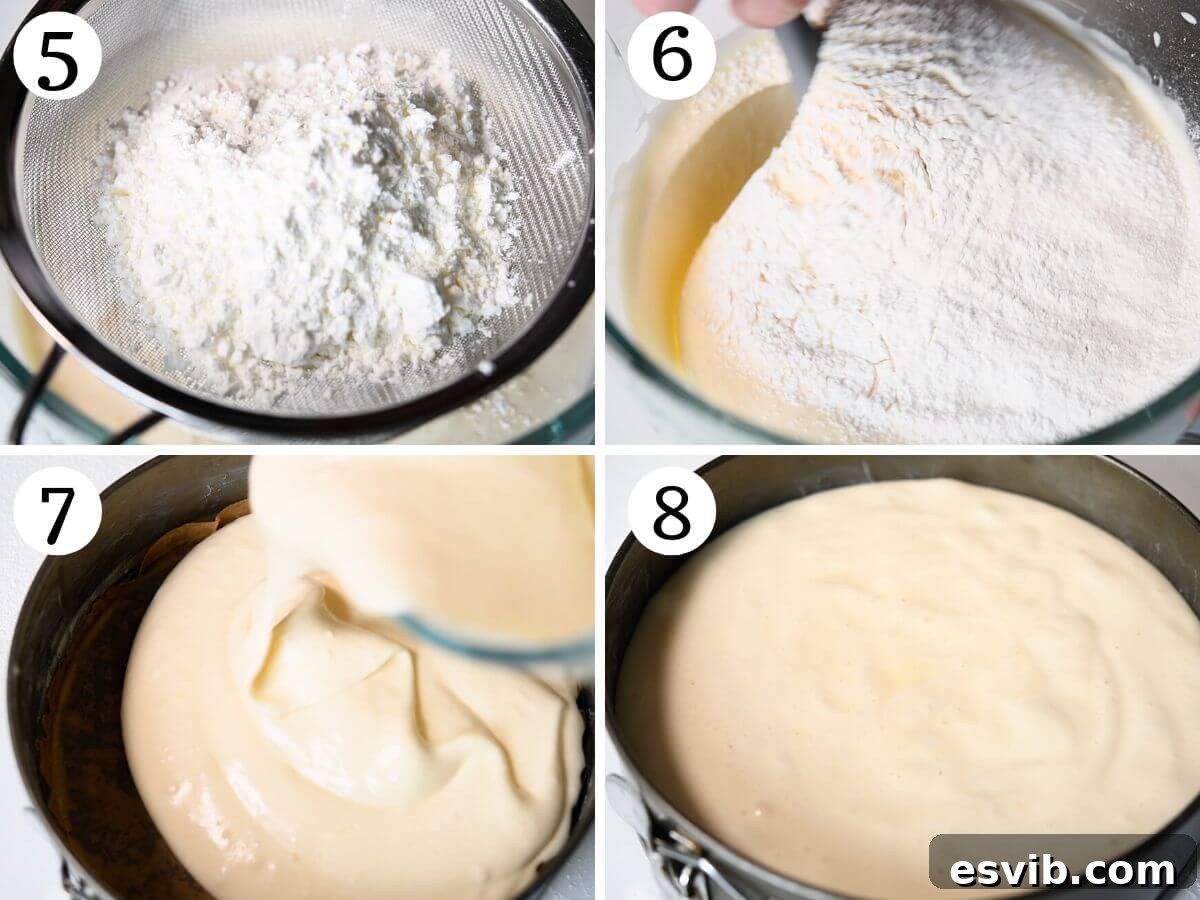
- Sift Dry Ingredients: Sift both the 00 flour and cornstarch together. Sifting aerates the flours and prevents lumps, ensuring a smooth batter.
- Fold in Increments: Gently fold one-third of the sifted flour mixture into the whipped eggs using a spatula. Use a cutting and folding motion, turning the bowl as you go. The goal is to incorporate the flour without deflating the precious air you’ve whipped into the eggs. Repeat with the remaining two-thirds of the flour, adding it in separate increments until just combined. Overmixing will cause the batter to lose volume.
Baking to Golden Perfection: Oven Management
- Transfer to Pan: Carefully transfer the airy batter into your prepared cake pan. Gently flatten the top with a spatula, but avoid tapping the pan on the work surface, as this can release air and cause the cake to sink.
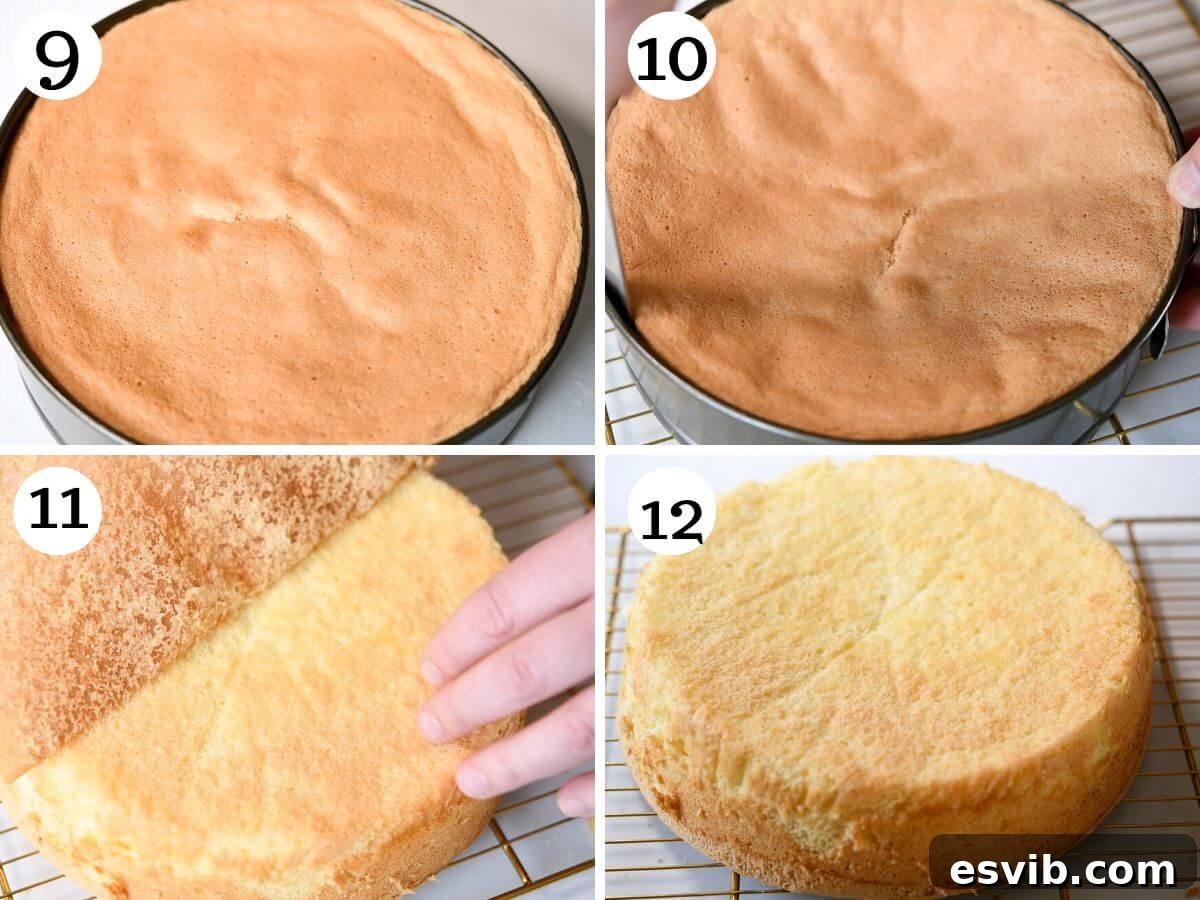
- Bake Evenly: Place the cake pan on the lowest shelf of your preheated oven. Bake for approximately 35-40 minutes. The cake is done when a wooden skewer or toothpick inserted into the center comes out clean. The top should be golden brown and spring back lightly when touched.
- Crucial: Do NOT Open Oven Door: Resist the temptation to open the oven door during the first 30 minutes of baking. A sudden change in temperature can cause the delicate structure of the Pan di Spagna to collapse, resulting in a dense, sunken cake.
Cooling for Optimal Texture: Patience is a Virtue
- Initial Cooling in Pan: Once baked, remove the cake from the oven and let it cool in the springform pan for 5-10 minutes. This brief period allows the cake to stabilize its delicate structure.
- Transfer to Cooling Rack: After the initial cooling, carefully remove the cake from the pan and transfer it to a wire cooling rack to cool completely. Allowing it to cool entirely in the pan can trap steam, leading to a soggy bottom, or worse, overbaking and drying out the edges.
Expert Tips for Pan di Spagna Mastery
- Embrace Your Kitchen Scale: For baking, especially delicate recipes like Pan di Spagna, weighing your ingredients with a kitchen scale is far more accurate than using volume measurements (like cups). Flour, in particular, can be easily over-measured when scooped into a cup, leading to a denser cake. Consistent results come from precise measurements.
- Room Temperature is King for Eggs: As highlighted, eggs must be at room temperature. This allows them to incorporate air more efficiently, yielding a higher volume and a more stable foam, which is crucial for the cake’s lift without leavening agents.
- Whip Those Eggs Thoroughly: The success of your Pan di Spagna hinges on the egg and sugar mixture reaching the “ribbon stage.” Don’t cut this time short. It needs to be pale, thick, and fluffy enough to leave a visible ribbon on the surface when the whisk is lifted.
- Fold with a Feather-Light Touch: When adding the sifted flours, do so gently and in stages. Use a light hand and a folding motion with your spatula to avoid deflating the air from the whipped eggs. Overmixing will lead to a dense, chewy cake.
- “No Peeking” Rule for the Oven: Avoid opening the oven door, especially during the first two-thirds of the baking time. A sudden drop in temperature can cause the delicate sponge to sink irreversibly. Trust your oven and the suggested baking time.
- Cool Correctly to Preserve Texture: The cooling process is also vital. Allow the cake to rest in its pan for 5-10 minutes to set, then promptly transfer it to a wire rack to cool completely. This prevents overbaking and ensures even cooling, maintaining its light and tender texture.
- Prevent Drying Out: Due to its fat-free nature, Pan di Spagna can dry out quickly. Always wrap it tightly in plastic wrap once completely cooled, or store it in an airtight container.
Beyond the Basics: Creative Uses & Flavor Variations
Pan di Spagna is a true culinary chameleon, adaptable to countless Italian dessert creations and delightful on its own. Its mild flavor and airy texture make it incredibly versatile.
Classic Italian Desserts Featuring Pan di Spagna
- Zuccotto: This iconic Florentine dome-shaped dessert traditionally uses Pan di Spagna slices to line a bowl, which is then filled with a rich mixture of ricotta cheese, chocolate, and candied fruit, often soaked in a liqueur.
- Cassata Siciliana: A vibrant and elaborate Sicilian cake, Cassata features Pan di Spagna layered with sweetened ricotta cheese, candied fruit, and often covered in marzipan, creating a stunning presentation and a symphony of flavors.
- Tiramisu: While ladyfingers (Savoiardi) are traditional, Pan di Spagna makes an excellent, more substantial substitute for homemade Tiramisu. Its ability to absorb coffee and liqueur creates a wonderfully moist and flavorful base for the creamy mascarpone layers.
- Zuppa Inglese: An Italian trifle, Zuppa Inglese involves layers of Pan di Spagna (often soaked in Alchermes liqueur), rich Italian pastry cream (Crema Pasticcera), and sometimes chocolate or fruit.
Elegant Layer Cakes and Simple Servings
- Layer Cakes: Pan di Spagna is the ultimate foundation for elegant layer cakes. Its light texture pairs beautifully with a variety of fillings. Consider classic Crema Pasticcera (Italian pastry cream), a decadent Crema al Cioccolato (chocolate pastry cream), or an irresistible Crema al Pistacchio (pistachio cream). Fresh whipped cream and berries also make a superb and refreshing filling.
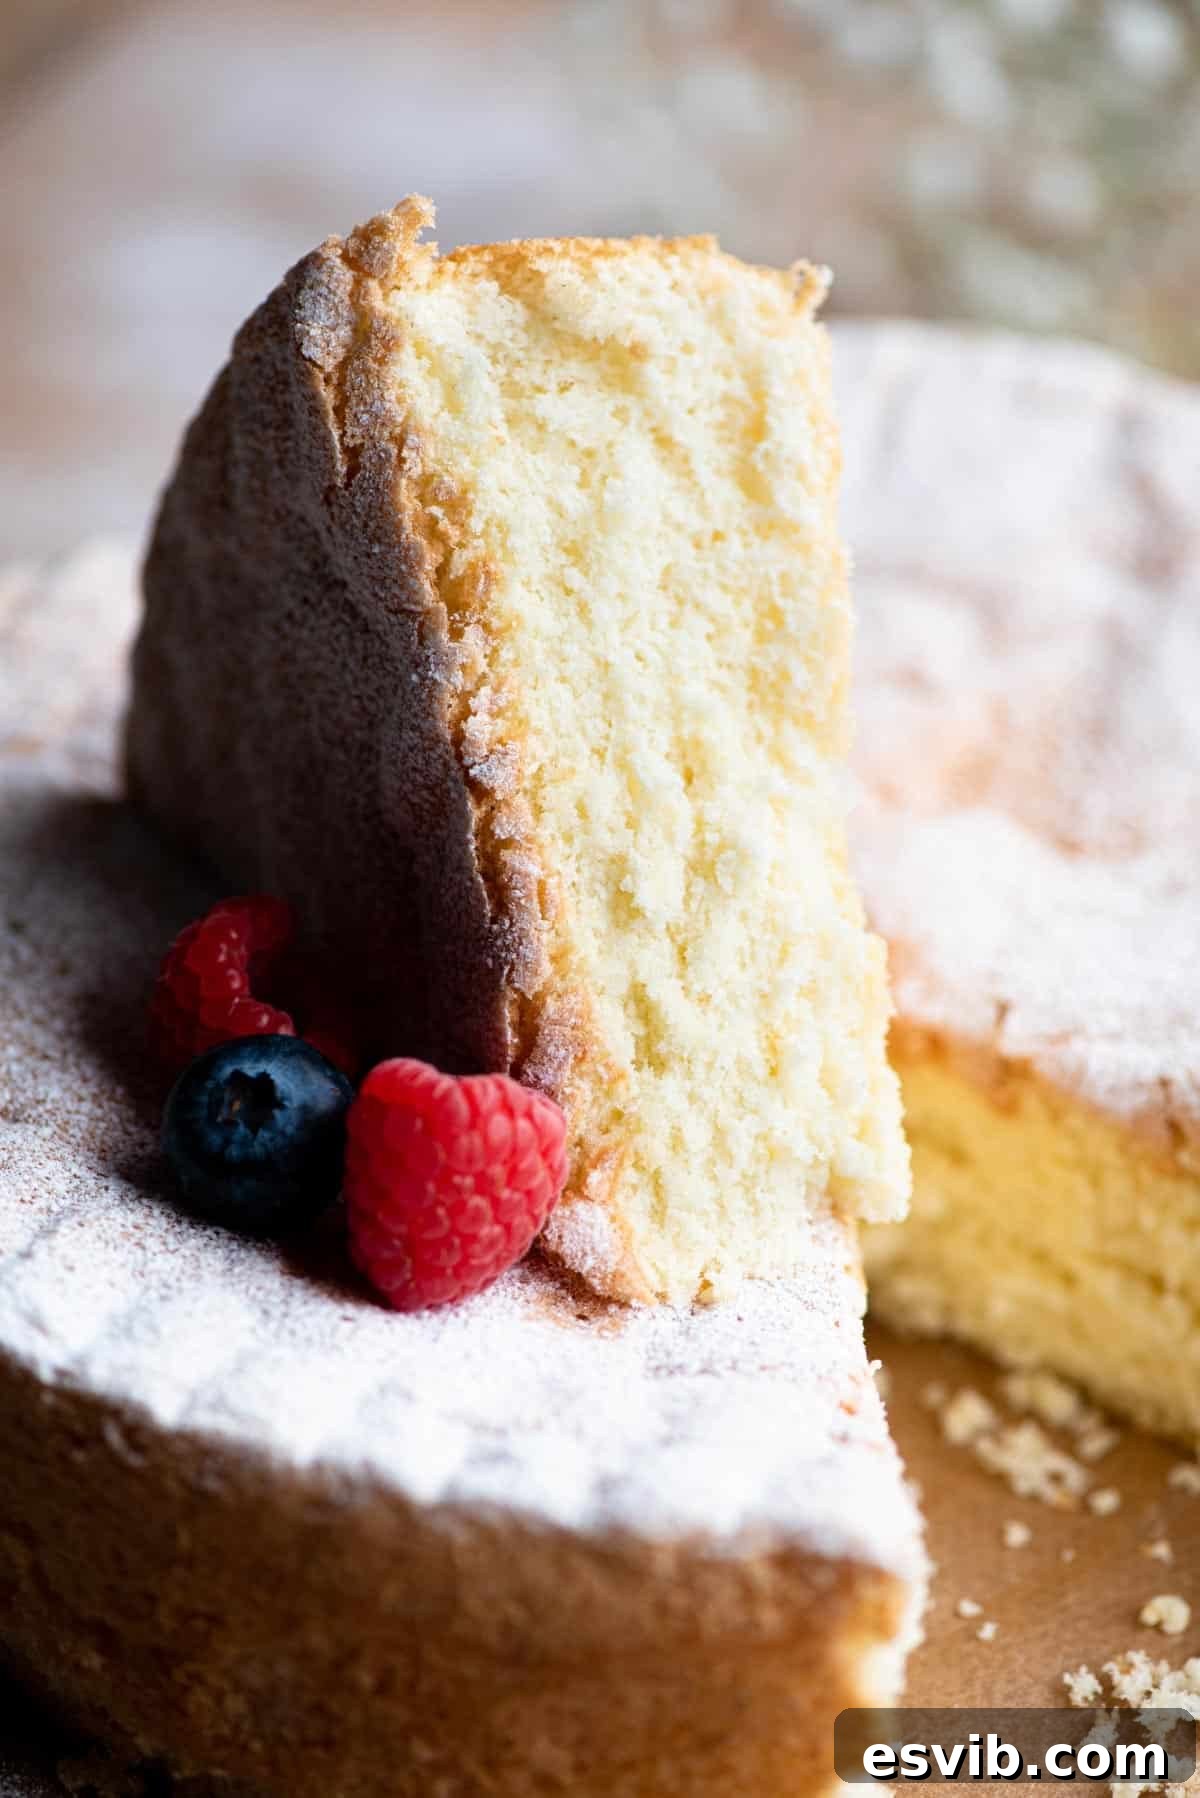
- Simple Enjoyment: For a less elaborate but equally satisfying treat, serve slices of Pan di Spagna simply dusted with a generous amount of powdered sugar and accompanied by fresh seasonal berries or a dollop of fruit compote. It’s also delicious with a cup of coffee or tea.
Infusing Flavor: Customizing Your Sponge
- Citrus Zest: Add finely grated lemon or orange zest to the egg mixture for a bright, refreshing aroma and flavor. Vanilla and lemon zest together create a particularly delightful combination.
- Cocoa Powder: For a chocolate version, replace a small portion of the flour with unsweetened cocoa powder (e.g., replace 15-20g of flour with cocoa powder, ensuring the total dry ingredients remain the same weight).
- Almond Extract: A teaspoon of almond extract can add a sophisticated nutty dimension to the cake.
- Coffee Infusion: For a subtle coffee flavor, you can dissolve a teaspoon of instant espresso powder in a small amount of warm water and add it to the egg mixture.
Storing Your Pan di Spagna: Keeping it Fresh
Due to its minimal fat content, Pan di Spagna tends to dry out more quickly than butter-based cakes. Proper storage is key to maintaining its wonderful texture and freshness.
- Airtight Storage: Once completely cooled, it is crucial to wrap the Pan di Spagna tightly in plastic wrap or store it in an airtight container. This barrier prevents air exposure, which is the main culprit for drying.
- Shelf Life: Stored correctly at room temperature, the plain sponge will remain fresh for about 2-3 days without becoming overly dry. If you’ve used the Pan di Spagna as a base for a dessert with cream fillings or frostings (like Zuccotto or a layer cake), it will generally last a little longer, typically around 4-5 days, as the moisture from the filling helps keep the cake tender.
- Freezing: Pan di Spagna freezes beautifully. Wrap the cooled cake (whole or in slices) tightly in plastic wrap, then an additional layer of aluminum foil. It can be frozen for up to 2-3 months. Thaw overnight in the refrigerator before using.
Frequently Asked Questions
What is the difference between Pan di Spagna and a regular sponge cake?
The primary differences lie in the fat content and leavening agents. A “regular” or American-style sponge cake often includes butter or oil, and typically uses baking powder or baking soda as chemical leavening. This results in a cake that is generally more moist and denser. Pan di Spagna, conversely, is a fat-free sponge that relies entirely on the air whipped into the eggs for its rise. This method produces a much lighter, drier, and incredibly airy texture, making it ideal for absorbing syrups and creams without becoming heavy.
What’s the best cake pan to use for Pan di Spagna?
For this recipe, a 9-inch (23cm) springform cake pan is highly recommended. The springform design, with its removable bottom, makes it much easier to release the delicate sponge without damaging its structure. Always remember to grease the pan with butter and line the bottom with baking parchment for a smooth release.
The Pan di Spagna Recipe
Ready to bake your own light and airy Italian sponge cake? Here is the full recipe for Pan di Spagna.
Pan di Spagna (Italian Sponge Cake)
By Emily
25 mins
40 mins
1 hr 5 mins
12 servings
Equipment
- 8.5 inch springform cake tin
- Baking parchment
- Sieve
- Stand mixer with whisk attachment or electric whisk
Ingredients
- 4 large eggs, at room temperature (do not use cold eggs)
- 65 g Italian 00 flour (00 is recommended but all-purpose flour can also be used) (1/2 cup)
- 65 g corn starch (cornflour) (1/2 cup)
- 130 g caster sugar (superfine sugar) (3/4 cup)
- 1 teaspoon vanilla extract (optional, see notes for other flavor options)
- 1 pinch salt
- Butter, for greasing
Instructions
- Pre-heat the oven to 320°F (160°C). A static oven (no fan) is best for this recipe.
- Grease the cake tin with butter and place a cut-out disk of baking parchment in the bottom of the tin so the cake doesn’t stick.
- Put the eggs, vanilla, and a pinch of salt in a bowl of a stand mixer. Start whisking the eggs on a medium speed and gradually add the sugar in 3 goes.
- Whisk the eggs for 15-20 minutes until thick, pale and fluffy. You’ll know the eggs are whisked enough when you can draw a ribbon in the mixture without it disappearing.
- Sieve both flours into the egg mixture a third at a time, making sure to gently fold the flour into the egg so you don’t remove too much air. Doing this in three goes will also help avoid lumps in the batter.
- Once the flour is fully combined, transfer the batter to the cake tin and bake on the lowest shelf of the oven for 35-40 minutes until an inserted toothpick comes out clean.
- Remove the cake from the oven and let it cool in the tin for 10 minutes, then remove it and let it cool completely on a cooling rack.
Video
Notes
-
- Use a kitchen scale: As with any baking recipe, the only way to get accurate results every time is to weigh the flour with a kitchen scale. I always test our recipes using a scale, but it’s very easy to over-measure flour using cups, so I don’t recommend it for baking.
- Use room temperature eggs: Make sure that your eggs are at room temperature before you start making the cake for optimal whipping volume.
- Don’t overmix: When folding the flour into the egg mixture, do it gently to avoid knocking the air out of the egg and overmixing the batter.
- Don’t open the oven door! It’s very important not to open the oven door until the end of baking, or the cake will sink.
- Letting it cool: Let the cake cool for 5-10 minutes in the cake pan, but then remove it to a cooling rack. Don’t let it cool completely in the cake pan, or it has a risk of overbaking and drying out.
- Storage: Wrap the Pan di Spagna tightly in plastic wrap or store in an air-tight container, otherwise it’ll dry out quickly due to its low-fat content. It’ll keep well for up to 3 days. If used in a layered dessert, it may last a little longer.
Helpful Info for All Recipes
- I always use extra virgin olive oil in all of my recipes unless stated otherwise.
- When I use canned or jarred tomatoes of any kind, I always use Cirio or Mutti brands for the best results and flavor.
- All vegetables are medium sized unless stated otherwise.
- All recipes are tested and developed using a fan (convection) oven.
- Find out more about how nutrition is calculated.
- Check out our must-have Italian Pantry Staples.
- You can also find all our Essential Kitchen Tools for Italian Cooking.
Nutrition
Calories: 104kcal
|
Carbohydrates: 20g
|
Protein: 2g
|
Fat: 1g
|
Saturated Fat: 0.5g
|
Polyunsaturated Fat: 0.3g
|
Monounsaturated Fat: 1g
|
Trans Fat: 0.01g
|
Cholesterol: 55mg
|
Sodium: 25mg
|
Potassium: 27mg
|
Fiber: 0.2g
|
Sugar: 11g
|
Vitamin A: 79IU
|
Calcium: 9mg
|
Iron: 1mg
Nutrition information is automatically calculated and should only be used as an approximation.
More Italian Dessert Inspiration
Italian Desserts
Zuppa Inglese (Italian Trifle)
Italian Desserts
Irresistible Chocolate Tiramisu
Italian Desserts
Italian Pastry Cream: Crema Pasticcera
Italian Desserts
Chocolate Pastry Cream (Crema al Cioccolato)
If you’ve tried this Pan di Spagna recipe or any other recipe on the blog, then don’t forget to rate the recipe and let me know how you got on in the comments below! I love hearing from you! You can also follow us on Facebook, Instagram, and Pinterest, or sign up to our Newsletter to see more of our delicious food.