
Authentic Italian Butter Cookies: Crafting Perfection with Pasta Frolla Montata
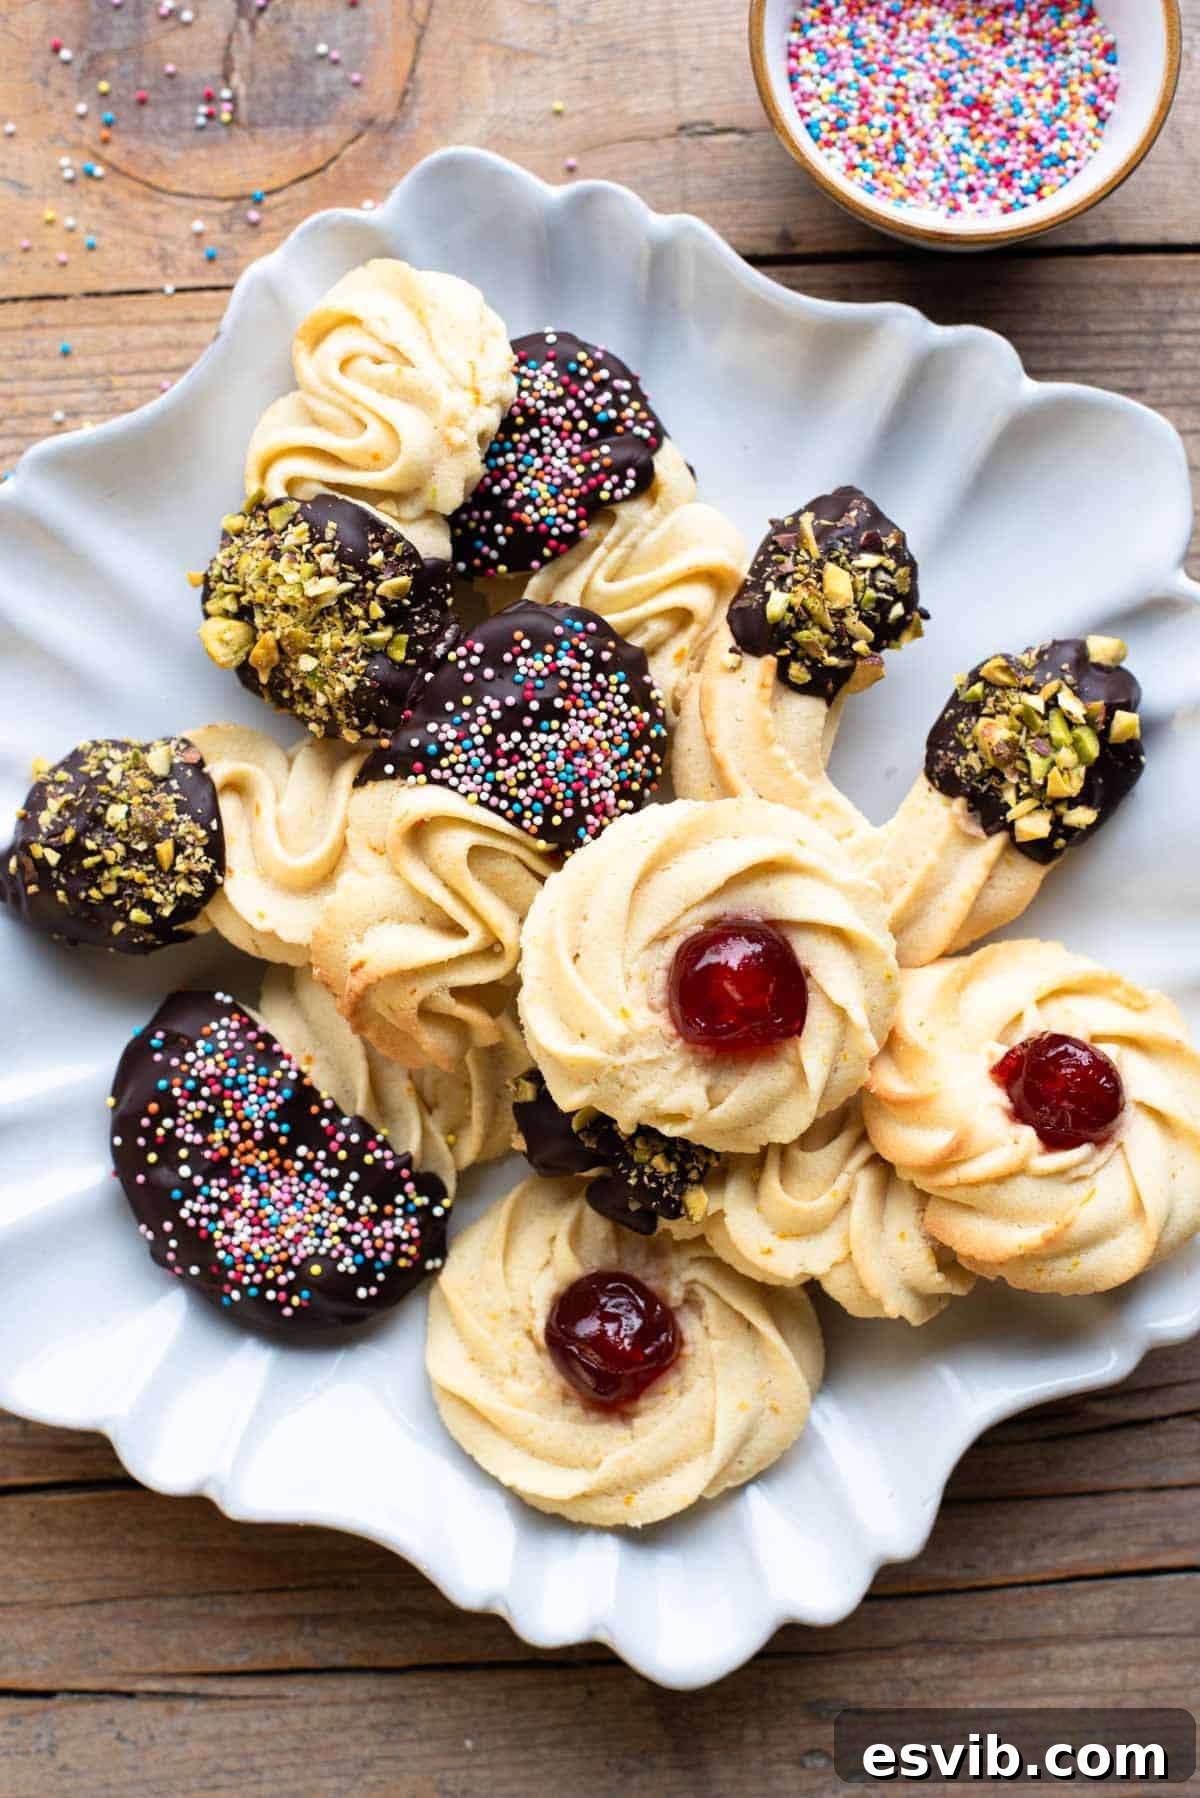
Embark on a culinary journey to Italy with these truly irresistible Italian Butter Cookies. Celebrated for their unparalleled softness, luxurious buttery flavor, and delicate melt-in-your-mouth texture, these cookies are a testament to simple Italian baking at its finest. The secret lies within a special Italian cookie dough known as Pasta Frolla Montata, a variation that elevates the classic shortcrust pastry to new heights of tenderness. Despite their elegant appearance, these butter cookies are remarkably easy to prepare, making them a perfect project for bakers of all skill levels. Their versatile nature allows for endless creativity in shaping and decorating, transforming simple dough into beautiful edible art, adorned with vibrant candied fruits, rich melted chocolate, or finely chopped nuts.
The Heart of the Cookie: Understanding Pasta Frolla Montata
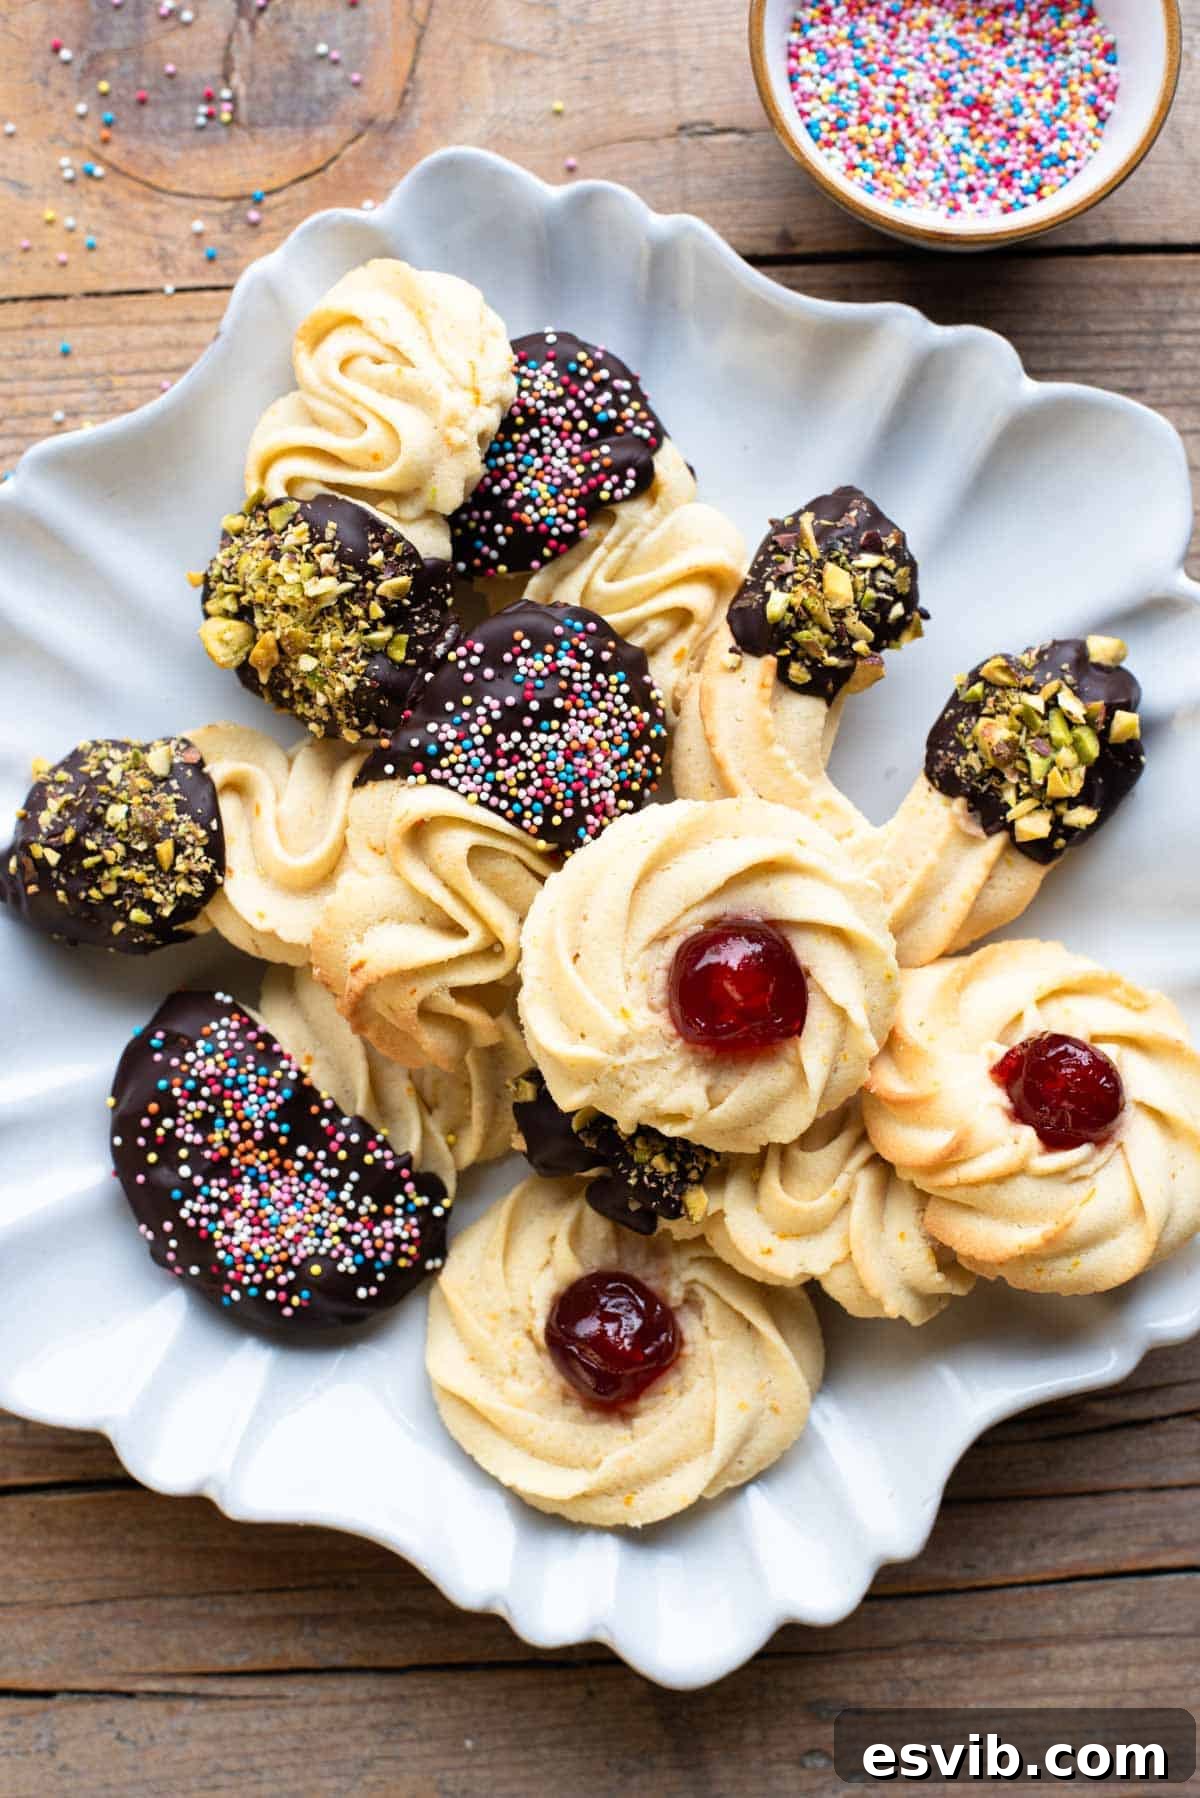
What makes these Italian Butter Cookies so uniquely soft and tender? It all comes down to their distinct dough, Pasta Frolla Montata. This special preparation method differentiates it from the more traditional classic Pasta Frolla, which is typically firmer and ideal for tarts and pie crusts. The magic of Pasta Frolla Montata begins with softened unsalted butter, which is rigorously whipped together with powdered sugar. This creaming process incorporates a significant amount of air into the mixture, resulting in a base that is exceptionally light, fluffy, and extra creamy. This aeration is crucial for the delicate texture of the finished cookies.
The resulting dough is wonderfully soft and pliable, a characteristic that makes it perfectly suited for piping. Using a piping bag fitted with a star-shaped nozzle, you can effortlessly create an array of elegant and charming cookie shapes. Imagine crafting delicate swirls, classic “S” shapes, or traditional horseshoe forms. The versatility doesn’t stop at shaping; once baked, these buttery delights serve as a perfect canvas for various decorations. You can stud them with vibrant candied cherries before baking, or after cooling, dip them in rich melted chocolate and sprinkle with finely chopped nuts like pistachios or hazelnuts, or add a festive touch with colorful sprinkles. This dough not only ensures a truly tender, buttery crumb but also makes the cookie-making process an enjoyable creative endeavor.
Ready to bake? Below, you’ll find the complete recipe, including detailed notes on each ingredient, captivating step-by-step photos, invaluable baking tips, exciting flavor variations, and a helpful video tutorial to guide you. For the full printable version of this delightful Italian Butter Cookie recipe, please scroll down to the dedicated recipe card section at the bottom of the page.
Gather Your Ingredients: What You Need for Italian Butter Cookies
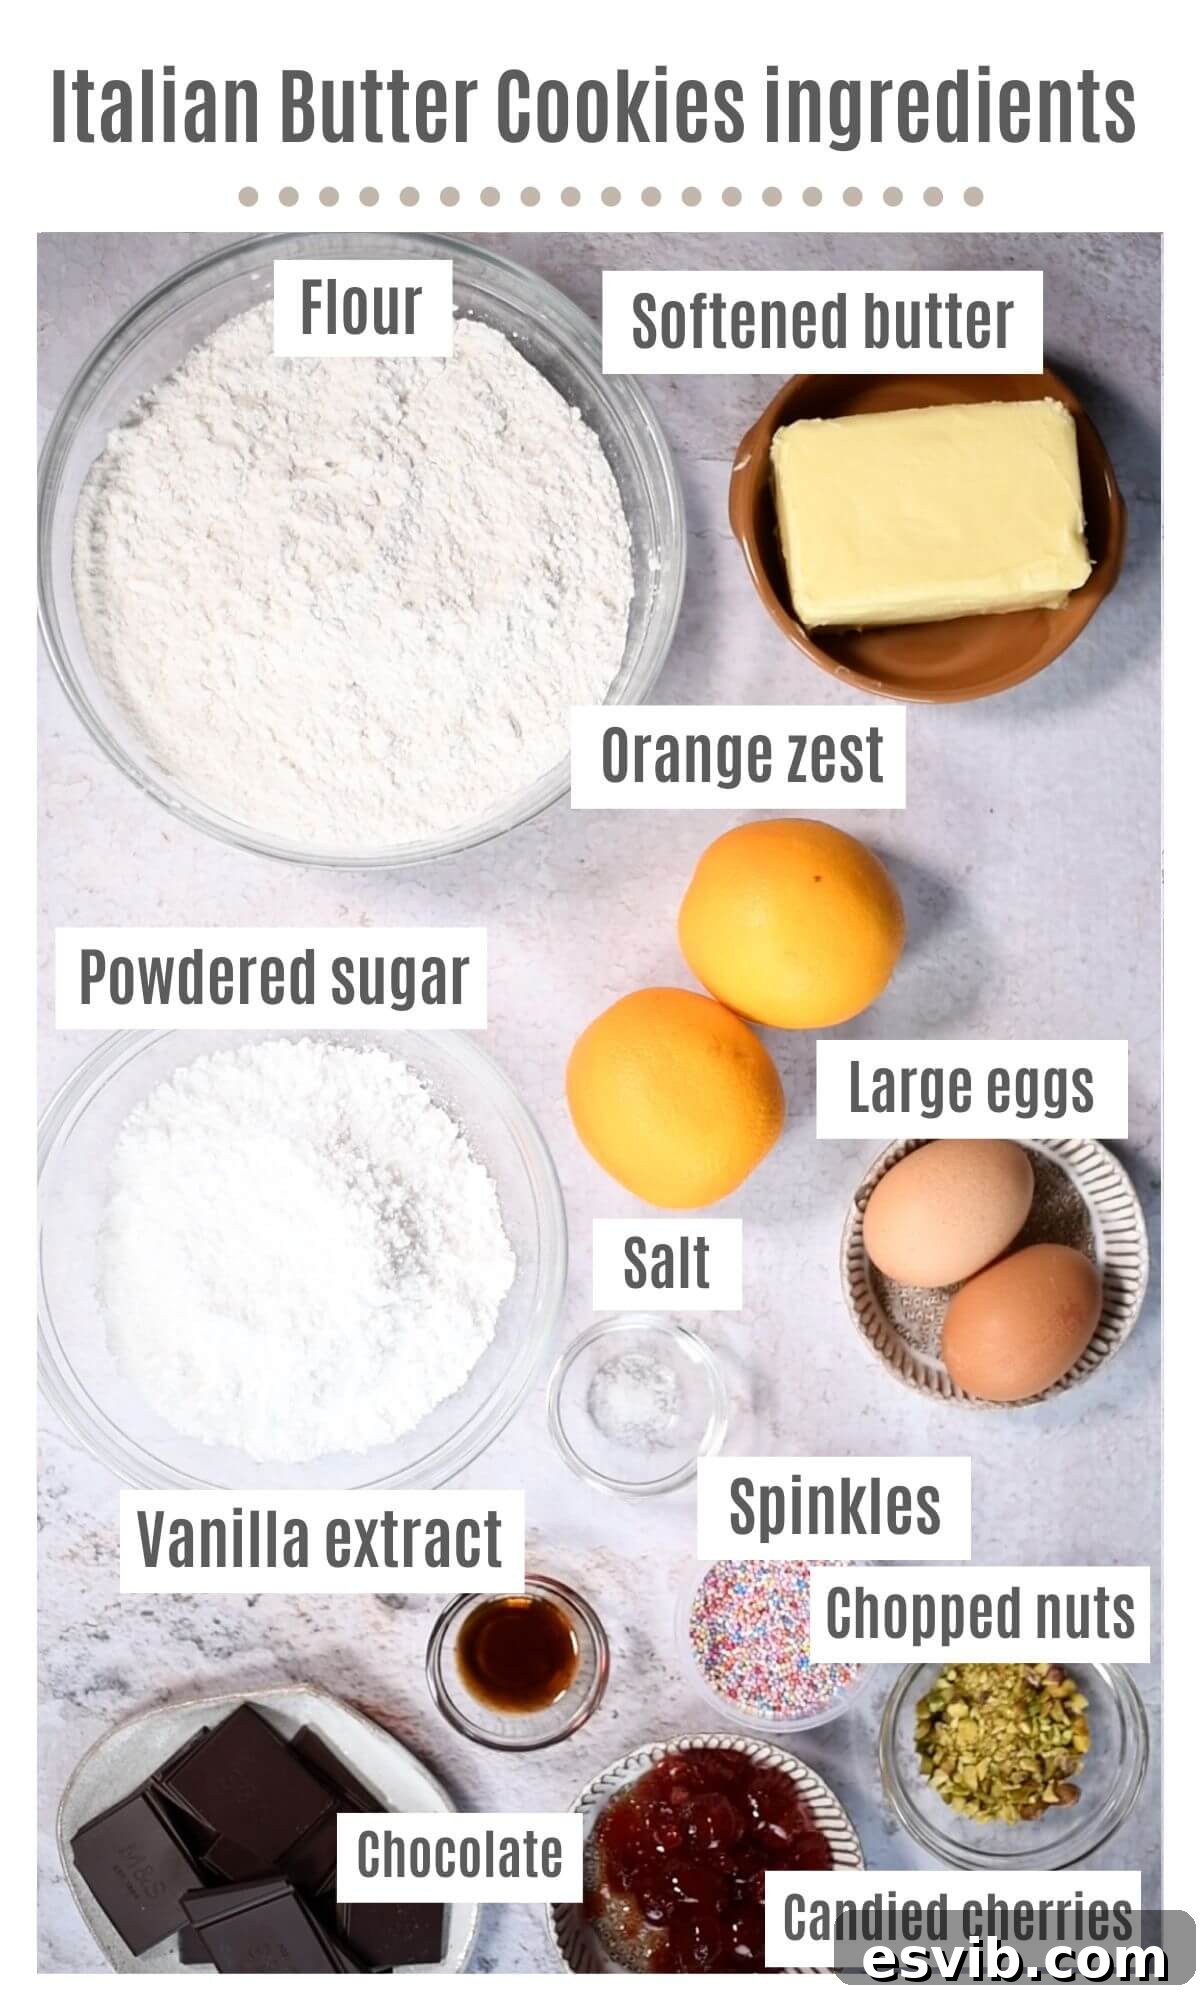
Crafting these delectable Italian Butter Cookies starts with selecting the right ingredients. Each component plays a vital role in achieving their renowned flavor and delicate texture. Below, you’ll find a comprehensive list of what you’ll need, along with essential notes and potential substitutions to ensure your cookies are nothing short of perfect.
Detailed Ingredient Notes and Smart Substitutions
- Unsalted Butter: The undisputed star of these cookies. It is absolutely crucial for the butter to be softened to true room temperature. This ensures it creams properly with the powdered sugar, incorporating air for a light, fluffy dough. Always use unsalted butter to control the overall salt content of your recipe. If your butter is still a bit firm, you can gently warm it for a few seconds in the microwave or cut it into small pieces to speed up the softening process.
- Powdered Sugar (Confectioners’ Sugar): Essential for the tender crumb of these cookies. Its fine texture dissolves seamlessly into the butter, creating a smooth, homogenous mixture without any grainy residue, which is vital for the delicate nature of Pasta Frolla Montata.
- All-Purpose Flour or Italian 00 Flour: While Italian 00 flour is traditionally used in Italy for its extra-fine texture and lower protein content, resulting in an exceptionally tender crumb, good quality all-purpose flour works perfectly well too. Sifting the flour before adding it to the mixture is recommended to prevent lumps and ensure a uniformly smooth dough.
- Large Eggs: Make sure your eggs are at room temperature. Cold eggs can cause the butter mixture to curdle, resulting in a less smooth dough. Room temperature eggs emulsify better, leading to a more cohesive and evenly textured batter.
- Orange Zest: The fragrant zest of fresh oranges adds a bright, slightly tangy aroma that beautifully complements the rich butter flavor. For an alternative citrus note, lemon zest can be used. If you prefer a pure vanilla flavor, or simply don’t have citrus on hand, you can omit the zest entirely without compromising the cookie’s structure.
- Vanilla Extract: For the most authentic and rich flavor, always opt for pure vanilla extract. Vanilla bean paste or the scraped seeds from a vanilla bean are also excellent choices, providing a more intense vanilla profile. Avoid artificial vanilla essence, as it often has a less desirable, synthetic taste.
- A Pinch of Fine Salt: Don’t underestimate the power of salt in sweet baking! A small pinch balances the sweetness, enhances the overall flavor profile, and brings out the subtle nuances of the butter and citrus.
- Decorations: The fun part! Feel free to customize your cookies with your favorite toppings. Popular choices include vibrant candied cherries, rich melted dark, milk, or white chocolate, a variety of chopped nuts (pistachios for color, hazelnuts for classic Italian flavor, or almonds for a delicate crunch), and colorful sprinkles to match any theme or season.
Step-by-Step Instructions: Baking Your Italian Butter Cookies
Creating these delightful Italian Butter Cookies is a straightforward process when you follow these steps carefully. Attention to detail will ensure your cookies are perfectly shaped, tender, and incredibly delicious.
- Prepare Your Baking Surfaces: Begin by lining two large baking trays with baking parchment. This crucial step prevents the delicate cookies from sticking and ensures easy removal after baking, making cleanup a breeze.
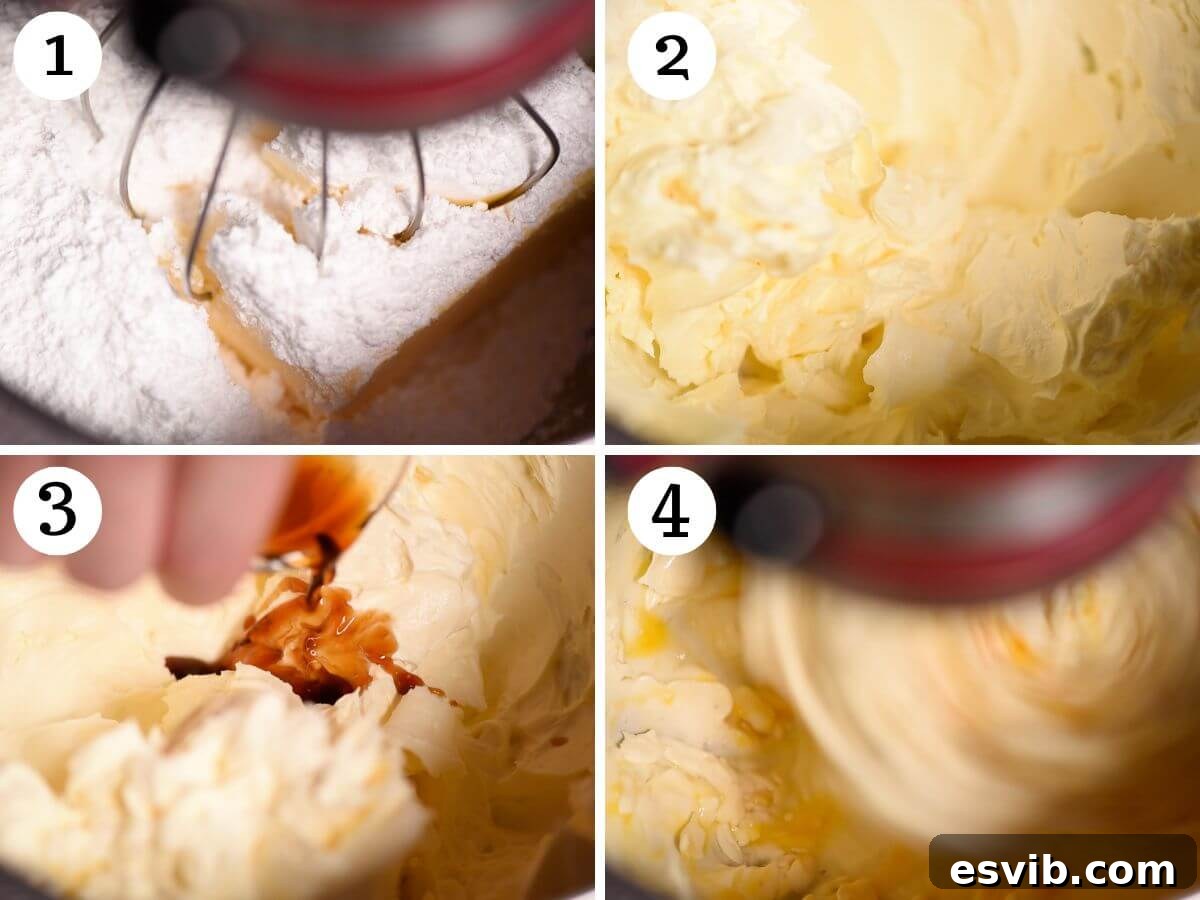
- Cream Butter and Powdered Sugar: In the bowl of a stand mixer fitted with the whisk attachment (or using an electric hand whisk), combine the softened unsalted butter and powdered sugar. Whip on a medium speed for approximately 5 minutes. Continue until the mixture transforms into a wonderfully thick, light, and fluffy consistency. This creaming process is paramount, as it incorporates the air necessary for the airy and tender texture characteristic of Pasta Frolla Montata.
- Introduce Flavorings and Eggs: Add the pure vanilla extract and fragrant orange zest to the creamy butter mixture. With your stand mixer still running on a medium-low speed, add one large room-temperature egg at a time. It is important to allow each egg to fully incorporate into the batter before adding the next. This methodical approach prevents the mixture from curdling and ensures a smooth, consistent dough.
- Incorporate the Flour: Gently sift the all-purpose or “00” flour directly over the wet ingredients in the mixer bowl. If using a stand mixer, switch to the paddle attachment. If using a hand whisk, continue on low speed. Mix just until the flour is fully combined and no dry streaks remain. Be careful not to overmix the dough, as excessive mixing can develop the gluten in the flour, leading to a tougher, chewier cookie rather than the desired delicate tenderness. The dough will have a noticeably soft consistency, which is perfect for piping.
- Pipe Your Cookie Shapes: Transfer the soft cookie dough into a piping bag fitted with a large star-shaped nozzle (a Wilton 1M or similar open-star tip is highly recommended for classic Italian butter cookie aesthetics). On your prepared baking trays, pipe various shapes to your heart’s content. Popular choices include elegant round swirls, charming “U” or “S” shapes, straight finger-like cookies, or even small hearts. Ensure you leave at least 1cm (about 1/2 inch) of space between each cookie on the tray, as they will spread slightly during baking.
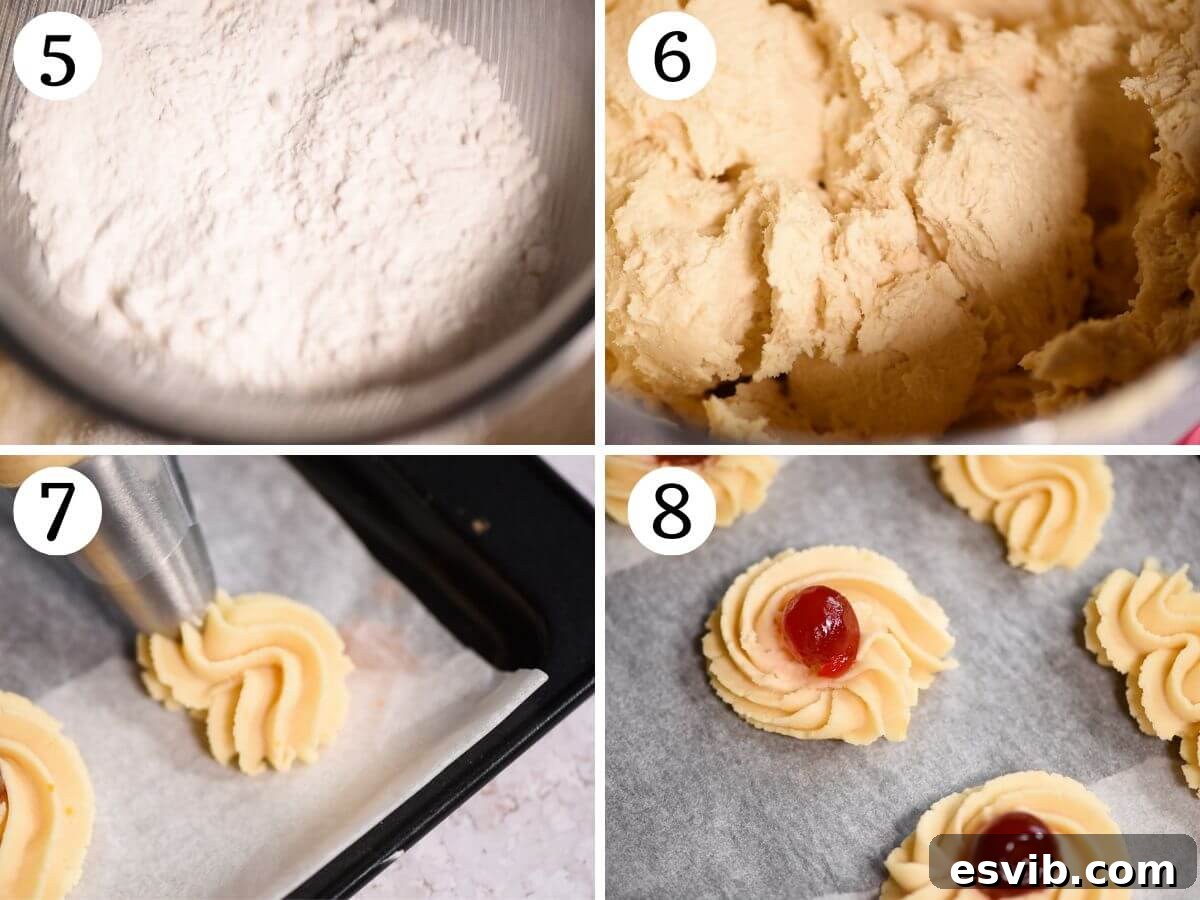
- Add Pre-Bake Decorations & Chill: If you plan to adorn your cookies with candied cherries or whole nuts (like almonds or hazelnuts) in the center, do so now. Gently press them into the piped dough. Once your cookies are shaped and initially decorated, place the entire baking trays into the refrigerator for at least 30 minutes. This chilling step is absolutely crucial; it allows the butter in the dough to firm up, preventing the cookies from spreading excessively in the hot oven and helping them maintain their intricate piped designs.
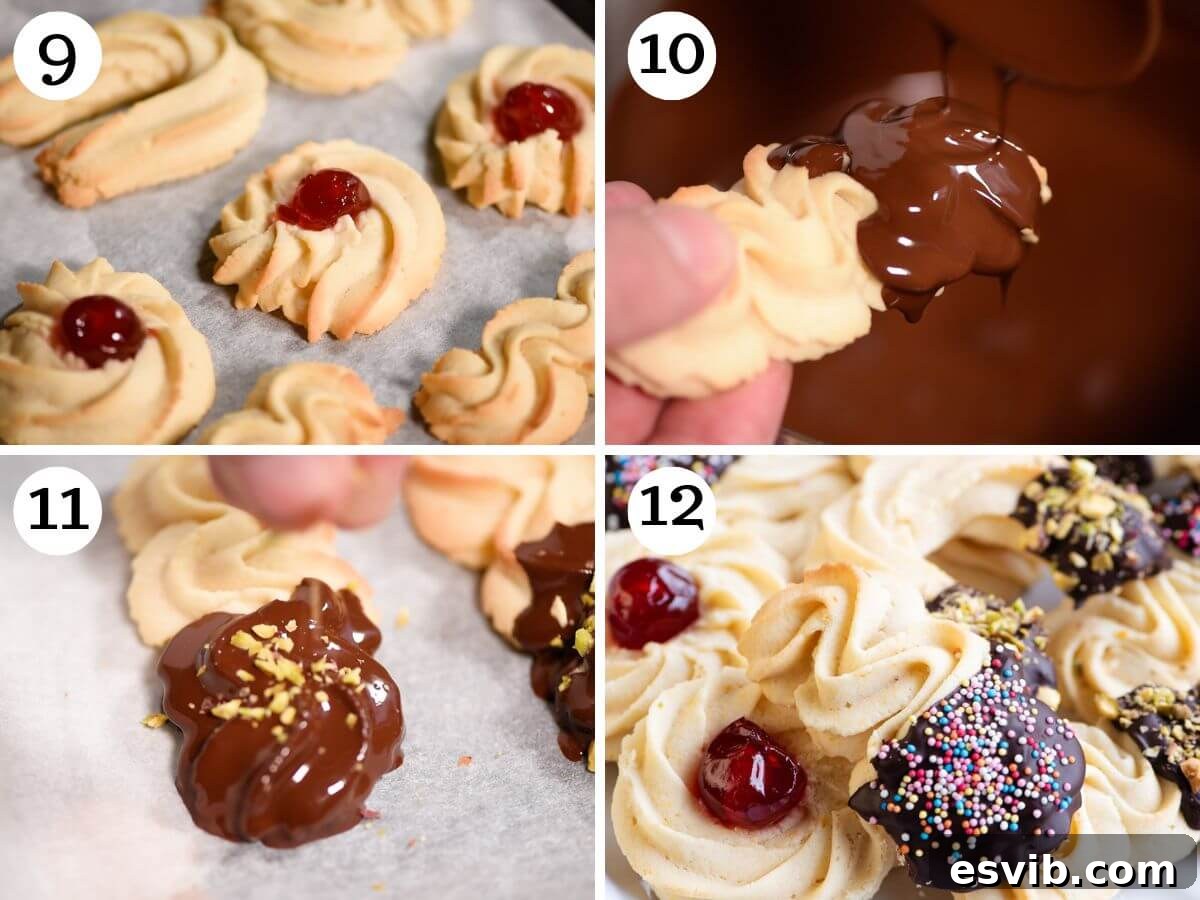
- Bake to Golden Perfection: Preheat your oven to 350°F (180°C). Bake the cookies, one tray at a time, on the middle shelf of the oven for approximately 10-12 minutes. Keep a close eye on them; they should be lightly golden at the edges but remain relatively pale in the center. Over-baking can make them dry and crumbly, so aim for that perfect soft texture. Once baked, allow the cookies to cool on the baking tray for a few minutes before carefully transferring them to a wire rack to cool completely. This prevents them from breaking and allows them to firm up.
The Finishing Touch: Creative Decoration Ideas
Once your Italian Butter Cookies have cooled completely, it’s time for the most enjoyable part – decorating! This is your opportunity to unleash your creativity and personalize your batch, making them perfect for any celebration or simply a delightful treat.
- Prepare Your Chocolate: Select your favorite type of chocolate – dark, milk, or white – for melting. The classic method involves using a bain-marie: place a heatproof bowl over a pot of simmering water, ensuring the bottom of the bowl does not touch the water. Stir the chocolate occasionally until it is smooth and completely melted. Alternatively, you can melt chocolate in short bursts in the microwave, stirring well after each interval to prevent burning.
- Dip, Drizzle & Garnish: Carefully take each cooled cookie and dip one end into the melted chocolate. Alternatively, for a more artistic flair, use a spoon to drizzle chocolate decoratively over the cookie tops. While the chocolate is still wet and pliable, immediately sprinkle your chosen garnishes over it. This could be a generous scattering of finely chopped nuts (pistachios offer a vibrant green, while hazelnuts provide a rich, earthy flavor), or a burst of color from festive sprinkles. Place the decorated cookies on a fresh sheet of baking parchment and allow the chocolate to set completely at room temperature or, for a quicker set, in the refrigerator.
Expert Tips and Frequently Asked Questions for Perfect Italian Butter Cookies
Master the art of making Italian Butter Cookies with these invaluable tips and answers to common queries. Achieve professional-level results in your home kitchen!
- Precision with a Kitchen Scale: In baking, accuracy is paramount, especially when working with flour. I cannot stress enough the importance of using a digital kitchen scale to weigh your ingredients rather than relying on volume measurements (cups). Flour can be notoriously difficult to measure accurately by volume, and even slight discrepancies can drastically affect the dough’s consistency and the final texture of your cookies. A kitchen scale guarantees precise measurements every single time, leading to consistently perfect cookies.
- Optimal Piping Bag and Nozzle: Given the soft nature of Pasta Frolla Montata and the generous quantity of dough, I highly recommend using a large, sturdy piping bag. For those iconic, beautifully defined Italian butter cookie shapes seen in the photos, a large star-shaped nozzle (such as a Wilton 1M or 2D tip) is ideal. Feel free to experiment with different nozzles to create a variety of unique designs and patterns.
- The Non-Negotiable Chill Time: Do not be tempted to skip or shorten the 30-minute chilling period in the refrigerator after piping the cookies. This step is absolutely critical. It allows the butter in the dough to firm up, which prevents the cookies from spreading excessively in the oven. This ensures that they retain their beautiful, intricate piped shapes and maintain that delicate yet structured texture.
- Butter Temperature is Key: For a truly light and fluffy dough, ensure your unsalted butter is genuinely at room temperature – soft enough to leave a slight indentation when pressed, but not melted or greasy. If it’s too cold, it won’t cream properly; if it’s too warm, the dough will be too soft to pipe.
- Avoid Overmixing the Dough: Once you add the flour, mix the dough only until it is just combined and no streaks of dry flour remain. Overmixing develops the gluten in the flour, which can result in tough, dense cookies instead of the desirable tender, melt-in-your-mouth quality.
Frequently Asked Questions (FAQs)
These delicious cookies will remain wonderfully fresh and retain their delicate texture for up to one week (or even longer) when stored in an airtight container at room temperature. To enjoy them beyond this period, you can easily freeze them for up to 3 months. If freezing, it’s best to do so before decorating with chocolate, or ensure the chocolate is fully set. Thaw them at room temperature before serving.
The primary distinction lies in their preparation and consistency. Traditional Pasta Frolla (Italian sweet shortcrust pastry) is made by cutting cold butter into flour, resulting in a crumbly, firm dough ideal for tarts and pies. In contrast, Pasta Frolla Montata involves creaming softened butter with powdered sugar until it’s light and fluffy. This aeration and higher proportion of butter make the dough very soft, perfect for piping, and yields a significantly more tender, melt-in-your-mouth cookie texture.
Absolutely! You can prepare the Pasta Frolla Montata dough up to a day in advance. Once made, cover it tightly with plastic wrap and store it in the refrigerator. Before you plan to pipe the cookies, allow the dough to come back to room temperature (this might take an hour or two), as it will be quite stiff when cold. You might need to gently knead it for a minute or two to restore its pliability and make it easy to pipe.
Exciting Flavor Variations and Creative Decoration Ideas
One of the most delightful aspects of these Italian Butter Cookies is their incredible adaptability. They serve as a perfect base for a myriad of flavor enhancements and decorative flourishes. Here are some fantastic ideas to personalize your batch and make them uniquely yours:
- Experiment with Citrus Zest: While our recipe calls for orange zest, which provides a lovely, bright aroma, don’t hesitate to experiment! Lemon zest offers a tangier, equally refreshing profile, or for a subtle floral note, consider a hint of lime zest. Of course, if you prefer a pure, unadulterated buttery vanilla flavor, you can simply omit the citrus entirely.
- Indulgent Chocolate Italian Butter Cookies: For the ultimate chocolate lover, transform your dough itself! Replace 30 grams of the all-purpose flour with 30 grams (approximately 3 tablespoons) of unsweetened cocoa powder. This creates a beautifully rich chocolate cookie. For a truly decadent treat, dip these baked chocolate cookies in melted dark, milk, or white chocolate, creating a sensational double-chocolate experience.
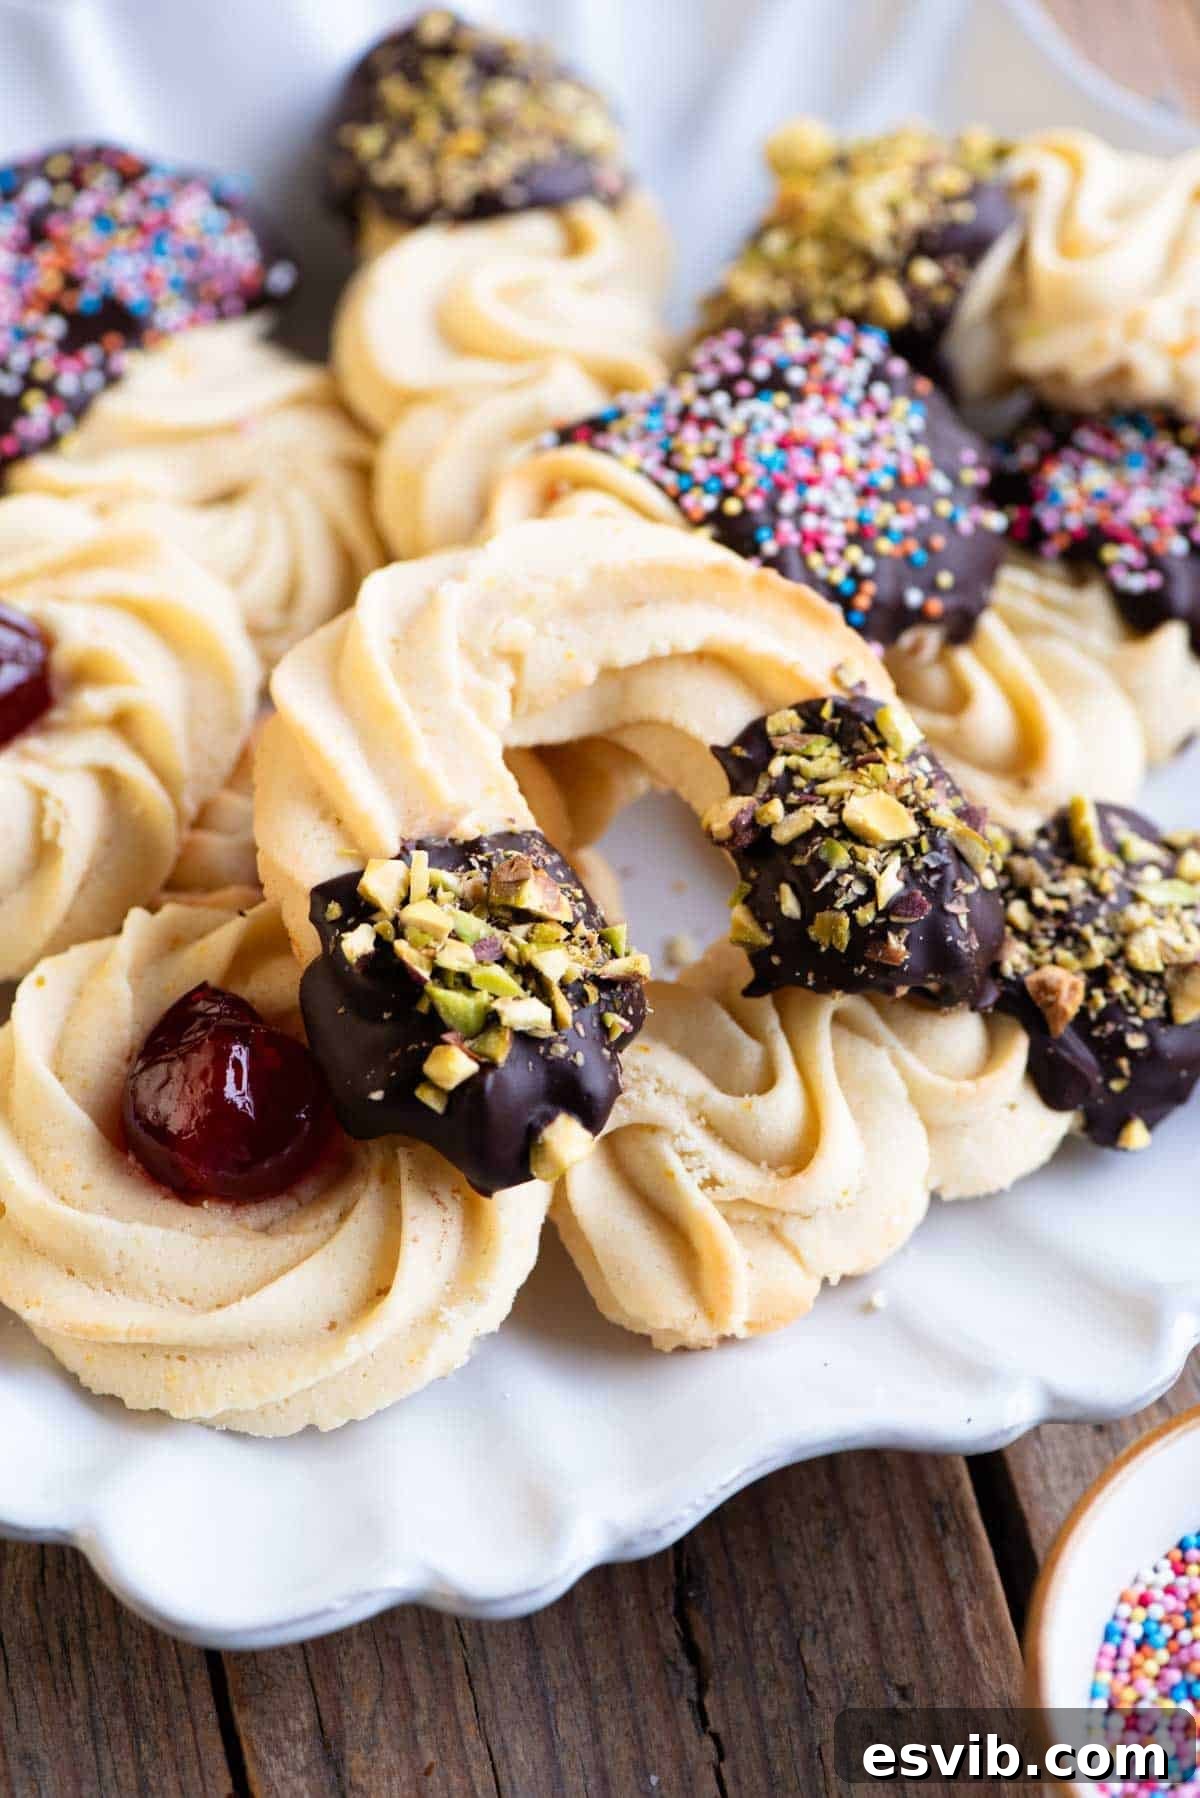
- Crunchy Chopped Nuts: After dipping your cooled cookies in luscious melted chocolate, elevate their texture and depth of flavor with a generous sprinkle of finely chopped nuts. Pistachios not only add a beautiful color contrast but also a delicate, unique flavor. Toasted hazelnuts offer a classic Italian pairing with chocolate, imparting a rich, warm nuttiness. Almonds are another excellent and versatile choice, providing a subtle crunch.
- Seasonal and Festive Sprinkles: Add a burst of color and a playful touch with sprinkles! Choose designs and colors to perfectly match any holiday or celebration. Think vibrant multi-colored sprinkles for birthdays, festive red and green for Christmas, or soft pastel shades for Easter or spring gatherings. This is an easy way to customize your cookies for any event.
- Traditional Candied Fruit Centers: For a touch of classic Italian charm, press a small, vibrant piece of candied cherry, citrus peel, or other candied fruit into the center of round-shaped butter cookies before baking. As they bake, the fruit will slightly caramelize, adding a delightful chewy texture and concentrated sweetness that beautifully complements the buttery cookie.
- Tropical Coconut Kiss: If you’re a fan of tropical flavors, try dipping your baked cookies in melted chocolate, then immediately rolling them in finely shredded (desiccated) coconut. The combination of rich chocolate and sweet, chewy coconut is absolutely divine.
- Flavorful Extract Experimentation: Beyond vanilla, the world of extracts offers endless possibilities to infuse different flavors into your cookie dough. Almond extract is a popular choice, providing a distinctive marzipan-like flavor often found in Italian patisserie. A hint of orange extract can intensify the natural citrus notes if you’ve added orange zest, while a dash of rum extract can add a sophisticated warmth and complexity, perfect for holiday baking.
Discover More Delicious Italian Cookie Recipes to Try
If you’ve savored the delight of these Italian Butter Cookies, you’re sure to enjoy exploring the diverse and rich world of other authentic Italian cookie recipes from our kitchen. Each recipe offers a unique taste of Italy’s cherished baking traditions, perfect for expanding your repertoire:
Christmas
Italian Almond Cookies (Ricciarelli)
Italian Cookies
Cuccidati (Italian Fig Cookies)
Italian Cookies
Italian Nutella Cookies (Nutellotti)
Italian Cookies
Pignoli Cookies (Biscotti ai Pinoli)
If you’ve tried these delightful Italian Butter Cookies or any other recipe from our blog, we would absolutely love to hear about your experience! Please don’t forget to rate the recipe and share your thoughts in the comments section below – your feedback is incredibly valuable to us and helps other bakers. You can also follow us on Facebook, Instagram, and Pinterest to stay updated with our latest delicious food creations. Alternatively, sign up for our Newsletter to receive weekly recipe inspiration directly in your inbox.
Step-by-step photos and a detailed video tutorial are available above in the post.
Italian Butter Cookies
5-star rated from 1 vote
By Emily
Print Recipe
The most delicious, soft and buttery Italian Butter Cookies are made with an authentic Italian cookie dough called Pasta Frolla Montata. These delightful cookies are surprisingly easy to make and can be shaped and decorated in countless ways with candied fruit, melted chocolate, and chopped nuts, making them perfect for any occasion.
Equipment
- Stand mixer with whisk and paddle attachments or a reliable electric hand whisk
- Two large baking trays
- Baking parchment
- Piping bag fitted with a large star nozzle (e.g., Wilton 1M or 2D)
Ingredients
For the Italian Butter Cookies
Decoration Options (Optional)
Instructions
- Line two large baking trays with baking parchment.
- Using a stand mixer (with the whisk attachment) or an electric hand whisk, cream the softened butter and powdered sugar on a medium speed for about 5 minutes until the mixture is thick, light, and fluffy.
- Add the vanilla extract and orange zest. Then, with the mixer on medium-low speed, add one large egg at a time, ensuring each egg is fully incorporated into the batter before adding the next.
- Sift the flour into the wet ingredients. Switch to a paddle attachment on your stand mixer or continue with an electric hand whisk on low speed. Mix just until the flour is fully absorbed and no dry streaks remain. Be careful not to overmix. The dough will be quite soft.
- Transfer the soft cookie dough into a piping bag fitted with a large star-shaped nozzle. Pipe various shapes of cookies onto the prepared baking trays, ensuring they are at least 1cm (½ inch) apart. You can pipe circles, ‘U’ or ‘S’ shapes, straight lines, or hearts (refer to the photos above for visual inspiration).
- If you are adding candied cherries or whole nuts to the cookies, press them gently into the dough now. Place the baking trays with the piped cookies into the fridge for at least 30 minutes. This chilling step is essential for maintaining their shape during baking.
- Preheat your oven to 350°F (180°C). Bake the cookies, one tray at a time, on the middle shelf of the oven for 10-12 minutes. The edges should be lightly golden, but the centers should remain pale. Once baked, let them cool on the baking tray for a few minutes before carefully transferring them to a wire rack to cool completely.
To Decorate (Optional)
- Melt your chocolate of choice (dark, milk, or white) in a bain-marie (a heatproof bowl set over a pot of hot, simmering water) or in the microwave in short intervals. Stir until smooth.
- Dip one end of the cooled cookies into the melted chocolate, or drizzle chocolate artistically over them. While the chocolate is still wet, immediately top with chopped nuts or sprinkles. Place the decorated cookies on baking parchment and allow the chocolate to set completely before serving or storing.
Video Tutorial
Watch our comprehensive video guide below to see each step of making these delicious Italian Butter Cookies, ensuring perfect results every time!
Click Here to Watch the Full Video Tutorial!(Opens in a new window)
Notes
- Weigh your ingredients: For the most accurate results, especially with flour, always use a digital kitchen scale instead of cup measurements. This prevents inconsistencies in your dough and ensures perfect cookies every time.
- Use a large piping bag: Working with a generous amount of soft dough is easier with a large, sturdy piping bag. A large star-shaped nozzle (e.g., Wilton 1M) is ideal for classic shapes.
- Experiment with nozzles: While a star nozzle creates beautiful, classic Italian butter cookies, feel free to explore other piping tips for different shapes and designs to customize your batch.
- Storage: Store the baked Italian Butter Cookies in an airtight container at room temperature for up to one week. For longer preservation, they can be frozen for up to 3 months.
Helpful Information for All Our Recipes
- Unless specified otherwise, I consistently use extra virgin olive oil in all my recipes.
- For the best flavor and results, I exclusively use Cirio or Mutti brands when a recipe calls for canned or jarred tomatoes.
- All vegetables mentioned are assumed to be medium-sized unless an alternative size is explicitly stated.
- Every recipe provided is thoroughly tested and developed using a fan (convection) oven.
- For detailed information on how nutrition values are calculated, please refer to our privacy policy page.
- Discover our essential list of Italian Pantry Staples to stock your kitchen.
- Explore our recommended Essential Kitchen Tools for Italian Cooking to enhance your culinary skills.
Nutrition Facts (Approximation per Cookie)
Nutrition information is automatically calculated and should only be used as an approximation. Actual values may vary based on ingredients and preparation methods.
Carbohydrates: 19 g
Protein: 2 g
Fat: 9 g
Saturated Fat: 5 g
Polyunsaturated Fat: 0.4 g
Monounsaturated Fat: 2 g
Trans Fat: 0.3 g
Cholesterol: 32 mg
Sodium: 7 mg
Potassium: 25 mg
Fiber: 0.5 g
Sugar: 7 g
Vitamin A: 266 IU
Calcium: 7 mg
Iron: 1 mg