
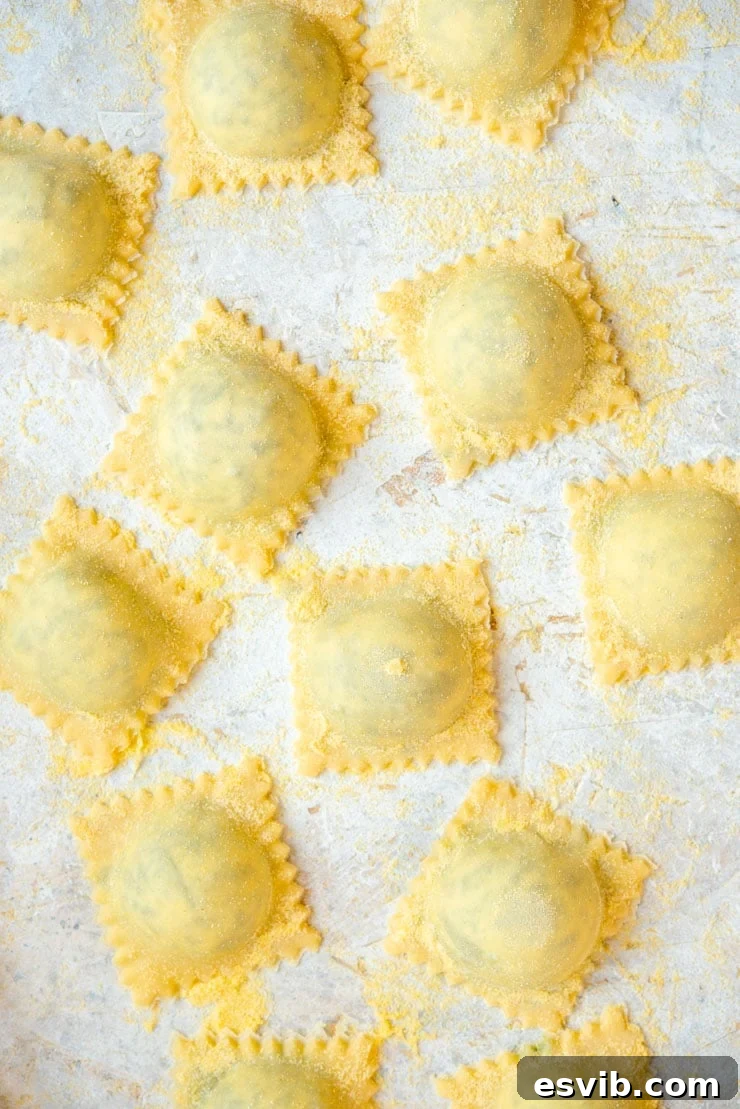
Embark on a delightful culinary journey with this comprehensive guide to making homemade ravioli from scratch. Whether you’re a seasoned pasta maker or a curious beginner, this guide is packed with step-by-step instructions, invaluable tips, and creative ideas to help you craft perfectly tender, flavorful ravioli every single time. From selecting the right tools to choosing the most delicious fillings and complementary sauces, we’ll cover everything you need to know to bring the authentic taste of Italy into your kitchen.
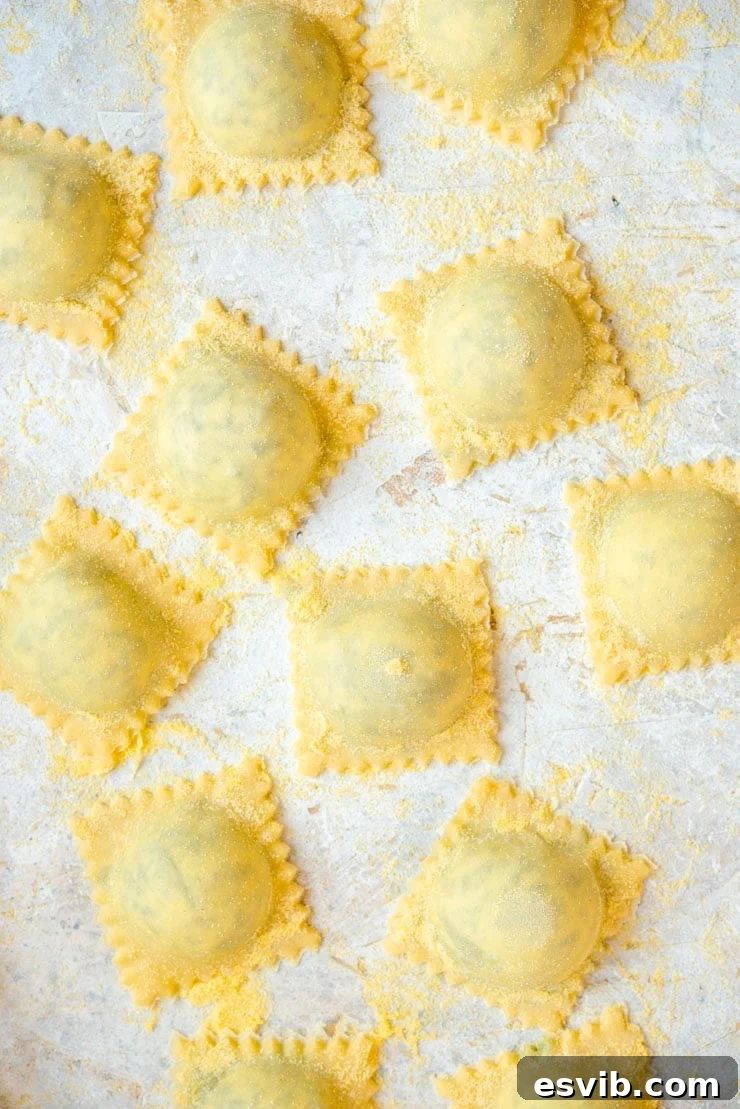
There’s an unparalleled satisfaction in making homemade ravioli. It might seem like a labor of love, but the reward is truly extraordinary: silky, tender fresh pasta cradling an exquisite filling, all bathed in a harmonious sauce. This experience transcends a simple meal; it’s a celebration of flavor, texture, and tradition.
The beauty of making fresh pasta, especially ravioli, is that it becomes easier and more intuitive with practice. Each batch you create builds your confidence and refines your technique. This ultimate guide will walk you through every critical step, ensuring your homemade ravioli are nothing short of spectacular. We’ll delve into essential tools, offer incredible recipe ideas, and share expert tips to guarantee success.
The Ultimate Guide to Homemade Ravioli: Crafting Perfect Pasta from Scratch
Homemade ravioli embodies the heart of Italian cuisine – simple ingredients transformed into something extraordinary through care and technique. This guide is designed to demystify the process, making it accessible and enjoyable for every home cook. We’ll explore everything from the foundational pasta dough to the art of filling and sealing, ensuring your foray into fresh ravioli is a resounding success.
Essential Tools for Ravioli Making
While fresh pasta can be made with minimal equipment, specific tools can significantly streamline the ravioli-making process and help achieve professional-looking results. The choice of tool often depends on the desired shape and uniformity of your ravioli.
*This post contains affiliate links, meaning we may earn a small commission if you make a purchase through them, at no extra cost to you.*
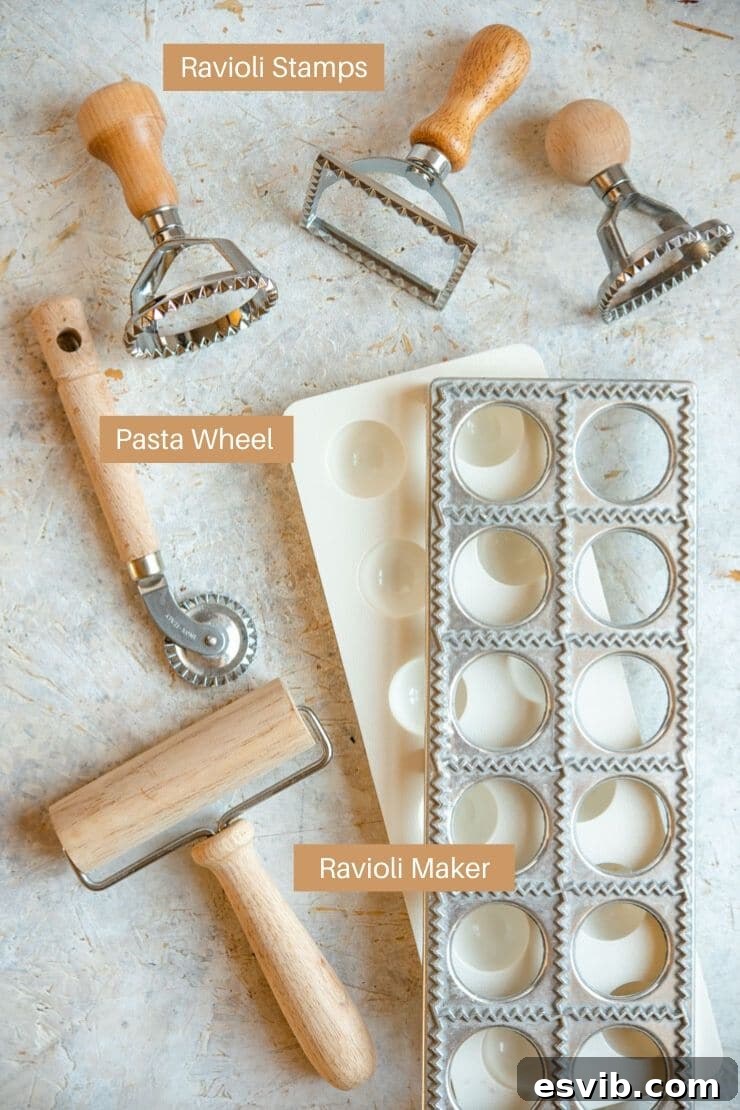
- Ravioli Wheel or Pasta Wheels: This handheld tool features a crimped edge that creates beautifully sealed and decorative edges on your ravioli. It allows for complete freedom in shaping your pasta, from large squares to custom rectangles. It’s perfect for those who enjoy a more artisanal, free-form approach to pasta making.
- Ravioli Stamps or Cutters: Available in a variety of shapes like squares, circles, and even intricate designs, stamps provide consistency and ease of use. You simply place the stamp over your filled pasta sheets and press down to cut out perfectly formed ravioli. They offer a great way to achieve uniform portions with classic shapes.
- Ravioli Maker (Tray): This tool, often a metal tray with indentations, is incredibly helpful for making a large batch of uniformly sized ravioli quickly. It works by laying pasta sheets over the tray, pressing down to create pockets, filling them, and then covering with another pasta sheet before rolling to seal and cut. It’s ideal for beginners seeking consistency or for preparing ravioli for a crowd.
- Pasta Machine (Manual or Electric): While not strictly a ravioli-specific tool, a pasta machine is a game-changer for achieving consistently thin pasta sheets, which is crucial for ravioli. It saves immense time and effort compared to a rolling pin alone. Both manual crank models and electric versions are available, catering to different preferences and budgets.
- Rolling Pin: For those without a pasta machine, a good rolling pin and some “elbow grease” can still yield excellent results. A long, heavy rolling pin is best for creating wide, thin sheets of dough.
- Pastry Brush: Useful for lightly moistening pasta edges with water or egg wash to ensure a tight seal, especially if your dough starts to dry out.
- Baking Sheets and Semolina Flour: Essential for dusting your work surface and storing freshly made ravioli to prevent them from sticking together before cooking.
Crafting the Perfect Pasta Dough
The foundation of truly exceptional homemade ravioli lies in the pasta dough itself. A superior dough means silky, buttery pasta that holds its shape, cooks beautifully, and perfectly complements your chosen filling. Before you even think about fillings, dedicating time to making a high-quality fresh egg pasta dough is paramount.
For an in-depth, step-by-step guide to mastering pasta dough, refer to our comprehensive recipe: How to Make Homemade Pasta Dough. This is our trusted, go-to recipe, designed to be straightforward and rewarding. It covers everything from the optimal flour choices to mixing and kneading techniques, ensuring you create a pliable, elastic dough that is a joy to work with.
Flour Choices: The type of flour significantly impacts the texture of your pasta. Traditional Italian pasta often uses “00” flour, an extra-fine wheat flour that results in incredibly tender and smooth pasta. Alternatively, you can use a mix of “00” flour and fine semolina flour (semola rimacinata) for a dough with more bite and elasticity, which is excellent for filled pastas like ravioli as it provides extra structure. All-purpose flour can work in a pinch, but the texture might be slightly less refined.
Resting the Dough: This step is non-negotiable. After kneading, wrap your pasta dough tightly in plastic wrap and let it rest at room temperature for at least 30 minutes, or up to an hour. This allows the gluten to relax, making the dough much easier to roll out thinly without springing back. Skipping this step will make rolling a frustrating experience.
Achieving the Ideal Pasta Dough Thickness
The thickness of your pasta sheets is crucial for ravioli. It needs to be thin enough to be delicate and cook quickly, yet strong enough to encase the filling without tearing during handling or boiling. When using a manual pasta machine, I typically roll my pasta dough out to a setting of number 7. On most machines, where 9 is the thinnest setting, this means the pasta still has a lovely “al dente” bite to it and is robust enough to handle the filling and sealing process without becoming overly fragile.
If you’re using a rolling pin or if your pasta machine has different settings, the general rule of thumb is to roll the pasta as thin as possible without it tearing. You should aim for it to be almost translucent when held up to the light, but not so thin that you can easily see through it entirely, which could lead to punctures. As you gain experience making ravioli, you’ll naturally discover your preferred thickness, balancing delicate texture with structural integrity.
A good visual indicator when using a rolling pin is to roll until the pasta sheet is about the thickness of a thick greeting card or just slightly thicker than a regular sheet of paper. Don’t worry if it’s not perfectly uniform at first; practice makes perfect, and minor imperfections add to the charm of homemade pasta.
Selecting the Best Ravioli Filling
The filling is the soul of your ravioli, offering endless possibilities for flavor combinations. However, there are a couple of crucial tips to ensure your filling performs beautifully within its pasta casing:
- Consistency is Key – Not Too Wet: Your filling should always have a paste-like consistency, similar to ricotta cheese or a thick cream cheese spread. If the filling is too saucy or overly wet, the moisture will seep into the fresh pasta dough, making it sticky, difficult to handle, and prone to tearing. Excess moisture can also lead to the pasta disintegrating during boiling. To remedy a wet filling, try draining excess liquid (e.g., from cooked spinach or ricotta) or adding a binding agent like breadcrumbs, grated Parmesan cheese, or a little egg yolk.
- Smoothness Over Roughness – Avoid Sharp Edges: Just as important as dryness is smoothness. A rough or chunky filling, especially one with hard bits (like large nuts, undercooked vegetables, or sharp cheese shards), can easily puncture the delicate pasta dough. This would be disastrous when boiling, as the filling could escape into the water, leaving you with tasteless pasta and a messy pot. Ensure all ingredients are finely chopped, puréed, or grated, creating a homogenous, smooth mixture.
With these guidelines in mind, here are some delightful and proven ravioli filling ideas for you to try:
- Mushroom Ravioli with Parmesan Cream Sauce: A wildly popular and incredibly flavorful choice, often featuring finely chopped sautéed mushrooms blended with ricotta or mascarpone.
- Butternut Squash: Sweet and savory, typically made with roasted or steamed butternut squash purée, often seasoned with nutmeg, Parmesan, and a touch of amaretti crumbs for texture and flavor.
- Classic Spinach and Ricotta: The quintessential ravioli filling. Ensure the spinach is thoroughly squeezed dry after cooking to remove all excess moisture before mixing with ricotta, Parmesan, and a hint of nutmeg.
- Burrata or Stracchino: For a creamy, decadent experience, these fresh Italian cheeses offer a delicate, rich interior. They are often mixed with a little fresh basil or lemon zest.
- Prosciutto and Ricotta: Finely minced prosciutto adds a salty, savory depth to a creamy ricotta base.
- Artichoke Heart: Puréed cooked artichoke hearts, mixed with ricotta or goat cheese and herbs, create a Mediterranean-inspired delight.
- Sweet Potato and Sage: A seasonal favorite, similar to butternut squash but with its own distinct earthy sweetness.
- Roasted Red Pepper and Goat Cheese: Tangy goat cheese pairs beautifully with the sweetness of roasted red peppers.
Experiment with herbs like parsley, basil, sage, or thyme, and always taste your filling before wrapping to adjust seasonings. A well-seasoned filling is the secret to unforgettable ravioli.
Filling and Sealing Ravioli – Three Proven Methods
Once your perfect pasta dough is rolled and your delectable filling is ready, it’s time for the exciting part: assembling your ravioli. We’ll explore three effective methods, each offering a slightly different approach to shaping and sealing.
Using a Ravioli Maker for Uniform Shapes
A ravioli maker tray is an excellent tool for achieving consistently sized and shaped ravioli, especially useful when making larger quantities.
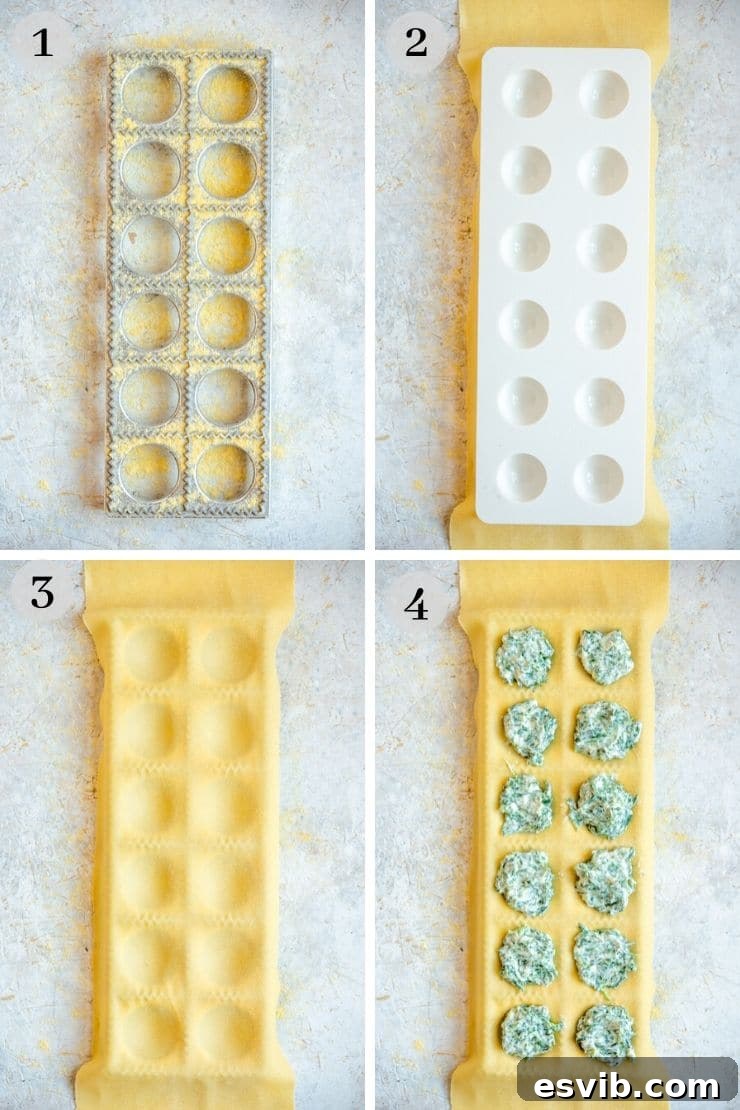
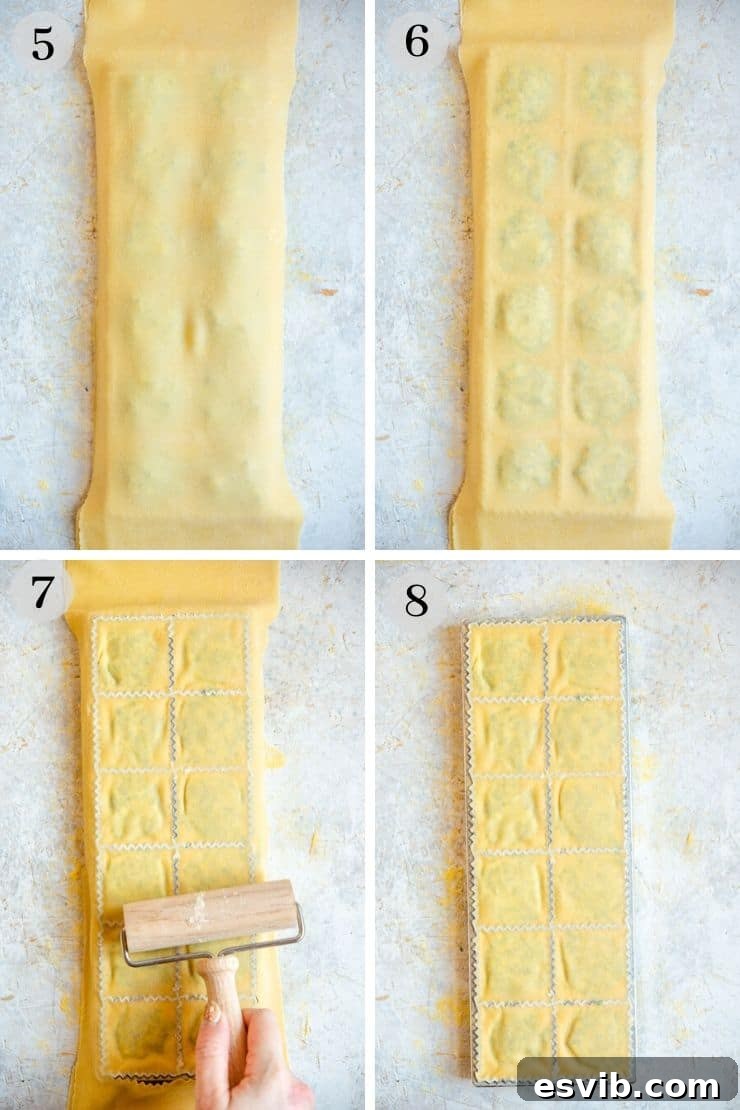
- **Prepare the Maker:** The most critical first step when using a ravioli maker is to **dust it generously with semolina flour or 00 flour**. This prevents the delicate pasta dough from sticking to the mold, which can lead to tears and frustration. I’ve had more than a few disasters when forgetting this vital step! (Refer to photo 1 for visual).
- **Lay the First Pasta Sheet:** Carefully place one sheet of your thinly rolled pasta dough directly over the ravioli maker. Ensure there’s ample overlap on all edges of the tray.
- **Create Pockets:** Gently lay the plastic dimple mold (often included with the maker) over the pasta sheet and lightly press down into the indentations. This creates small pockets for your filling, defining the shape of each ravioli. (Refer to photos 2 & 3).
- **Fill the Pockets:** Spoon your desired filling into each created pocket. Approximately 1 heaped teaspoon is usually sufficient, but adjust based on the size of your ravioli maker. (Refer to photo 4).
- **Add Second Pasta Sheet & Seal:** Carefully place your second sheet of pasta dough directly over the filled first sheet. With clean, dry hands, gently press down around the filling pockets to remove any trapped air and begin to seal the two pasta layers together. This is crucial for preventing your ravioli from bursting during cooking. (Refer to photos 5 & 6).
- **Cut and Release:** Use the mini rolling pin (also typically included with the maker) to roll firmly over the top of the ravioli maker. This action cuts the pasta dough along the edges of each pocket and seals them simultaneously. (Refer to photo 7).
- **Final Removal:** Carefully remove the excess pasta dough from around the edges of the maker. Then, gently invert the ravioli maker onto a lightly floured surface. The perfectly formed and sealed ravioli should fall out, ready for cooking or freezing. (Refer to photo 8).
Mastering the Ravioli Stamp for Classic Designs
Ravioli stamps offer a more traditional, hand-crafted aesthetic with charming crimped edges, providing a great balance between consistency and artisanal feel.
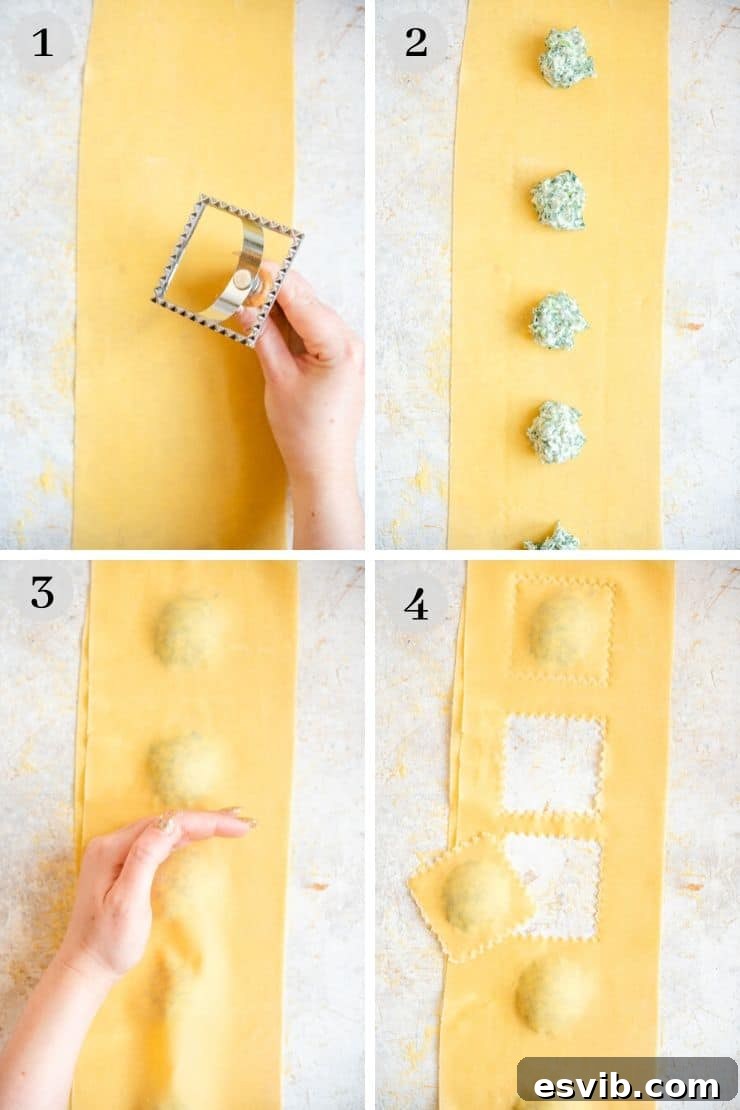
- **Prepare Work Surface:** Lay your single sheet of thinly rolled pasta dough on a clean, lightly dusted surface (using semolina flour to prevent sticking).
- **Mark the Dough:** Lightly press your ravioli stamp onto the pasta sheet. You only want to create a faint impression or guide for your filling, not cut through the pasta yet. This helps with even spacing. (Refer to photo 1).
- **Place the Filling:** Spoon approximately 1 heaped teaspoon of filling into the center of each marked ravioli area. Ensure the filling stays within the boundaries of the stamp impression. (Refer to photo 2).
- **Cover and Seal Air:** Carefully place a second sheet of pasta directly over the first, aligning it as best as possible. Gently use your hands to cup around each mound of filling, pressing lightly to seal the pasta layers together and, crucially, to push out any trapped air. Air pockets can cause ravioli to expand and burst during cooking.
- **Top Tip for Sealing:** If your pasta dough is a little dry or struggling to stick, very lightly dab the edges around the filling with a minimal amount of water using a pastry brush or your fingertip. This creates a stronger seal.
- **Stamp and Cut:** Finally, take your chosen ravioli stamp and press down firmly over each mound of filling. The stamp will cut out the individual ravioli and simultaneously create a beautiful crimped edge, sealing the filling securely inside. Remove the excess dough around the stamped ravioli. (Refer to photo 4).
The Freehand Method with a Pasta Wheel
For a truly rustic and customizable approach, the freehand method using a pasta wheel allows for complete creative control over your ravioli size and shape.
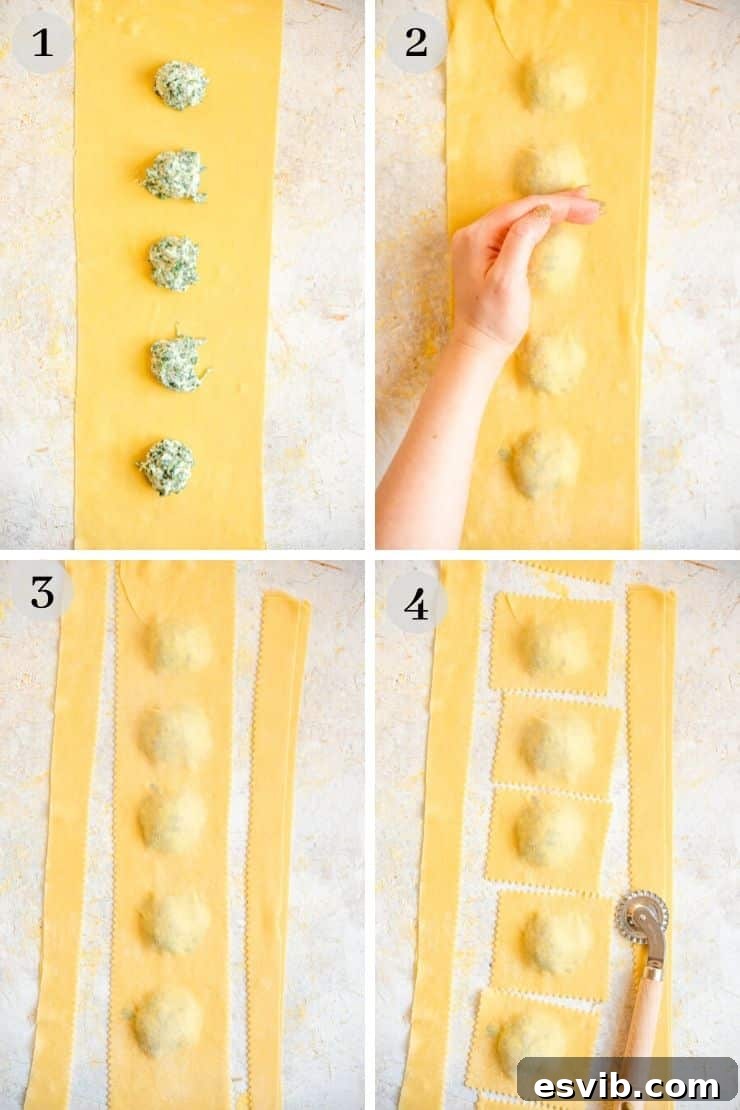
- **Space the Filling:** Lay out one sheet of thinly rolled pasta dough on a lightly floured surface. Space your filling mounds about two finger-widths apart. The exact amount of filling (usually 1 heaped teaspoon) will depend on how large you want your individual ravioli to be. (Refer to photo 1).
- **Cover and Expel Air:** Place your second sheet of pasta dough directly over the first. Similar to the stamp method, gently cup your hands around each filling mound, pressing lightly to seal the pasta layers and meticulously pushing out any trapped air. This prevents ballooning during cooking. (Refer to photo 2).
- **Cut with a Pasta Wheel:** Using a pasta wheel, cut the sides of the combined pasta sheets into individual squares or rectangles around the filling. You can then neaten up the edges or trim them smaller if desired. The crimped edge of the pasta wheel will also help to seal the ravioli securely. (Refer to photos 3 & 4).
- **Top Tip for Alternatives:** If you don’t have a specialized pasta wheel, you can achieve similar results using a pizza cutter or even a sharp knife. While these won’t provide the decorative crimped edges, they will still cut and seal the ravioli effectively. For a rustic crimp, you can press the edges with the tines of a fork.
Pairing Ravioli with the Perfect Sauce
Choosing the right sauce for your homemade ravioli is like selecting the perfect frame for a masterpiece – it should enhance, not overshadow, the beauty within. The goal is to create a harmonious balance where the delicate fresh pasta and the richness of the filling can truly shine.
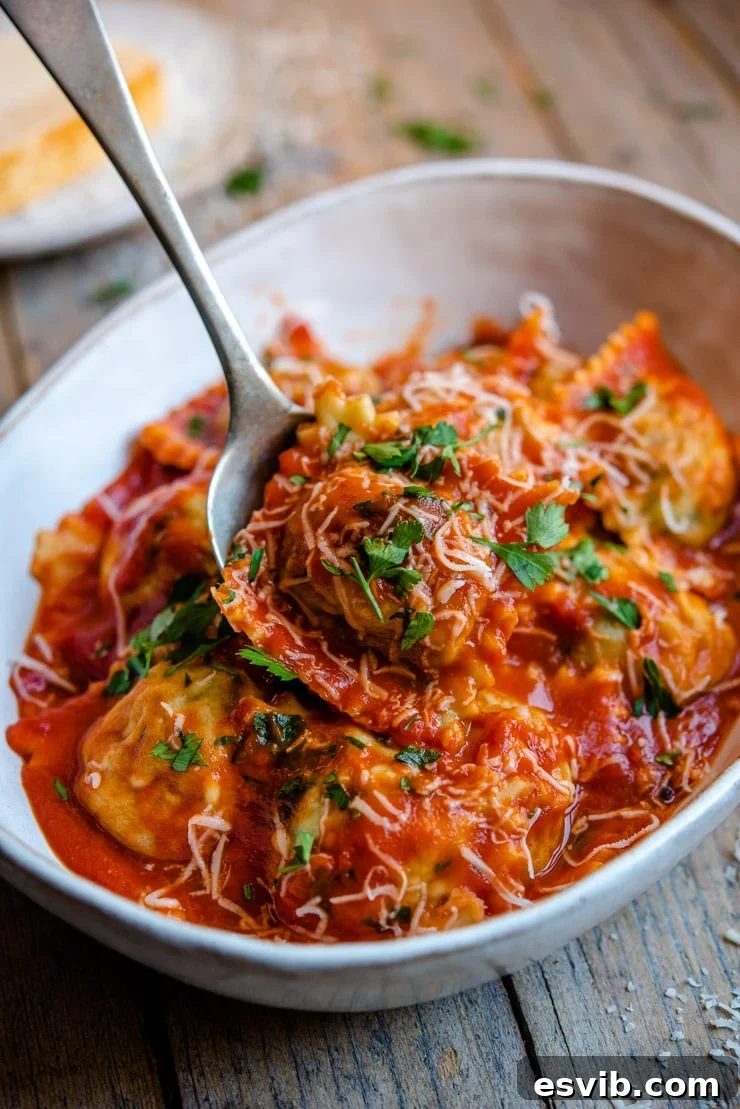
The possibilities are vast, ranging from a vibrant Authentic Italian Tomato Sauce to a fragrant Herby Garlic Butter Pasta Sauce, luxurious cream sauces, or even a hearty Ragu. I’m particularly fond of the rich Parmesan cream sauce that beautifully complements our mushroom ravioli – it’s simply divine!
The Golden Rule: The sauce should never overpower the filling!
- Light Fillings (e.g., ricotta and lemon, delicate seafood): Opt for lighter sauces that allow the subtle flavors of the filling to come through. Think simple butter and sage, a fresh lemon-infused olive oil, or a light white wine sauce.
- Medium Fillings (e.g., spinach and ricotta, mushroom, butternut squash): These versatile fillings pair well with a slightly wider range of sauces. Brown butter and sage, a light tomato cream sauce, or even a simple pesto can be excellent choices.
- Rich Fillings (e.g., braised meat, strong cheeses): For robust fillings, a heartier sauce can be a great match. A classic beef ragu, a robust marinara, or a rich gorgonzola cream sauce can stand up to these flavors.
Always consider the primary flavor profile of your filling. If it’s earthy, complement it with earthy notes in your sauce. If it’s bright and fresh, keep the sauce light and zesty. A little drizzle of good quality extra virgin olive oil and a sprinkle of fresh Parmesan are often all you need for an exquisite finish.
Making and Storing Ravioli in Advance
Homemade ravioli can certainly be prepared ahead of time, making it a convenient option for entertaining or for quick weeknight meals. Proper storage is key to maintaining their quality and preventing them from sticking together.
Short-Term Storage (Same Day or Next Day)
If you’re making your ravioli just a few hours in advance, or even up to 24 hours before cooking, you can store them in the refrigerator. Lay the freshly made ravioli in a single layer on a baking sheet or large plate that has been generously dusted with semolina flour. The semolina flour creates a barrier, preventing the delicate pasta from sticking. Once arranged, loosely cover the ravioli with a clean kitchen towel or plastic wrap to prevent them from drying out too much, and refrigerate. They will hold perfectly until you’re ready to cook.
Long-Term Storage (Freezing Ravioli)
For making ravioli several days or even weeks in advance, freezing is the best method. This allows you to enjoy homemade pasta whenever the craving strikes!
- How to Freeze Ravioli: Lay the individual ravioli flat and in a single layer on a baking sheet lined with parchment paper. Ensure they are not touching each other, as they will freeze solid. Place the baking sheet in the freezer for about 1-2 hours, or until the ravioli are completely frozen solid. Once frozen, you can transfer them to a freezer-safe ziploc bag or airtight container. This initial flash-freezing prevents them from sticking together in a clump, making it easy to grab just the amount you need.
- How to Cook from Frozen: There’s absolutely no need to thaw or defrost your frozen ravioli before cooking. In fact, thawing them can make them sticky and difficult to handle. Simply drop them directly into a pot of generously salted boiling water. They will take a few minutes longer to cook than fresh ravioli (usually 5-8 minutes, depending on size and thickness), but they will maintain their perfect texture and flavor. Cook until they float to the surface and are tender yet firm to the bite.
Expert Tips for Homemade Ravioli Success
- Flour Your Surface Liberally: Always have a generous supply of semolina flour or “00” flour at hand. Dust your work surface, tools, and finished ravioli liberally to prevent sticking. Semolina is particularly good as it’s coarser and less likely to be absorbed by the pasta dough, keeping it from drying out prematurely.
- Mind the Filling Consistency: Reiterate that your chosen filling should be smooth, thick (paste-like), and neither too wet nor too rough. Excess moisture will make the pasta sticky, while sharp pieces can tear the delicate dough.
- Work in Batches: Fresh pasta dough can dry out quickly. Divide your dough into manageable portions and keep the unworked dough covered with a damp cloth or plastic wrap while you work on one piece at a time.
- Expel Air Religiously: When placing the second pasta sheet over the filling, gently press around each mound to remove any trapped air. Air pockets will cause ravioli to inflate and possibly burst during boiling, leading to a loss of filling.
- Seal Properly: Ensure the edges of your ravioli are tightly sealed. If the dough seems a bit dry, a tiny dab of water or egg wash along the edges will act as glue. This is critical for keeping the filling securely inside.
- Don’t Overfill: While tempting to maximize filling, overfilling can make it difficult to seal the ravioli properly and increases the risk of them bursting. A modest, heaped teaspoon is usually ideal.
- Don’t Overcook: Fresh pasta cooks much faster than dried pasta. Ravioli typically only need 2-5 minutes in salted boiling water, depending on their size and thickness. Cook until they float and are tender to the bite.
- Invest in a Pasta Machine: While not strictly necessary, a pasta machine (manual or electric) will significantly simplify the rolling process, helping you achieve consistently thin sheets with minimal effort. However, with a rolling pin, some dedication, and the right technique, you can still achieve excellent results.
- Practice Makes Perfect: Don’t be discouraged if your first batch isn’t picture-perfect. Pasta making is an art that improves with practice. Each attempt will hone your skills and bring you closer to making exquisite homemade ravioli.
More Homemade Pasta Creations to Explore
Once you’ve mastered homemade ravioli, a world of other fresh pasta possibilities awaits! Expand your repertoire with these delightful recipes:
- Lobster Ravioli with Vodka Cream Sauce
- Mushroom Ravioli With Parmesan Cream Sauce
- Butternut Squash Ravioli with Sage and Brown Butter Sauce
- Homemade Agnolotti (step by step)
If you’ve tried making your own Homemade Ravioli or any other recipe on the blog, please let us know how you got on in the comments below! We love hearing from you and seeing your culinary creations. You can also Follow us on Facebook, Instagram, and Pinterest to see more delicious food and what we’re getting up to in the kitchen.
Step By Step Photos Above
Most of our recipes come with step by step photos, helpful tips and tricks to make it perfectly first time and even video!
How to Make Homemade Ravioli
By Emily
30 mins
40 mins
1 hr
10 mins
4 – 6 servings
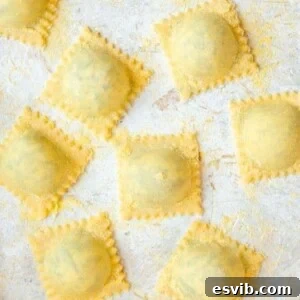
Equipment
- Pasta machine (recommended, but a rolling pin works)
- Pasta wheel
- Ravioli stamp (optional)
- Ravioli Maker (optional)
Ingredients
- 1 batch homemade egg pasta dough
- semolina flour, for dusting
- filling of choice, see notes for filling ideas above
Instructions
Using a Ravioli Maker
-
Dust the ravioli maker lightly with semolina or 00 flour to prevent sticking.
-
Place a sheet of pasta directly over the ravioli maker, ensuring sufficient overlap on all edges.
-
Place the plastic dimple mold over the pasta sheet and lightly press to create filling pockets.
-
Fill each pocket with your desired filling (approximately 1 heaped tsp).
-
Place a second sheet of pasta over the first and lightly push down to remove any air around the filling.
-
Use the mini roller to roll over the maker until the pasta is cut around the edges.
-
Remove excess pasta dough and turn the maker over to release the ravioli.
-
You now have perfectly filled ravioli ready for cooking.
Using a Ravioli Stamp
-
Lay a pasta sheet on a clean surface dusted with semolina flour.
-
Lightly press your stamp onto the pasta to mark where the filling will go (do not cut yet).
-
Place about 1 heaped tsp of filling in the middle of each marked area.
-
Place a second pasta sheet over the first and cup your hands around the filling, pressing lightly to seal and remove air.
-
Top Tip: If pasta struggles to stick, dab edges very lightly with water to seal.
-
Use your stamp to cut out each ravioli.
The Free Hand Method (with a pasta wheel)
-
Lay out one pasta sheet and space filling mounds two finger-spaces apart.
-
Aim for about 1 heaped teaspoon of filling per ravioli, adjusting for desired size.
-
Lay a second pasta sheet over the first, gently cupping hands around the filling to seal and push out air.
-
Use a pasta wheel to cut the sides and separate the ravioli into individual squares. Neaten edges as needed.
-
Top Tip: A pizza cutter or knife can be used instead of a pasta wheel for cutting, though it won’t create crimped edges.
Notes
- Ensure plenty of semolina flour is available to prevent ravioli from sticking during preparation and storage.
- Standard all-purpose flour can be used for dusting as an alternative to semolina, but be aware it might dry the pasta out faster.
- The filling must be smooth and not overly wet or rough to avoid tearing the delicate pasta dough.
- For our reliable homemade pasta dough recipe, refer to the dedicated guide.
- While specialized tools like pasta machines and ravioli makers simplify the process, excellent homemade ravioli can still be achieved with just a rolling pin, knife, cookie cutter, or pizza wheel, with a little extra effort.
- Nutrition information provided below is calculated without the filling, as fillings can vary widely.
Ravioli Filling and Sauce Ideas
- Mushroom Ravioli With Parmesan Cream Sauce
- Lobster Ravioli with Vodka Cream Sauce
- Spinach and Ricotta (classic)
- Roasted Butternut Squash and Sage
- Artichoke and Goat Cheese
Helpful Info for All Recipes
- We consistently use extra virgin olive oil in all our recipes unless otherwise specified.
- For canned or jarred tomatoes, we recommend Cirio or Mutti brands for superior results and flavor.
- All vegetables are considered medium-sized unless specified differently.
- All recipes are meticulously tested and developed using a fan (convection) oven.
- Find out more about how nutrition is calculated.
- Explore our must-have Italian Pantry Staples.
- Discover all our Essential Kitchen Tools for Italian Cooking.
Nutrition
Calories:
104
kcal
Nutrition information is automatically calculated and should be used as an approximation only, especially as filling ingredients vary.
Did you try this recipe?
Leave a comment below!