
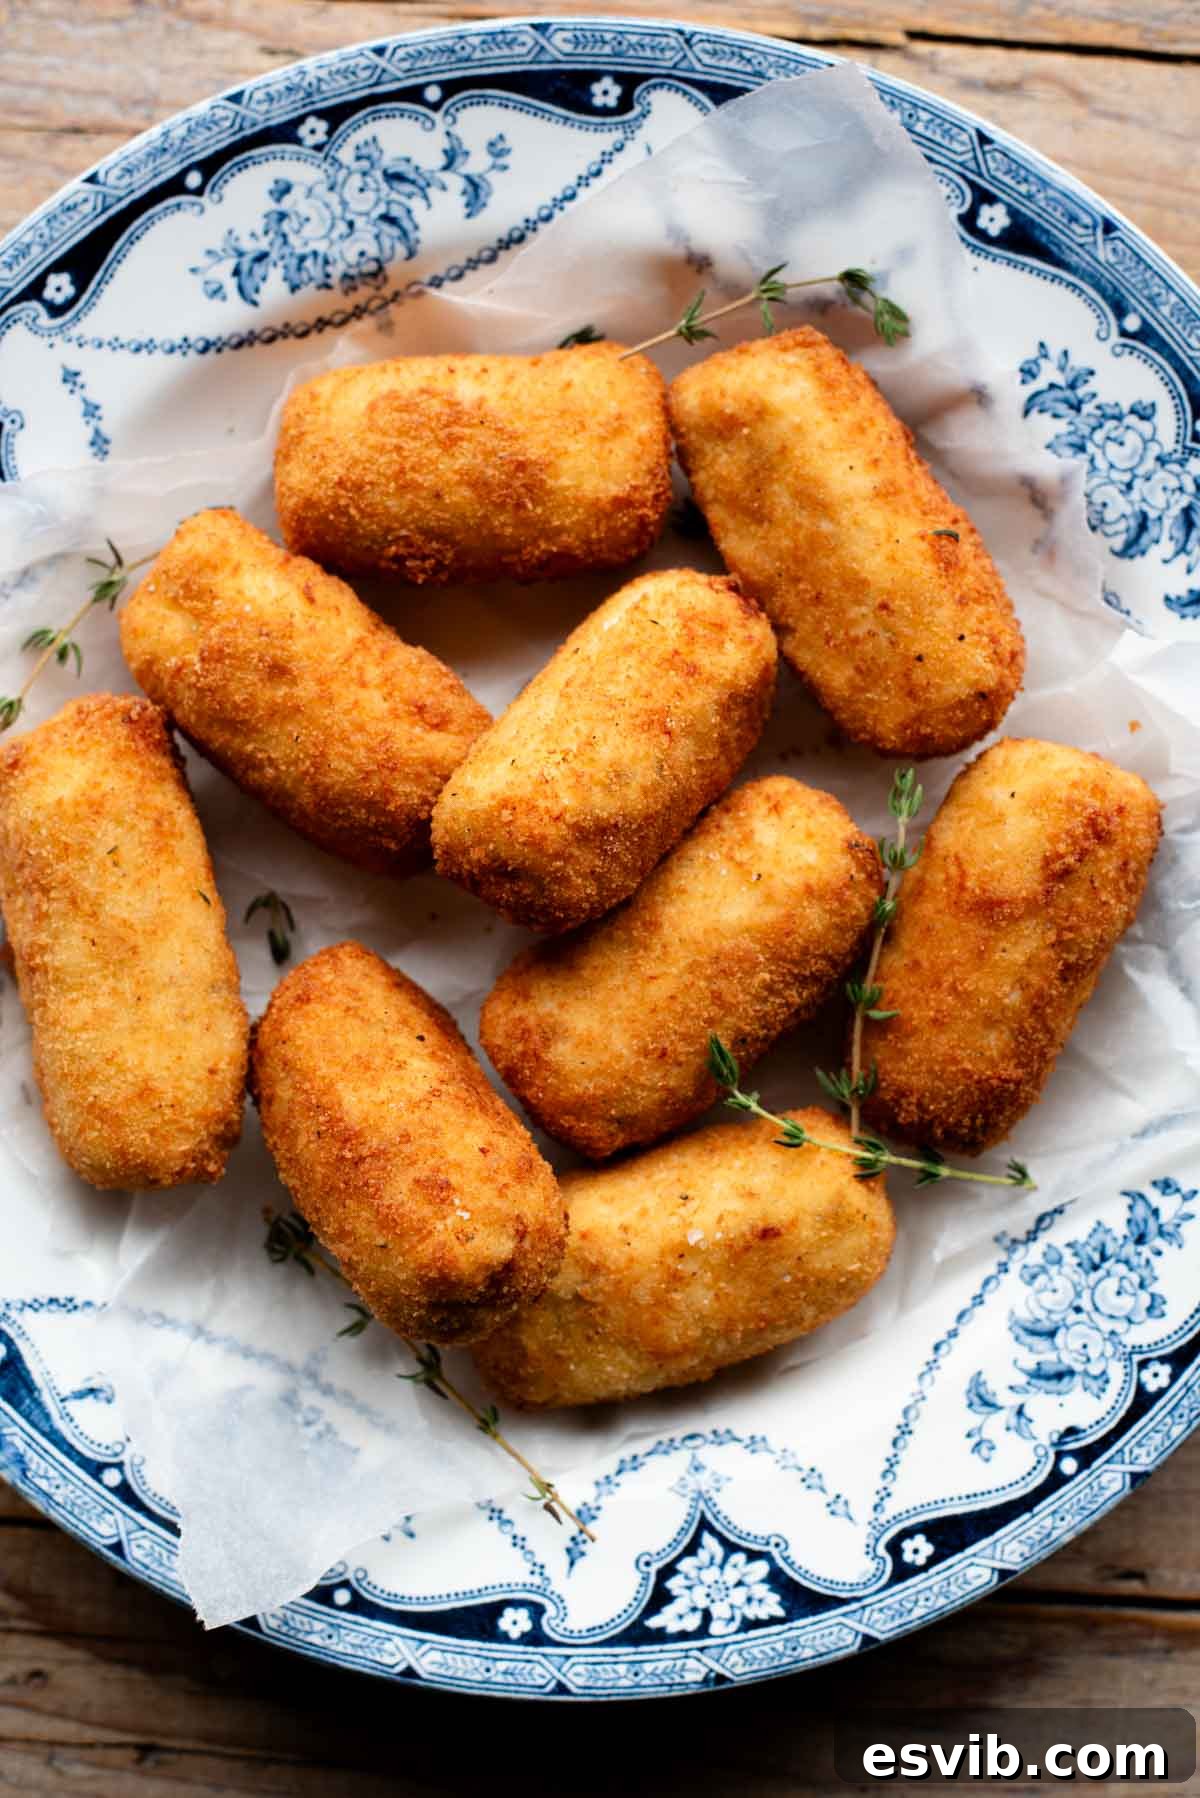
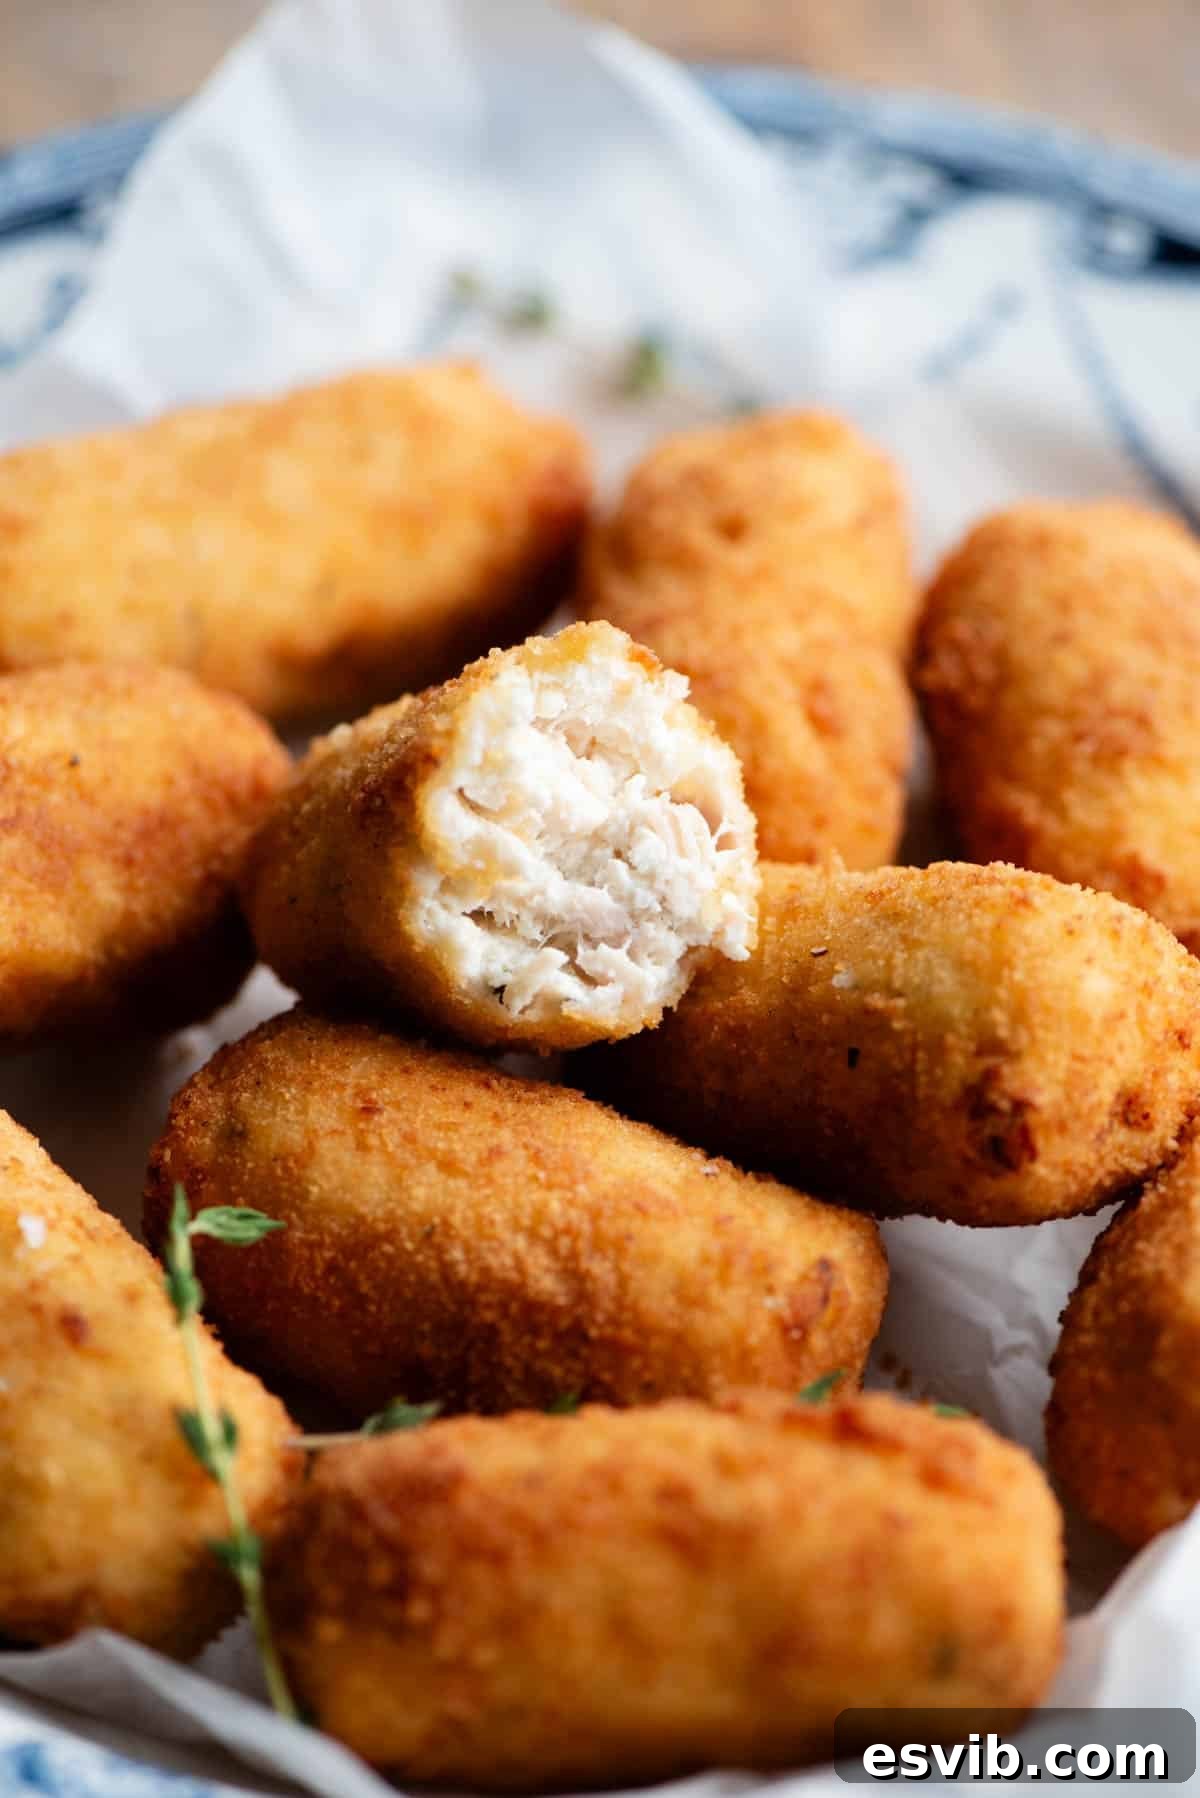
Unlock the secret to irresistible Italian comfort food with our recipe for **Ricotta Chicken Croquettes**. These golden-fried delights boast a beautifully crispy and crunchy exterior that gives way to a luxuriously soft and creamy middle. Crafted from tender shredded chicken, rich ricotta cheese, subtly sweet onion, and fragrant fresh thyme, these croquettes are a true culinary gem, perfect for any occasion.
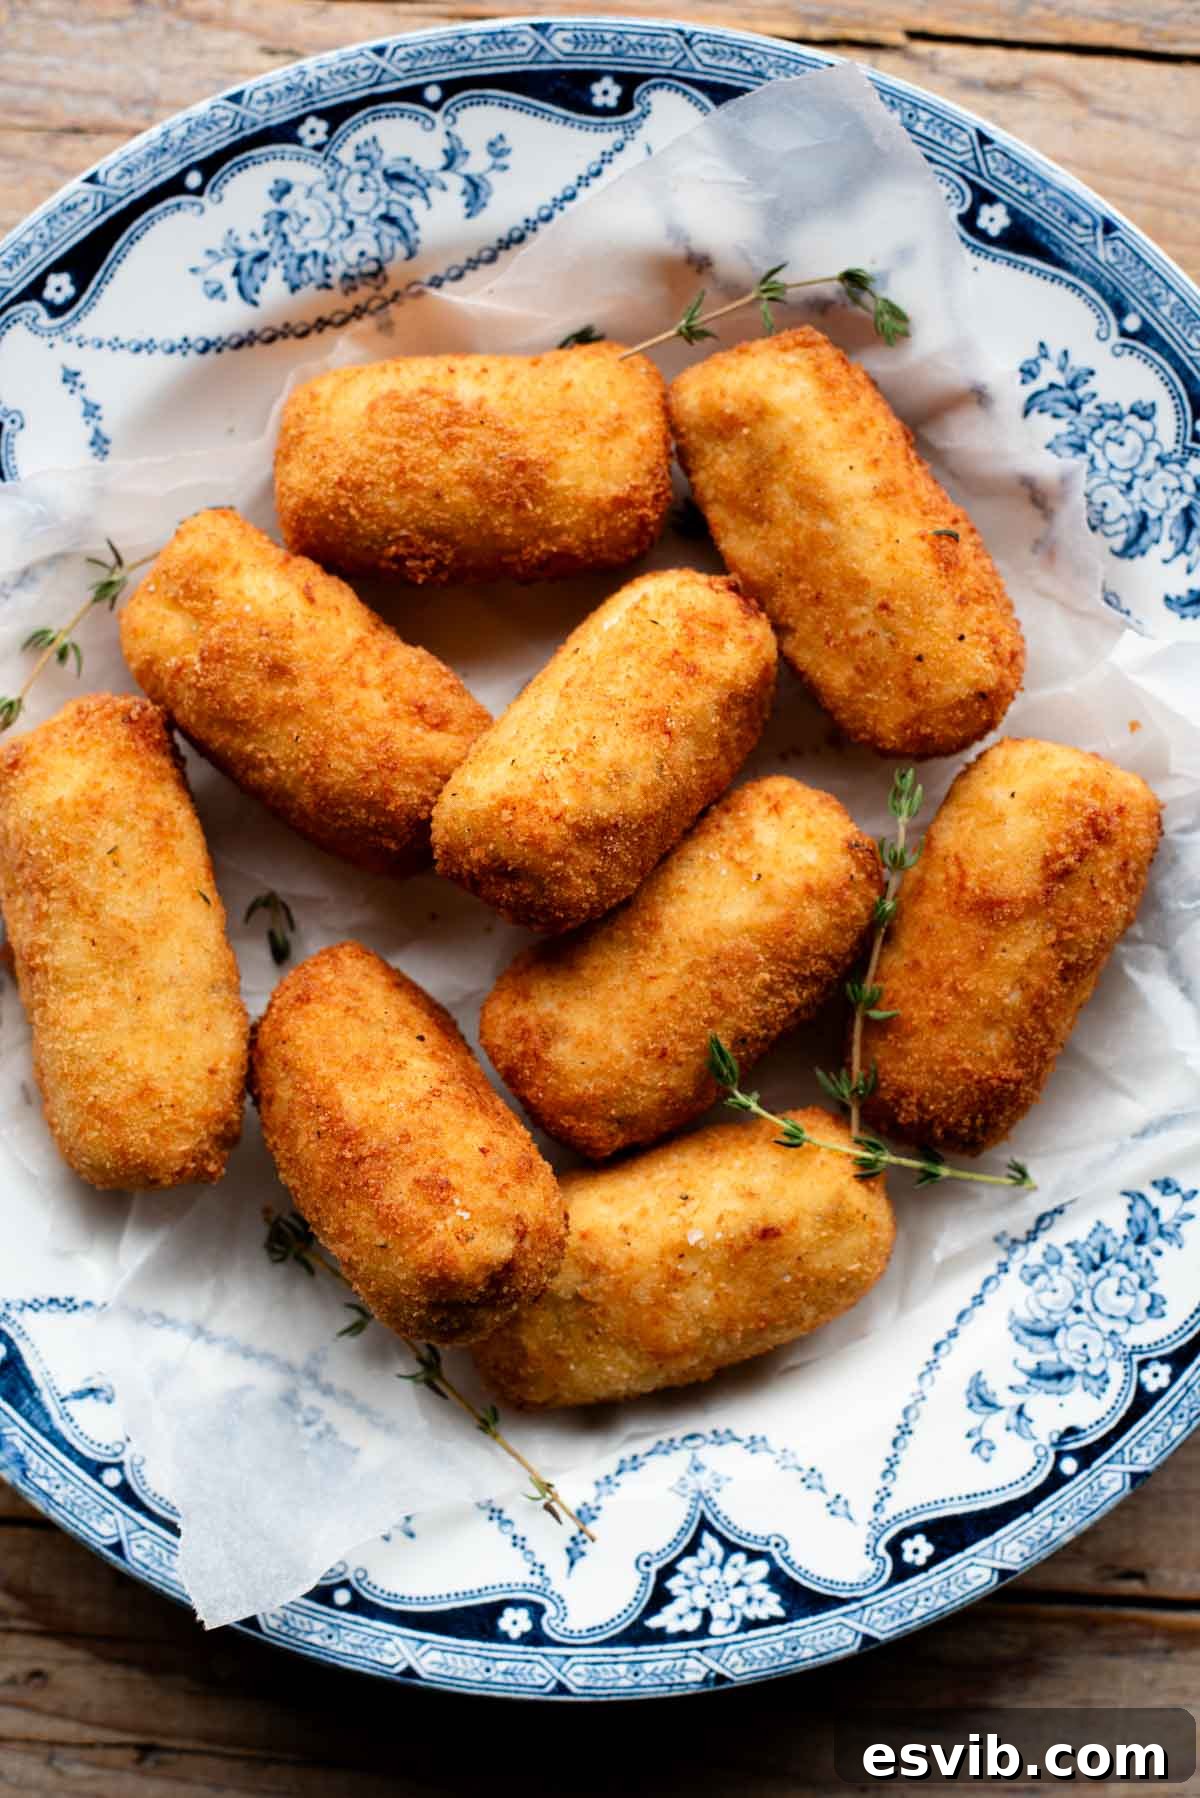
Inspired by the rich culinary traditions of Piedmont, a region in northern Italy renowned for its exquisite ingredients and sophisticated dishes, these chicken croquettes offer a delightful taste experience. The inclusion of creamy ricotta cheese is what truly elevates this recipe, imparting an unparalleled lightness and an incredibly smooth texture to the croquette’s core. This creamy center beautifully contrasts with the golden, crisp breadcrumb coating, making each bite an explosion of texture and flavor.
Not only are these croquettes incredibly delicious, but they are also exceptionally moreish, ensuring they’ll disappear quickly from any platter. Whether you’re serving them as an elegant appetizer, a satisfying snack, or a unique side dish, they are guaranteed to impress. This updated recipe, originally published on February 24th, 2017, has been lovingly refined with new photos and enhanced tips to provide an even better cooking and eating experience for you.
**Ready to create these culinary masterpieces?** Below, you’ll find the complete recipe, including detailed notes on ingredients, step-by-step photos, expert tips, exciting variations, and even a video tutorial to guide you through every stage. For the full printable recipe, simply scroll to the bottom of this page or click the dedicated recipe link.
Table of Contents
- Introduction to Ricotta Chicken Croquettes
- Why You’ll Love These Croquettes
- Ingredients for Perfect Croquettes
- Ingredient Notes and Expert Substitutions
- Step-by-Step Guide to Making Ricotta Chicken Croquettes
- Recipe Tips and Frequently Asked Questions
- Creative Serving Suggestions
- More Delightful Italian Antipasti Recipes
- Full Printable Ricotta Chicken Croquettes Recipe
Introduction to Ricotta Chicken Croquettes
Croquettes hold a special place in Italian cuisine, particularly as part of an antipasti spread or a delightful snack. These Ricotta Chicken Croquettes take inspiration from the rich culinary traditions of Piedmont, a region known for its sophisticated and flavorful dishes. The combination of tender shredded chicken and creamy ricotta cheese creates a harmonious blend of textures and tastes, making these croquettes stand out. The crispy coating provides a satisfying crunch, while the ricotta ensures a light, airy, and incredibly moist interior. This recipe is designed to be straightforward yet yield impressive results, whether you’re a seasoned chef or a home cook looking to explore new flavors.
Why You’ll Love These Croquettes
- **Irresistible Texture:** The contrast between the golden-brown, crunchy exterior and the tender, creamy interior is simply divine. It’s a texture sensation that keeps you coming back for more.
- **Flavorful & Aromatic:** Fresh thyme and lemon zest infuse the chicken and ricotta mixture with a bright, herbaceous, and zesty flavor profile. Parmigiano Reggiano in the breading adds an extra layer of savory depth.
- **Versatile:** These croquettes are incredibly adaptable. Serve them as an elegant appetizer, a hearty side dish, a light lunch with a salad, or a sophisticated addition to an Italian antipasti platter.
- **Perfect for Leftovers:** A fantastic way to transform leftover roast chicken into something exciting and new, reducing food waste while creating a delicious meal.
- **Piedmontese Inspiration:** Experience a taste of northern Italian cuisine with a recipe that’s rooted in rich regional flavors and techniques.
Ingredients for Perfect Croquettes
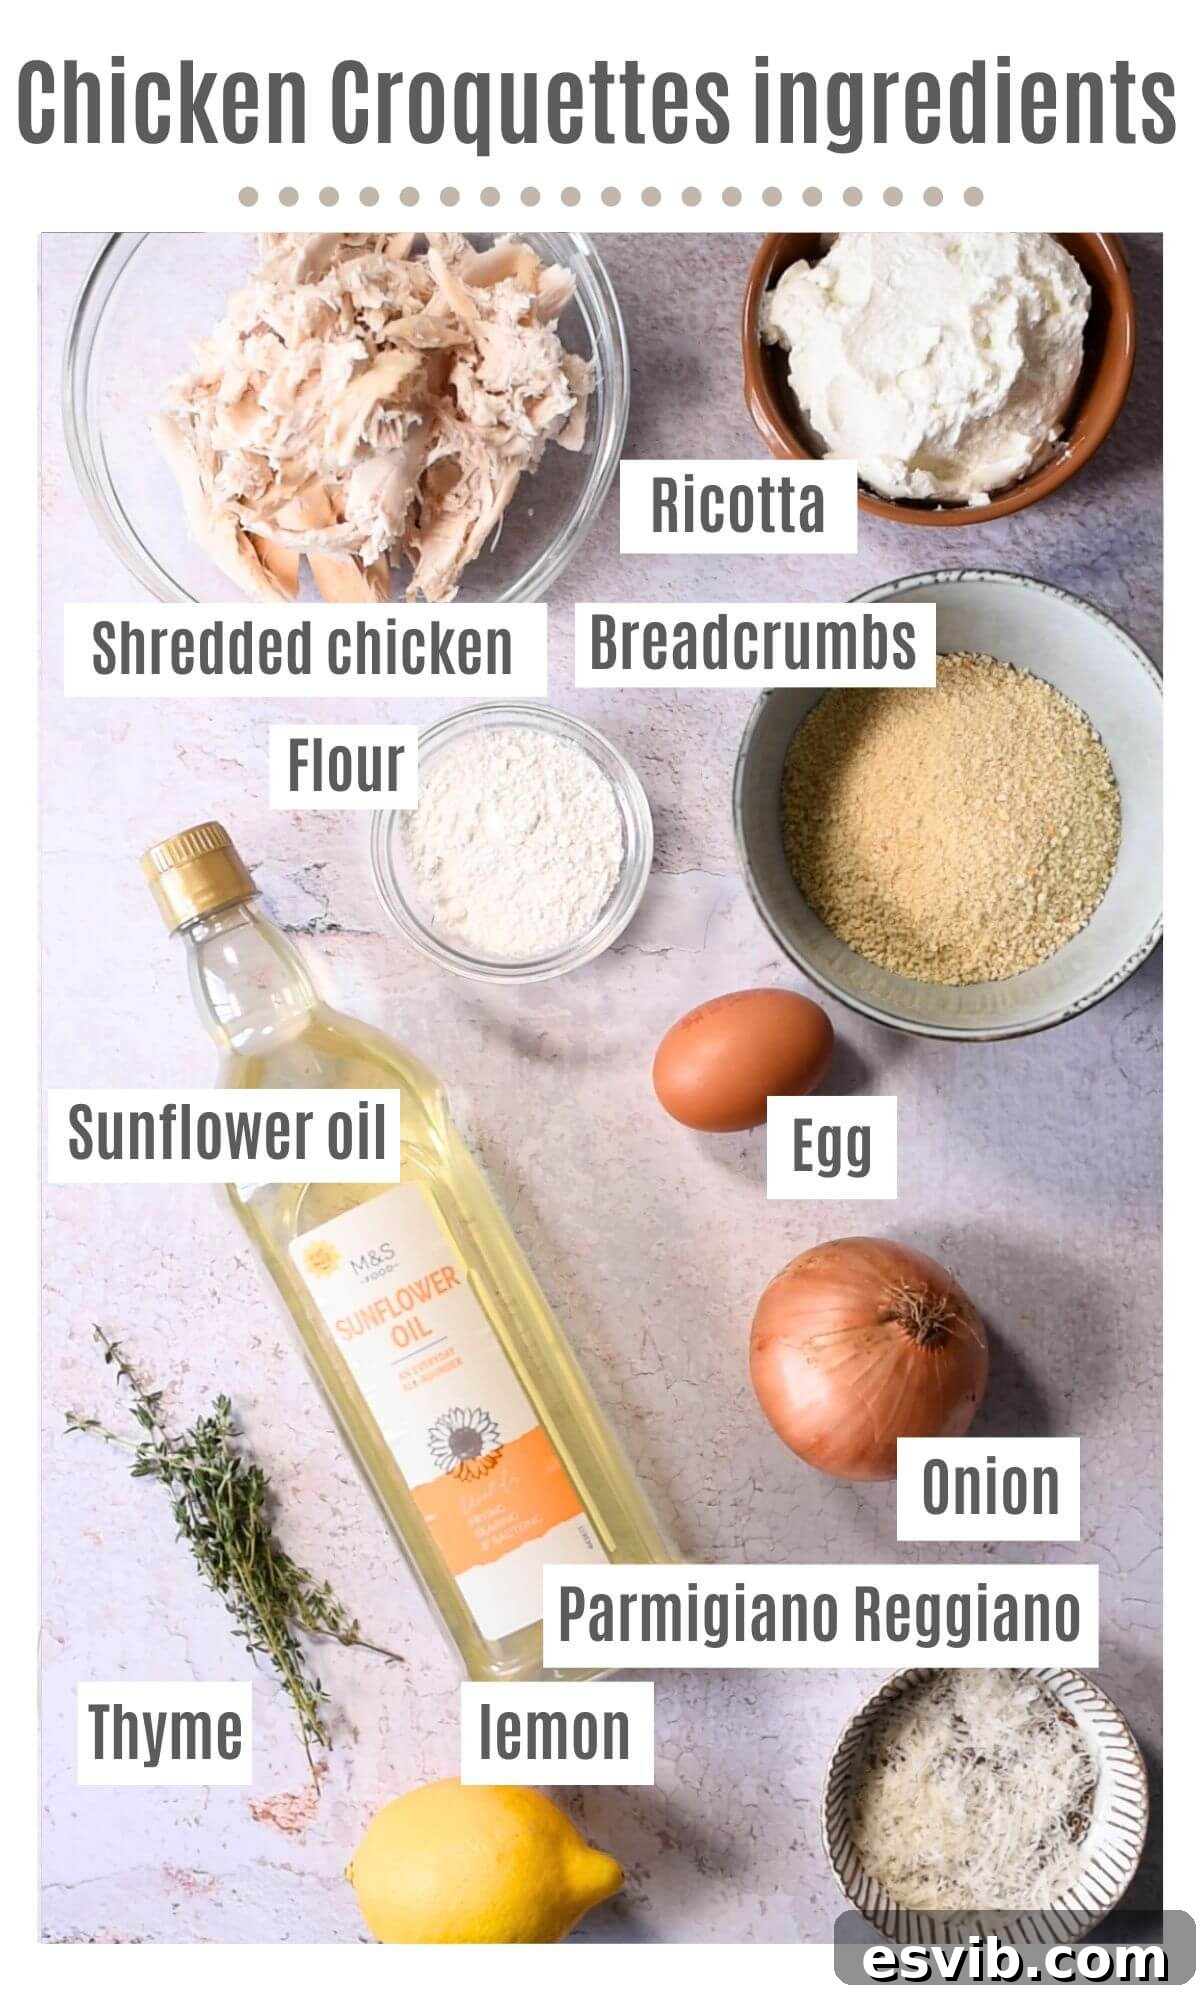
Crafting perfect Ricotta Chicken Croquettes begins with selecting fresh, quality ingredients. Each component plays a vital role in achieving that sought-after balance of flavor and texture. Here’s a visual overview of everything you’ll need to bring these delicious croquettes to life in your kitchen.
Ingredient Notes and Expert Substitutions
- **Shredded Chicken:** The heart of our croquettes! You can easily use leftover roast chicken for a quick and flavorful start. Alternatively, cook boneless, skinless chicken thighs or breasts, or even drumsticks, specifically for this recipe. Simply boil or bake them until cooked through, then shred finely using two forks or a stand mixer. Using dark meat (thighs or drumsticks) can add more moisture and flavor to the croquettes. Ensure the chicken is cool before mixing.
- **Ricotta Cheese:** This creamy Italian cheese is key to the light and tender texture. It’s crucial to drain any excess liquid from your tub of ricotta before incorporating it into the mixture. Placing it in a fine-mesh sieve lined with cheesecloth and letting it sit for at least 30 minutes (or even a few hours in the fridge) will prevent the croquettes from becoming too soft or watery. Whole milk ricotta will yield a richer, creamier result compared to part-skim.
- **Onion:** Finely chopped onion adds a subtle sweetness and aromatic depth. It’s important to chop the onion very finely (a small dice or even grated) to ensure it blends seamlessly into the mixture, making the croquettes easy to form and preventing large, raw chunks in the cooked product. Sautéing it until translucent is essential to soften its flavor.
- **Thyme:** Fresh thyme brings a wonderful herbaceous note that complements the chicken and ricotta beautifully. While fresh is always recommended for its vibrant flavor, if dried thyme is your only option, use about half the amount as dried herbs are more potent. For an authentic Piedmontese touch, fresh sage leaves are traditionally used and make a fantastic alternative. Fresh rosemary or dried oregano can also be used if you’re looking for different aromatic profiles.
- **Lemon Zest:** A small amount of grated lemon zest introduces a bright, fresh, and slightly acidic counterpoint that lifts the entire flavor profile of the croquettes. It prevents them from tasting heavy. If you prefer a richer, more savory croquette, you can omit the lemon zest and instead add an extra tablespoon of grated Parmigiano Reggiano to the mixture itself, or a pinch of nutmeg for a classic Italian flavor.
- **Parmigiano Reggiano:** I love to mix a little freshly grated Parmigiano Reggiano into the breadcrumbs. This adds a fantastic savory, umami flavor and contributes to a deeper golden color and an even crispier coating. Use good quality Parmigiano Reggiano for the best results; pre-grated varieties often lack the same depth of flavor.
- **Flour, Egg, and Breadcrumbs (for Coating):** This classic “dredging” trio is essential for achieving that perfect crispy exterior.
- **Flour:** All-purpose flour helps the egg adhere to the croquette mixture.
- **Egg:** A beaten egg acts as a binder, ensuring the breadcrumbs stick securely.
- **Breadcrumbs:** Fine breadcrumbs create a delicate, uniform crust. For an extra crispy, almost flaky texture, you can opt for Panko breadcrumbs. If using Panko, you might need slightly more to fully coat the croquettes. Homemade breadcrumbs (from stale bread processed in a food processor) are also an excellent choice and can significantly improve the flavor and texture.
Step-by-Step Guide to Making Ricotta Chicken Croquettes
Follow these detailed steps, accompanied by visual cues, to ensure your Ricotta Chicken Croquettes turn out perfectly crispy on the outside and wonderfully creamy on the inside.
1. Sauté the Onion: Begin by adding 1-2 teaspoons of olive oil to a small pan over medium heat. Add the finely chopped onion and sauté gently until it becomes soft and translucent, typically about 5-7 minutes. Be careful not to brown it, as this can alter the delicate flavor. Once cooked, transfer the sautéed onion to a small bowl and set it aside to cool completely. This step is crucial for mellowing the onion’s flavor and ensuring it doesn’t cook further when mixed with other ingredients (photo 1).
2. Prepare the Croquette Mixture: While the onion cools, roughly chop your shredded chicken. Transfer the chopped chicken to a large mixing bowl. Add the cooled sautéed onion, well-drained ricotta cheese, fresh thyme, and grated lemon zest. Mix all the ingredients thoroughly until they are well combined. Season generously with a pinch of salt and freshly ground black pepper to taste. Ensure the mixture is homogenous and ready for shaping (photos 2 & 3).
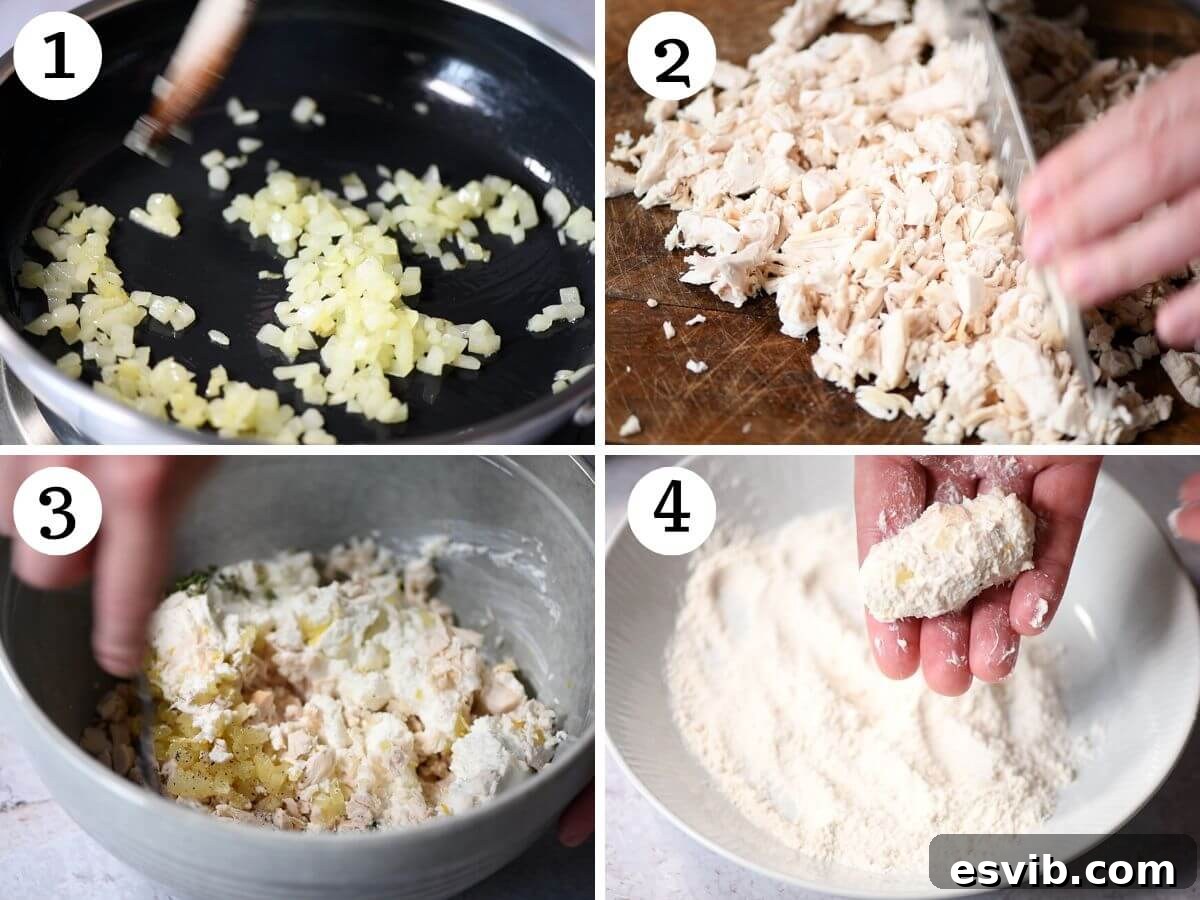
3. Shape the Croquettes: Take about one heaped tablespoon of the prepared chicken and ricotta mixture for each croquette. Gently roll the mixture between your palms to form either small cylindrical shapes or oval patties, as preferred. Aim for uniform size to ensure even cooking. This recipe typically yields around 12 croquettes. If the mixture feels too soft to handle, refer to our “Recipe Tips and FAQs” section for guidance (photo 4).
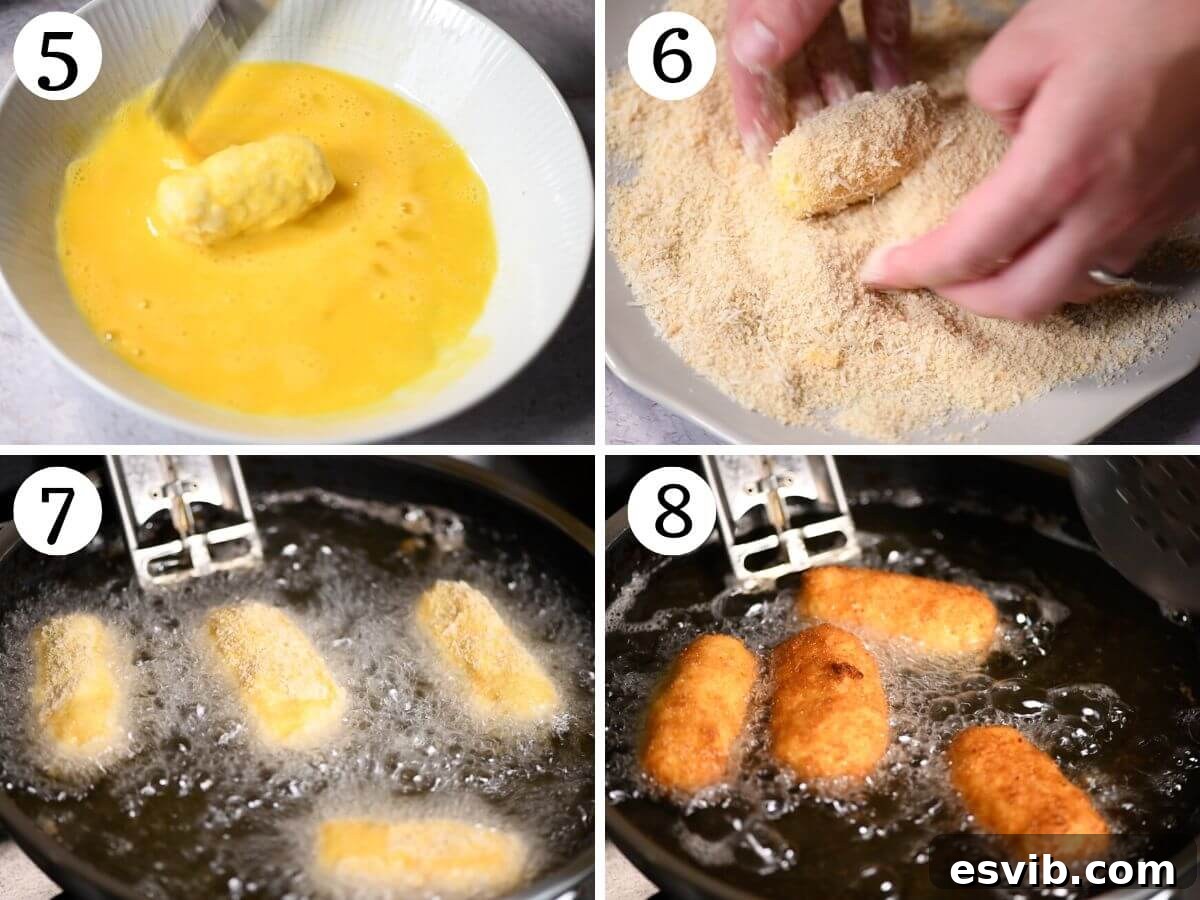
4. Bread the Croquettes: Set up a breading station with three separate shallow bowls. In the first bowl, place the 2 heaped tablespoons of flour. In the second bowl, whisk the egg until smooth. In the third bowl, combine the breadcrumbs with the grated Parmigiano Reggiano and a pinch of salt and pepper, mixing well. Take each shaped croquette, first dredge it lightly in the flour (shaking off any excess), then dip it into the beaten egg, ensuring it’s fully coated. Finally, roll it in the breadcrumb mixture, pressing gently to ensure an even and complete coating. Once breaded, place the croquettes on a plate or baking sheet and refrigerate for at least 30 minutes. This chilling step helps the coating adhere firmly and prevents the croquettes from breaking apart during frying (photos 5 and 6).
5. Fry the Croquettes: In a sturdy pan or deep skillet, heat about 1 inch of sunflower oil over medium-high heat. If you have a kitchen thermometer, heat the oil to 180°C (355°F). If not, you can test the oil by dropping a tiny piece of breadcrumb; if it sizzles and turns golden within 30 seconds, the oil is ready. Carefully add the croquettes to the hot oil in batches of 3 or 4, ensuring you don’t overcrowd the pan. Fry them for 2-3 minutes on each side, turning occasionally, until they are beautifully golden brown and crispy all over. Once cooked, use a slotted spoon to transfer the fried croquettes to a plate lined with kitchen paper. This allows any excess oil to drain off, keeping them perfectly crisp (photos 7 and 8). Serve immediately and enjoy!
Recipe Tips and Frequently Asked Questions
Mastering these croquettes is simple with a few key techniques. Here are some essential tips and answers to common questions to help you achieve perfect results every time.
Frying Perfection: Achieving the ideal crispness depends on the oil temperature. If you have a kitchen thermometer, heat the oil to 180°C (350°F) for optimal frying. Don’t have one? No problem! You can tell the oil is ready when it starts to gently shimmer in the pan. Another simple test is to drop a small breadcrumb into the oil; if it immediately sizzles and floats to the surface, it’s ready for frying. Avoid overheating the oil, as this can cause the croquettes to brown too quickly on the outside while remaining cool inside.
Fry in Batches: It’s crucial not to overcrowd your pan when frying. I recommend frying the croquettes in small batches of 3 or 4 at a time. Overcrowding significantly drops the oil’s temperature, leading to greasy, less crispy croquettes that take much longer to cook through. Giving each croquette enough space ensures consistent heat and that beautiful golden-brown crust.
Drain After Frying: As soon as the croquettes achieve their perfect golden hue, transfer them with a slotted spoon to a plate generously lined with kitchen paper (paper towels). This essential step helps absorb any excess oil, ensuring your croquettes remain wonderfully crisp and light, rather than oily.
The consistency of your croquette mixture can vary quite a bit depending on the moisture content of the ricotta you use. If you find the mixture is too soft or sticky to easily form into croquettes, there are a couple of solutions. First, you can add a small amount of all-purpose flour to the mixture, starting with half a tablespoon at a time and mixing until it reaches a more manageable consistency. Usually, no more than 2 tablespoons are needed. Alternatively, you can cover the bowl and place the mixture in the fridge for at least 30 minutes (or even an hour). Chilling helps firm up the ingredients, making it much easier to shape the croquettes without them sticking to your hands.
For deep frying, it’s best to use a neutral-flavored oil with a high smoke point. Sunflower oil is an excellent choice due to its mild taste and ability to withstand high temperatures without breaking down. Other suitable alternatives include peanut oil, vegetable oil, or canola oil. Avoid oils with strong flavors like olive oil for frying, as they can overpower the delicate taste of the croquettes and have a lower smoke point.
Leftover chicken croquettes can be stored in an airtight container in the fridge for up to 3 days. They are delicious eaten cold, making them a great option for packed lunches or quick snacks. To reheat and restore some of their crispness, preheat your oven to 200°C (400°F). Place the croquettes on a baking sheet and heat for about 10-15 minutes, or until warmed through and crispy again. Avoid reheating in the microwave, as this will make them soft and soggy.
Yes, for a lighter alternative, you can certainly bake or air fry the Ricotta Chicken Croquettes. To bake, preheat your oven to 200°C (400°F). Lightly spray the breaded croquettes with olive oil spray and bake for 20-25 minutes, flipping halfway through, until golden brown and cooked through. For air frying, preheat your air fryer to 190°C (375°F). Lightly spray the croquettes with oil and air fry for 12-15 minutes, shaking the basket halfway, until crispy and golden. The texture won’t be quite as rich as deep-frying, but they will still be delicious!
Yes, you can freeze these croquettes for future enjoyment. After shaping and breading the croquettes, arrange them in a single layer on a baking sheet and place them in the freezer. Once fully frozen (this takes a couple of hours), transfer the frozen croquettes to an airtight freezer-safe bag or container. They will keep well for up to 2-3 months. When ready to cook, you can fry them directly from frozen, adding a few extra minutes to the cooking time, or thaw them in the refrigerator before frying as usual.
Creative Serving Suggestions
These versatile Ricotta Chicken Croquettes can be enjoyed in various ways, fitting perfectly into different meal contexts. Here are some of my favorite ideas to serve them:
- Aperitivo Perfection: Elevate your Italian happy hour! Serve these golden croquettes alongside your favorite Italian Aperitivo cocktails. They pair wonderfully with a refreshing Aperol Spritz, a classic Venetian Spritz, or even a sparkling Prosecco. The savory, creamy croquettes beautifully balance the bitter and bubbly notes of these drinks.
- Elegant Antipasto Platter: Transform them into a centerpiece for an impressive antipasti platter. Arrange them artfully with an assortment of marinated olives, aged cheeses like Pecorino or Fontina, thinly sliced cured meats such as prosciutto or salami, and perhaps some grissini (Italian breadsticks). This creates a vibrant and flavorful start to any Italian meal.
- Light & Satisfying Lunch: For a delicious and fulfilling lunch, serve the chicken croquettes with a fresh, crisp salad. They are particularly good with our vibrant arugula salad, perhaps enhanced with juicy cherry tomatoes, a light vinaigrette, and a sprinkle of pine nuts for added texture. The freshness of the salad cuts through the richness of the croquettes beautifully.
- Versatile Side Dish: These croquettes make an excellent side dish for a more substantial meal, especially on special occasions. Pair them with roasted vegetables, a simple pasta dish, or even a light fish entrée. Their delicate flavor ensures they complement without overpowering the main course. Consider a creamy lemon aioli or a fresh tomato sauce as a dipping accompaniment.
- **Kid-Friendly Snack:** Their familiar taste and handheld size make them a hit with children. Serve them simply with a side of ketchup or a mild marinara sauce for a fun and nutritious snack or light meal.
More Delightful Italian Antipasti Recipes
If you’ve enjoyed these Ricotta Chicken Croquettes, you’ll love exploring other traditional and contemporary Italian appetizers. These recipes are perfect for entertaining or simply adding an Italian flair to your everyday meals.
Antipasti
Gnocco Fritto (Italian Fried Dough)
Sides
Baked Spinach Balls with Parmigiano Cream
Antipasti
Pizza Pinwheels with Prosciutto and Gorgonzola
Sides
Crispy Baked Polenta Fries
If you’ve tried this **Ricotta Chicken Croquettes recipe** or any other delicious recipe on our blog, we would love to hear from you! Don’t forget to rate the recipe and share your experience in the comments section below. Your feedback truly helps us create better content. You can also **follow us** on Facebook, Instagram, and Pinterest to see more of our delightful food. Or, sign up for our Newsletter to get our latest recipes delivered straight to your inbox!
Step-By-Step Photos Above
Most of our recipes come with step-by-step photos, helpful tips and tricks to make it perfectly first time and even video!
Ricotta Chicken Croquettes
★★★★★
By Emily
50
10
1
12 croquettes
Ingredients
- 3 cups shredded roast chicken, (250g/9oz)
- 1/2 onion, finely chopped
- 1 cup ricotta cheese, (250g, well-drained)
- 1 teaspoon fresh thyme
- 1/2 lemon zest, grated
- 2 heaped tbsp all-purpose flour (plus extra if necessary for mixture)
- 1 cup breadcrumbs, (120g, fine or Panko)
- 1 large egg, beaten
- 1 tbsp Parmigiano Reggiano, freshly grated
- Salt and pepper, to taste
- 1-2 teaspoons olive oil (for sautéing onion)
- Sunflower oil, for frying (approx. 1 inch in pan)
Instructions
-
Add the finely chopped onion to a pan with 1-2 tsp of olive oil. Sauté over medium heat until the onion is soft and translucent, about 5-7 minutes. Ensure it does not brown. Remove from heat and set aside to cool completely.
-
Roughly chop the shredded chicken. In a large bowl, combine the chopped chicken with the well-drained ricotta, fresh thyme, cooled sautéed onion, and grated lemon zest. Mix thoroughly to combine all ingredients. Season the mixture generously with salt and pepper to taste.
-
Tip: If the chicken and ricotta mixture feels too soft or sticky to form, gradually add half a tablespoon of all-purpose flour at a time (up to 2 tablespoons) until it becomes easier to handle. Alternatively, refrigerate the mixture for 30 minutes to firm it up.
-
Prepare your breading station. In a shallow plate, combine the breadcrumbs with the grated Parmigiano Reggiano, a pinch of salt, and pepper; mix well. In a separate shallow bowl, whisk the egg. In another shallow plate, place the 2 heaped tablespoons of flour.
-
Using about one heaped tablespoon of the chicken-ricotta mixture per croquette, shape them into small cylinders or oval patties. Roll each croquette first in the flour, shaking off any excess. Then, dip it into the beaten egg, ensuring complete coverage. Finally, roll it generously in the breadcrumb mixture, gently pressing to ensure an even and firm coating. Place the breaded croquettes on a clean plate or baking sheet and refrigerate for at least 30 minutes to help the coating adhere.
-
Heat about 1 inch of sunflower oil in a sturdy pan or deep skillet over medium-high heat. If using a thermometer, aim for 180°C (355°F). Fry the croquettes in small batches of 3 or 4 to avoid overcrowding the pan. Cook for 2-3 minutes on each side, turning as needed, until they are beautifully golden brown and crispy. Remove with a slotted spoon and drain on a plate lined with kitchen paper to absorb excess oil. Serve immediately.
Video Tutorial
Notes
- Mixture too soft? – If your mixture is too soft to form into croquettes, you can either add up to 2 tablespoons of all-purpose flour to the mixture, or place the mixture in the fridge for at least 30 minutes to firm up. The ideal consistency can depend significantly on the brand and moisture content of the ricotta you use.
- Fry in batches – Always fry the croquettes in small batches (e.g., 3-4 at a time). Overcrowding the pan will cause the oil temperature to drop significantly, leading to greasy croquettes that take too long to crisp up.
- Drain after frying – After frying, immediately transfer the croquettes to a plate lined with kitchen paper. This helps to absorb any excess oil, ensuring they remain perfectly crisp and light.
- Storage and Reheating – Leftover chicken croquettes can be stored in an airtight container in the fridge for up to 3 days. They are delicious cold, or you can reheat them in a preheated oven at 200°C (400°F) for 10-15 minutes until warmed through and crispy.
Helpful Info for All Our Recipes
- We consistently use extra virgin olive oil in all our recipes unless explicitly stated otherwise, for its superior flavor and quality.
- For canned or jarred tomatoes, we exclusively recommend Cirio or Mutti brands. Their consistent quality ensures the best results and authentic Italian flavor in your dishes.
- All vegetables specified in our recipes are assumed to be medium-sized unless a different size is indicated.
- All recipes on our site are thoroughly tested and developed using a fan (convection) oven to ensure reliable results across various home kitchens.
- Curious about the nutritional breakdown? Find out more about how nutrition is calculated for our recipes.
- Equip your kitchen with the best! Check out our must-have Italian Pantry Staples for authentic cooking.
- Discover the tools that make Italian cooking a joy with our list of Essential Kitchen Tools for Italian Cooking.
Nutrition Information
Calories:
176kcal
|
Carbohydrates:
9g
|
Protein:
10g
|
Fat:
11g
|
Saturated Fat:
3g
|
Polyunsaturated Fat:
1g
|
Monounsaturated Fat:
7g
|
Trans Fat:
0.002g
|
Cholesterol:
40mg
|
Sodium:
119mg
|
Potassium:
109mg
|
Fiber:
1g
|
Sugar:
1g
|
Vitamin A:
133IU
|
Vitamin C:
3mg
|
Calcium:
74mg
|
Iron:
1mg
Nutrition information is automatically calculated, so should only be used as an approximation.
Did you try this recipe?
Leave a comment below!