
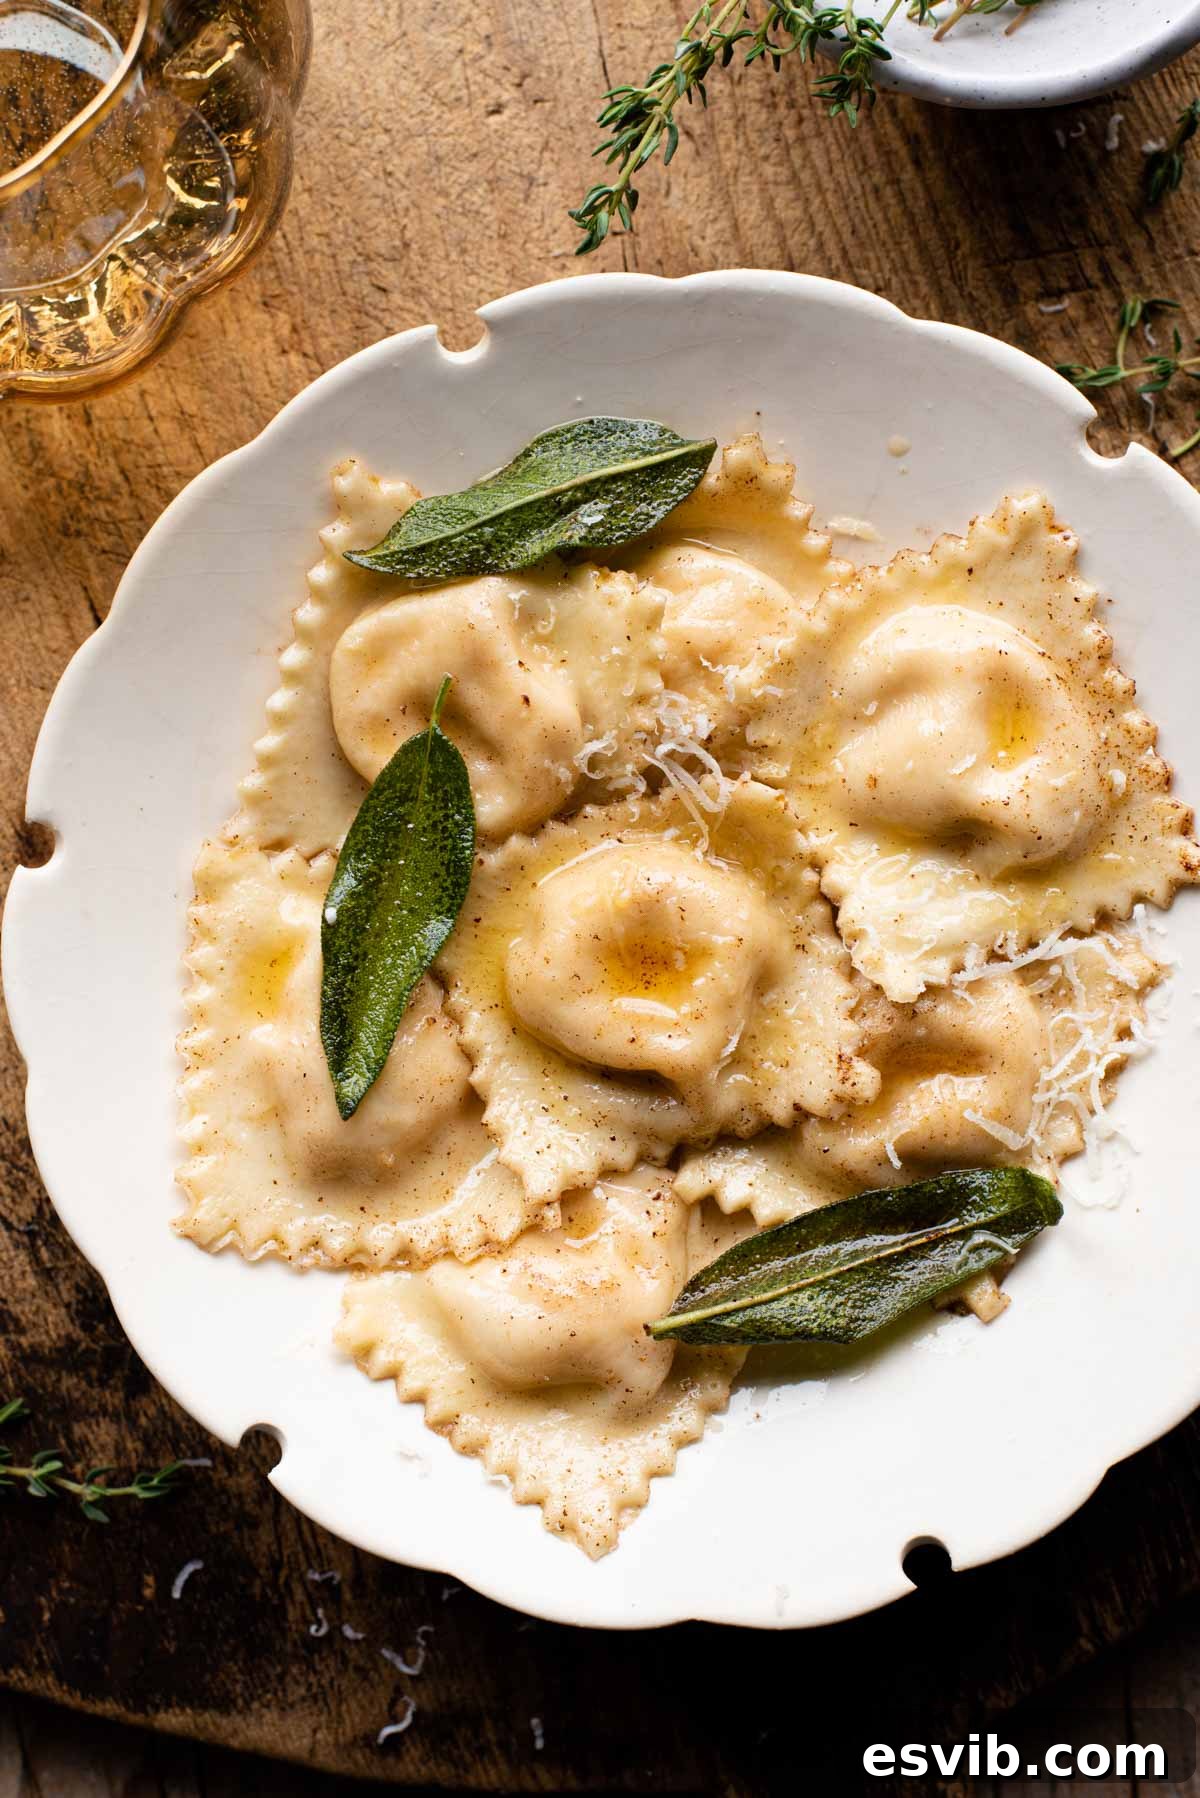
Homemade Butternut Squash Ravioli offers a truly special culinary experience, combining fresh, silky egg pasta dough with a rich, creamy butternut squash and ricotta filling. Each delicate parcel is then lovingly tossed in an aromatic, simple brown butter and sage sauce, creating a delightful harmony of flavors and textures. This cozy bowl of pasta is more than just a meal; it’s an embrace of autumnal warmth, perfectly suited for the crisp days of Fall.
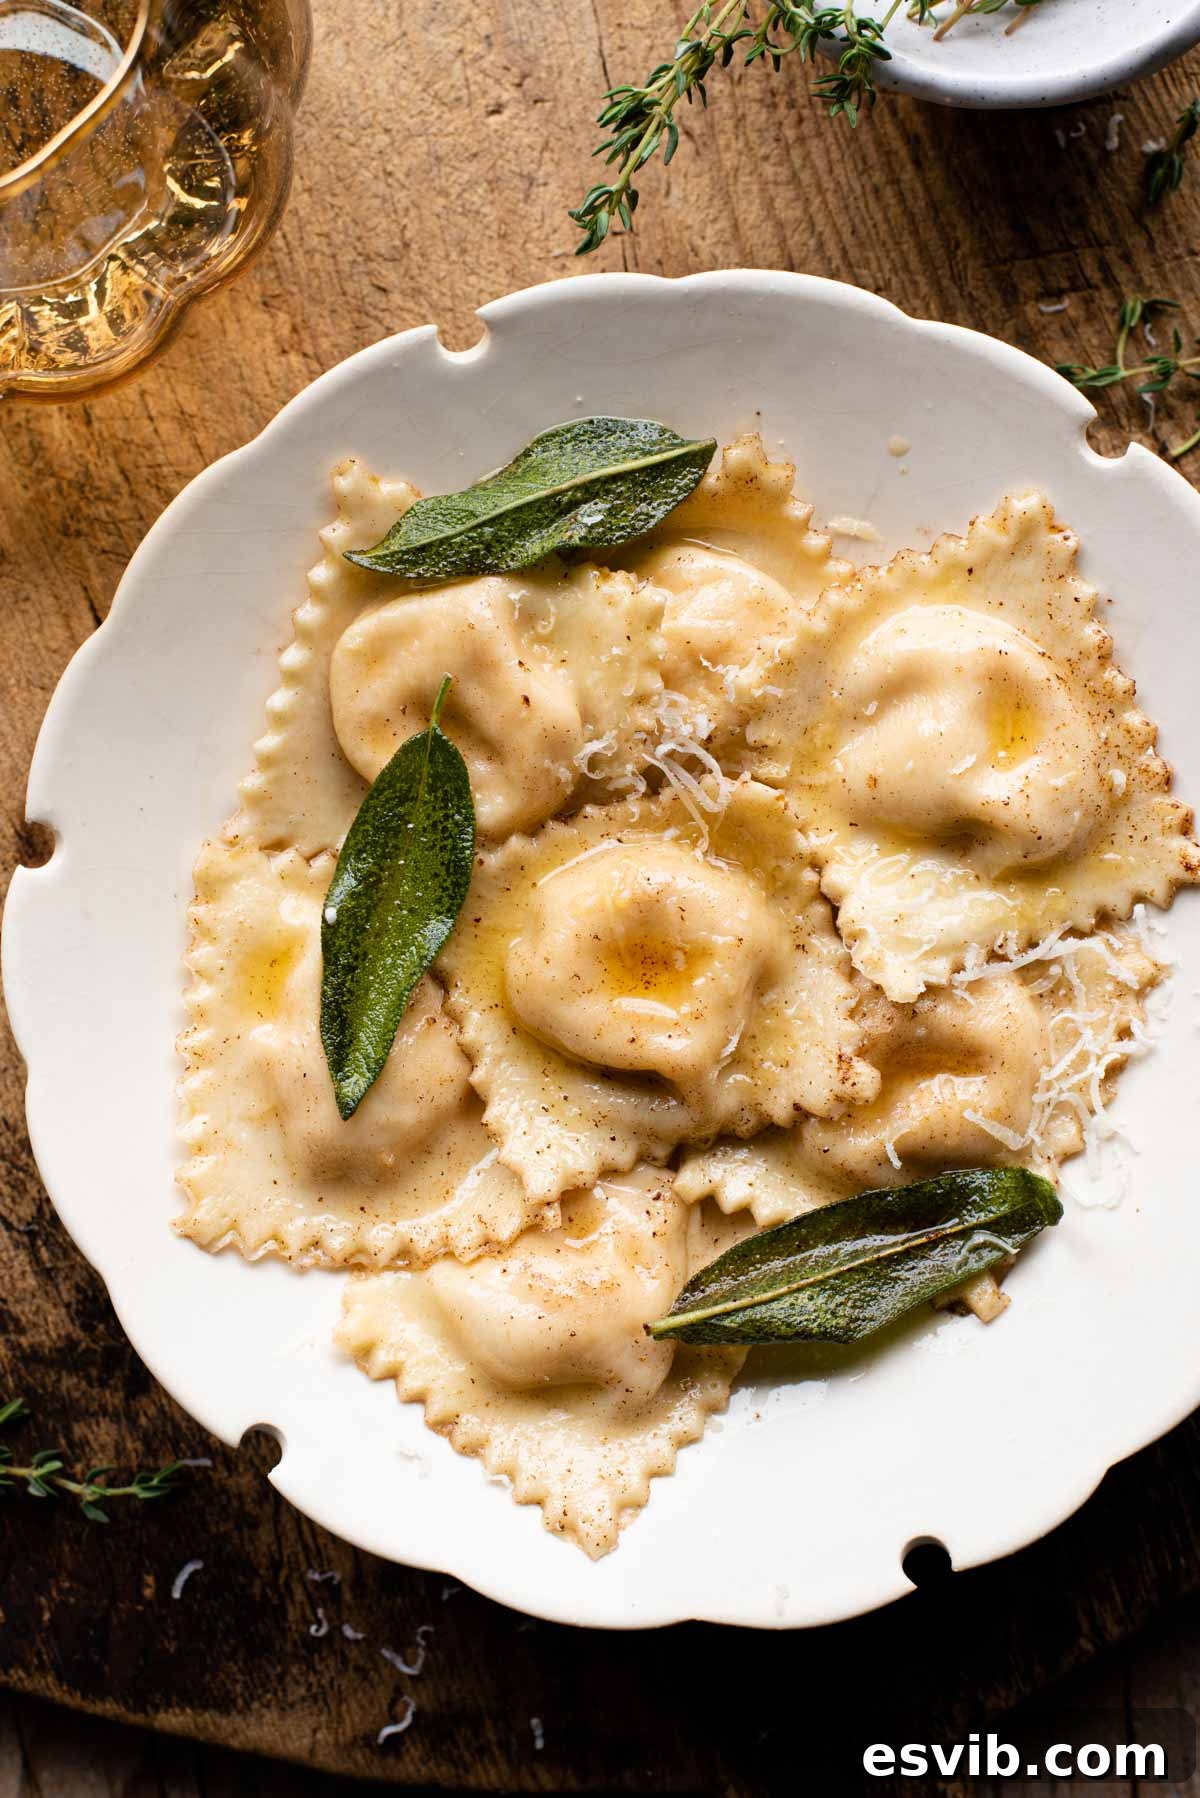
As the vibrant colors of summer fade and a gentle chill fills the air, there’s no better way to celebrate the essence of autumn than with the timeless combination of butternut squash and fragrant sage. This flavor duo signals the start of cozy season, and it’s always the first culinary pairing I reach for when temperatures begin to drop. The earthy sweetness of butternut squash, blended with the pungent, peppery notes of fresh sage, evokes a sense of comfort and tradition that perfectly encapsulates the spirit of Fall.
This recipe provides a wonderfully enjoyable and incredibly delicious method to showcase these quintessential fall ingredients. Imagine tender, homemade pasta, meticulously crafted from scratch, enveloping a luscious, velvety butternut squash filling. The simplicity of the filling, enriched with creamy ricotta, savory Parmigiano Reggiano, and a hint of warm nutmeg, pairs exquisitely with a quick, elegant two-minute sage and brown butter sauce. It’s a symphony of flavors that truly feels like a taste of heaven – an artisanal dish bringing Italian warmth to your table.
Embarking on the journey of making ravioli from scratch does require a little dedication and time, but the unparalleled freshness and superior flavor of homemade pasta make every moment spent entirely worthwhile. The satisfaction of creating something so delicious and beautiful with your own hands is immense. It’s a culinary project that many home cooks cherish, and we’ve noticed a real enthusiasm for it among our readers! Our popular Mushroom Ravioli recipe and comprehensive Homemade Ravioli Guide are testaments to this shared passion for artisanal pasta, offering detailed instructions and tips to help you succeed.
For those seeking a truly special occasion dish, or perhaps a more advanced pasta project, don’t miss our Egg Yolk Ravioli with Spinach and Ricotta. This unique recipe features a single, generously sized raviolo per person, where the rich egg yolk bursts forth when cut, creating an impressive and memorable presentation perfect for an intimate dinner or celebratory event.
Explore the full recipe below, complete with detailed notes on ingredients, step-by-step photographs, expert tips, exciting variations, and a helpful video tutorial. For the conveniently printable recipe card, please scroll to the bottom of the page or click the dedicated recipe link.
Essential Tools for Perfect Homemade Ravioli
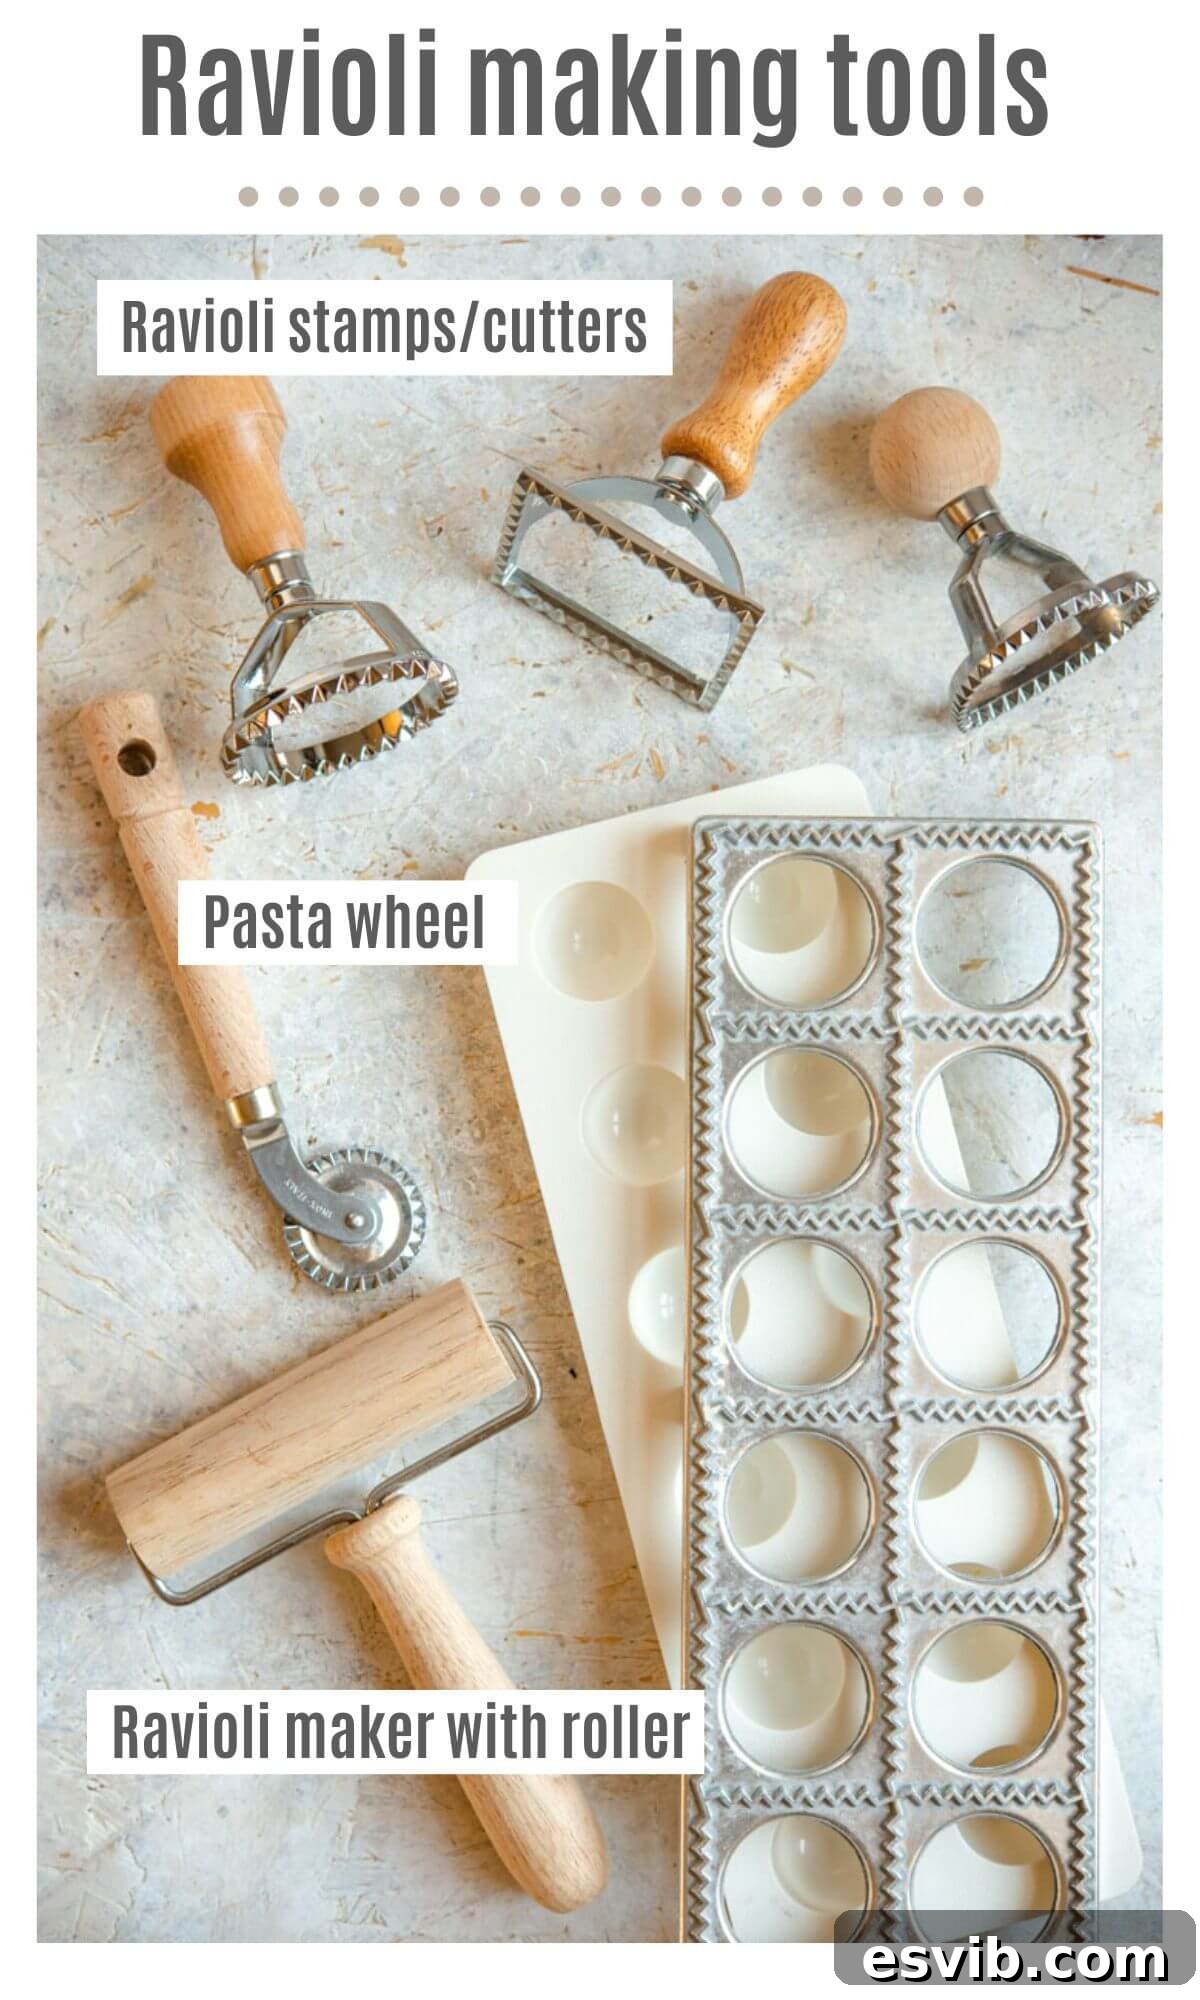
While the idea of making homemade pasta might initially seem intimidating, having the right kitchen tools can genuinely transform the process into a remarkably enjoyable and much more manageable endeavor. These specialized pasta and ravioli making tools are designed to streamline your efforts and ensure beautiful, consistent results with minimal fuss.
For this specific butternut squash ravioli recipe, we often utilize a ravioli maker. Despite its sophisticated name, a ravioli maker is a remarkably simple and affordable device (you can see it clearly pictured below). This ingenious tool helps create uniformly shaped ravioli, ensuring each one is perfectly filled and sealed, resulting in a professional-looking dish. A significant advantage of using a ravioli maker is that it substantially reduces the amount of leftover pasta scraps, maximizing your delicious output and minimizing waste. This makes the entire process more efficient and satisfying.
However, if a dedicated ravioli maker isn’t currently part of your kitchen arsenal, fear not! You have several excellent alternatives that will still allow you to create stunning homemade ravioli. A ravioli stamp can be used to press and cut individual ravioli, creating beautifully crimped edges. A pasta wheel (often called a fluted pastry wheel) is fantastic for cutting clean lines and decorative edges, while even a sharp kitchen knife can be effectively used to cut out your ravioli in simple square or rectangular shapes. Each method yields slightly different aesthetics but produces equally delicious results. Choose the tool that best suits your preference, your available equipment, and your desired final look.
Ingredients for Butternut Squash Ravioli: A Symphony of Fall Flavors
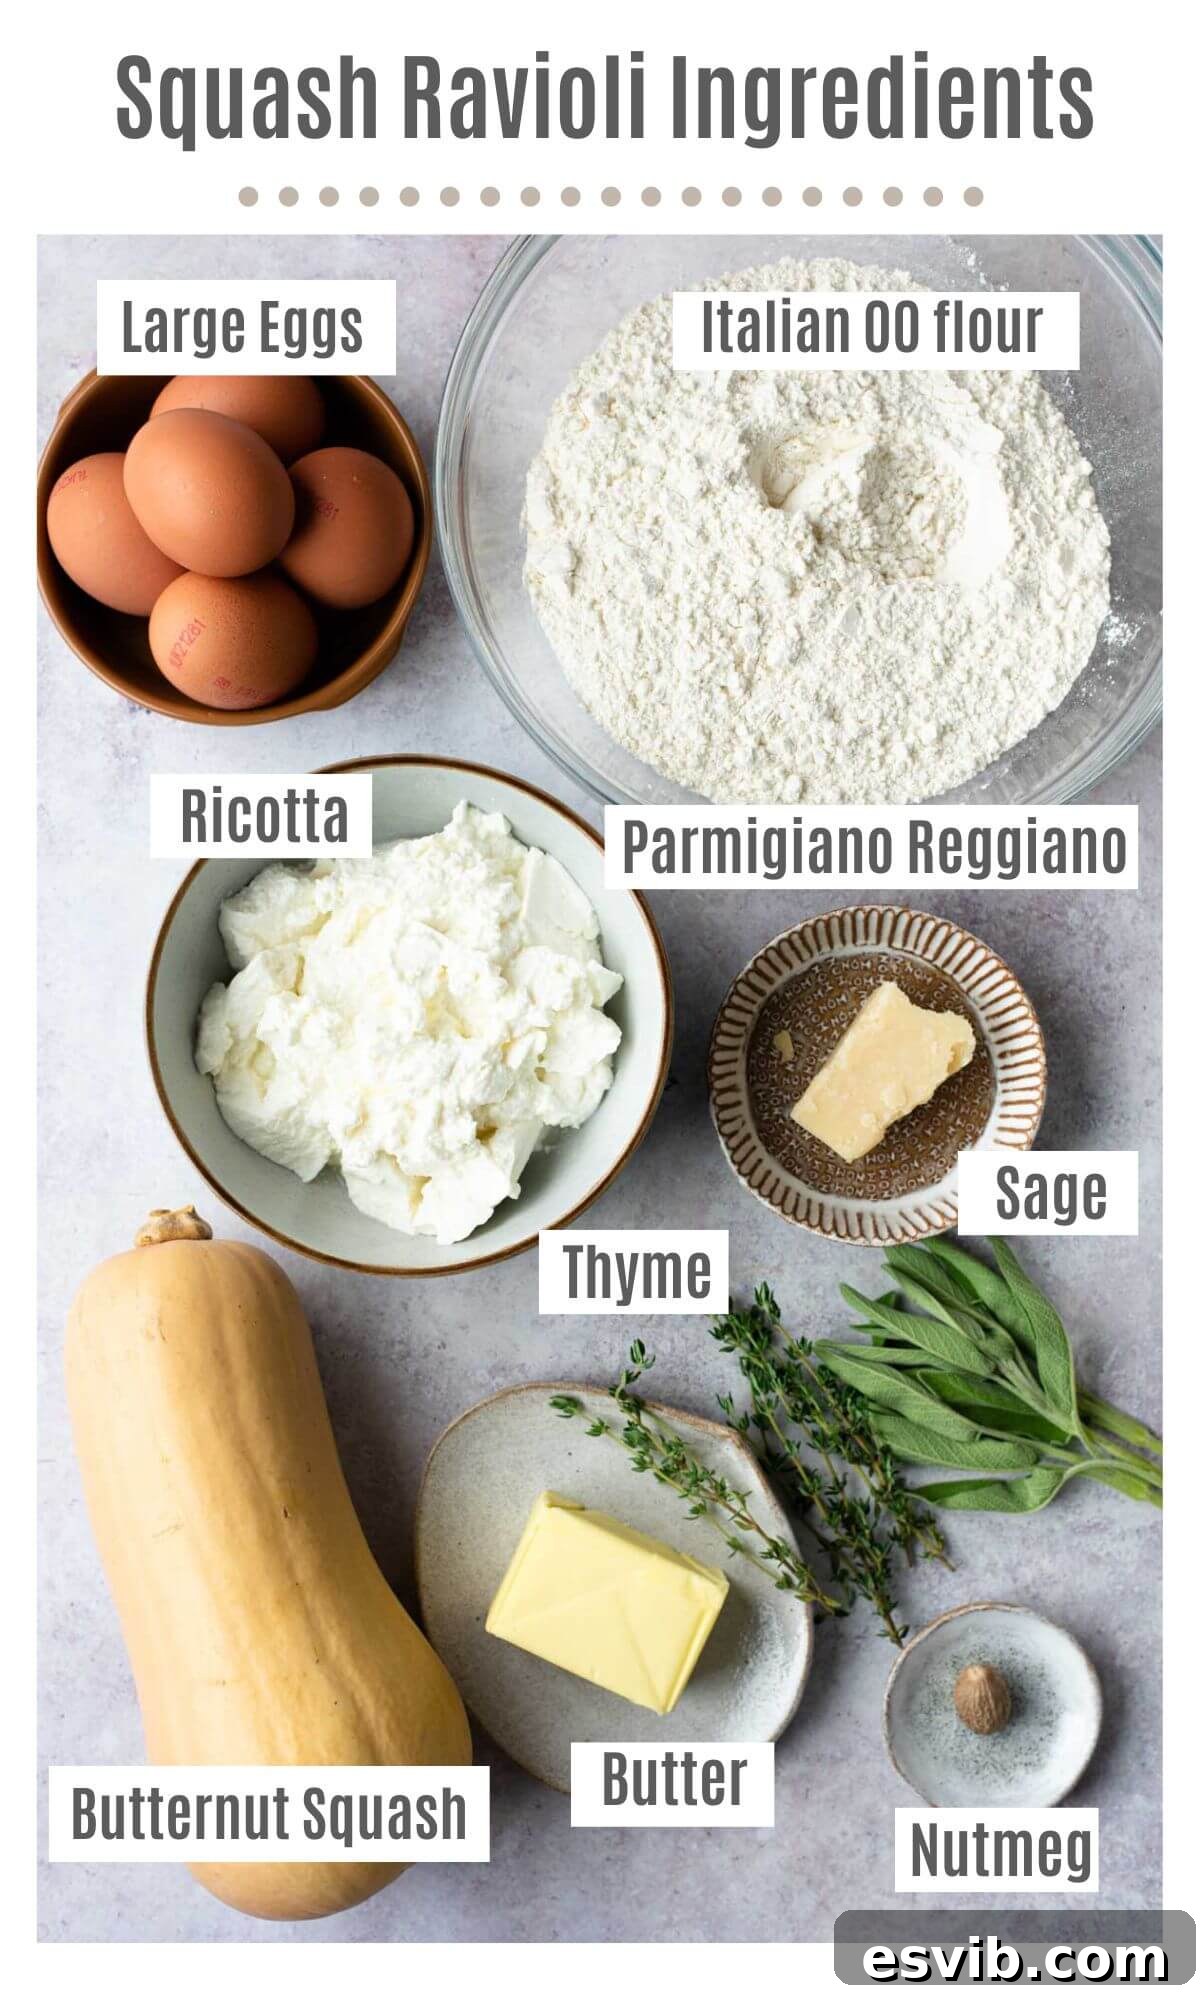
Gathering your ingredients is the first exciting and crucial step towards creating these delectable butternut squash ravioli. The photograph below visually illustrates all the components you’ll need for our homemade recipe, along with crucial notes to guide your selection for the best possible flavor and texture. Selecting high-quality ingredients will elevate your dish from good to truly exceptional.
Ingredient Insights and Smart Substitutions
- Butternut Squash: The undisputed star of our creamy filling, butternut squash offers a naturally sweet, earthy, and nutty flavor that perfectly epitomizes autumn. Its vibrant orange flesh provides both color and a delicious foundational taste. For delightful variations, feel free to substitute with other similar sweet winter squash varieties like kabocha or acorn squash, or even a good quality pumpkin for a slightly different, yet equally delicious, flavor profile.
- Ricotta Cheese: This fresh, soft Italian cheese is absolutely essential for achieving a creamy, luscious, and light filling texture. It’s vital to ensure your ricotta is well-drained of any excess liquid before incorporating it into the mixture. This crucial step prevents a watery filling that could compromise the integrity of your delicate ravioli, making them soggy or difficult to seal.
- Parmigiano Reggiano: Often dubbed the “King of Cheeses,” this hard, salty, and intensely flavorful Italian cheese adds a wonderful depth of umami and a salty tang to the filling. While authentic Parmigiano Reggiano is highly recommended for its complex flavor, Pecorino Romano can be used for a sharper, saltier kick if you prefer. Crucially, always grate the cheese yourself from a fresh block just before use; pre-grated cheeses often contain anti-caking agents that affect texture, diminish flavor, and can melt poorly.
- Fresh Sage: The quintessential herb for our exquisite brown butter sauce, fresh sage imparts a warm, earthy, slightly peppery, and subtly pine-like aroma. Its distinct and robust flavor is irreplaceable in this classic pairing, providing a beautiful counterpoint to the sweetness of the squash. Always prioritize fresh sage leaves over dried for the most vibrant and authentic flavor; dried sage has a much milder and less nuanced profile. If fresh sage is absolutely unavailable, fresh thyme or rosemary could serve as suitable, though different, aromatic substitutes, adding an alternative herbaceous note.
- Unsalted Butter: The foundation of our luxurious brown butter sauce. Opting for unsalted butter gives you complete control over the seasoning of your final dish. This allows you to add salt precisely as needed, ensuring the sauce is perfectly balanced to your taste and not inadvertently overly salty or overpowering. The process of browning butter is an art form, and controlling the salt level is key to highlighting its naturally nutty notes.
Butternut Squash Ravioli: Step-by-Step Guide with Visuals
Before You Begin: Important Notes for Success
- Please note that these instructions are intentionally detailed and comprehensive to ensure the recipe is as easy to follow and clear as possible, especially for those new to pasta making. While the process of making homemade ravioli can seem lengthy, if you have previous experience with making pasta, you’ll know that the hands-on process isn’t overly difficult and becomes significantly easier and more intuitive with practice. It does, however, require a bit of time and patience, so plan accordingly and enjoy the meditative process!
- This guide specifically demonstrates how to craft your ravioli using a dedicated ravioli maker. This tool is excellent for creating consistent shapes quickly. However, should you not possess one, you can certainly use a ravioli stamp, a pasta wheel, or even a simple knife to cut out your shapes. For detailed guidance on alternative methods and additional shaping techniques, we highly recommend referring to our in-depth Homemade Ravioli Guide, which covers various approaches to making stuffed pasta.
Crafting the Perfect Homemade Pasta Dough
Creating fresh pasta dough is a foundational and deeply rewarding skill for this recipe. Begin by tipping the Italian 00 flour onto a clean, spacious work surface, forming it into a mound. Then, create a substantial well in the center of the flour. A clever and effective trick is to place a medium-sized mixing bowl directly on top of the flour mound, pressing down firmly to create a perfectly sized and stable well, ideal for containing the eggs without spillage (photos 1 & 2).
It’s crucial that the well is wide and deep enough to hold the liquid ingredients; if it’s too narrow, the eggs may easily spill out onto the work surface, making a messy start. As an alternative to the countertop method, you can begin the mixing process in a large mixing bowl until a rough dough begins to form, or for maximum ease and efficiency, utilize a stand mixer fitted with a dough hook attachment.
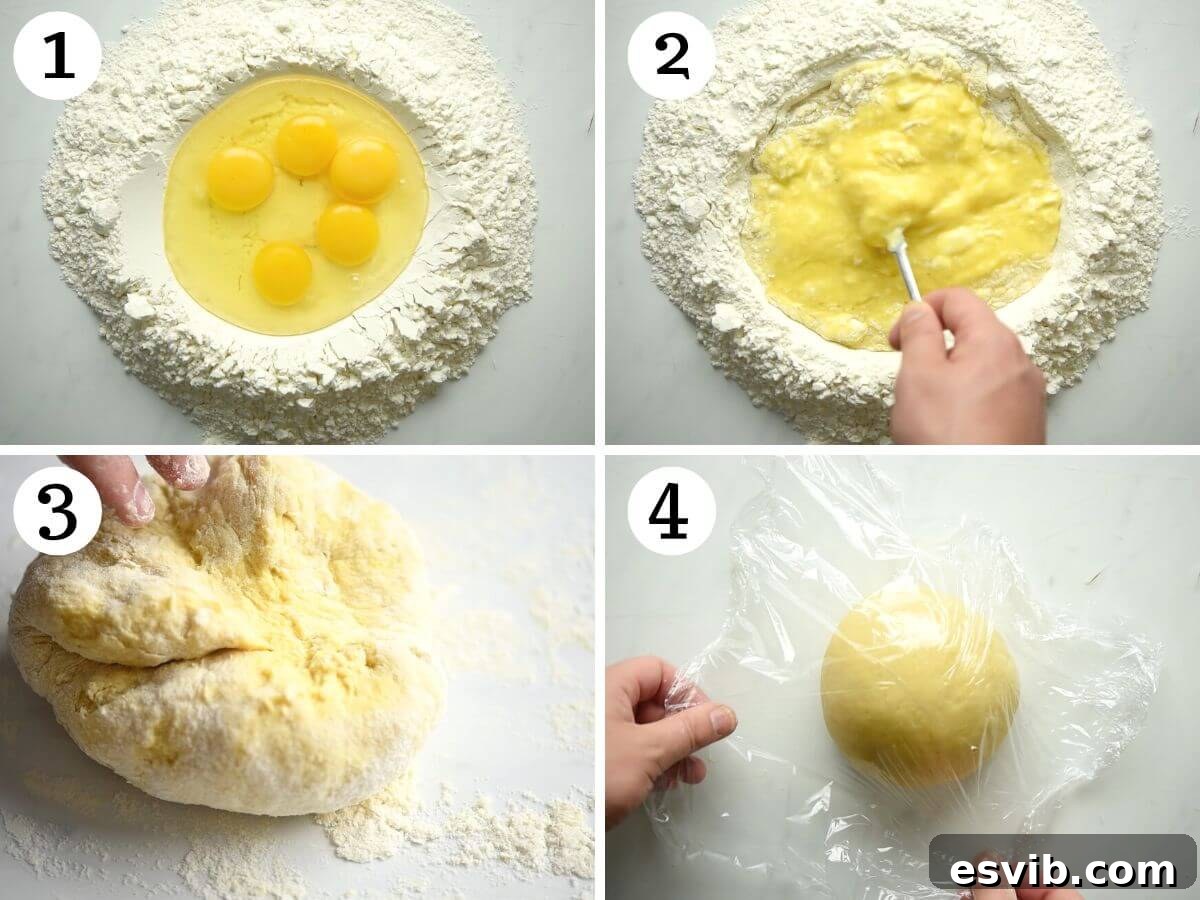
Once the ingredients are roughly combined and the dough comes together, it requires diligent kneading for at least 10 minutes. This essential step allows the gluten in the flour to properly develop, resulting in a smooth, elastic, and wonderfully workable pasta dough that will be a joy to roll. After kneading, the dough must be rested for a minimum of 30 minutes at room temperature, securely wrapped in plastic wrap. This resting period is critical; it allows the gluten to relax further, making the dough much more pliable and easier to roll out thinly without shrinking back or tearing (photos 3 & 4).
Preparing the Creamy Butternut Squash Filling
The heart of our ravioli lies in its exquisite, flavorful filling. Begin by carefully peeling the butternut squash using a sharp knife or a robust vegetable peeler. Once peeled, cut the squash into uniform, medium-sized pieces to ensure even cooking. Arrange these pieces evenly on a large baking tray. Drizzle generously with 1-2 tablespoons of olive oil, then season with a good pinch of salt, freshly ground black pepper, and the fragrant sprig of fresh thyme. Use your hands to thoroughly toss everything together, ensuring each piece of squash is beautifully coated in the oil and seasonings. Roast the squash in a preheated oven until it is completely fork-tender and lightly caramelized, which typically takes about 30-40 minutes, depending on the size of your squash pieces (photos 5 & 6).
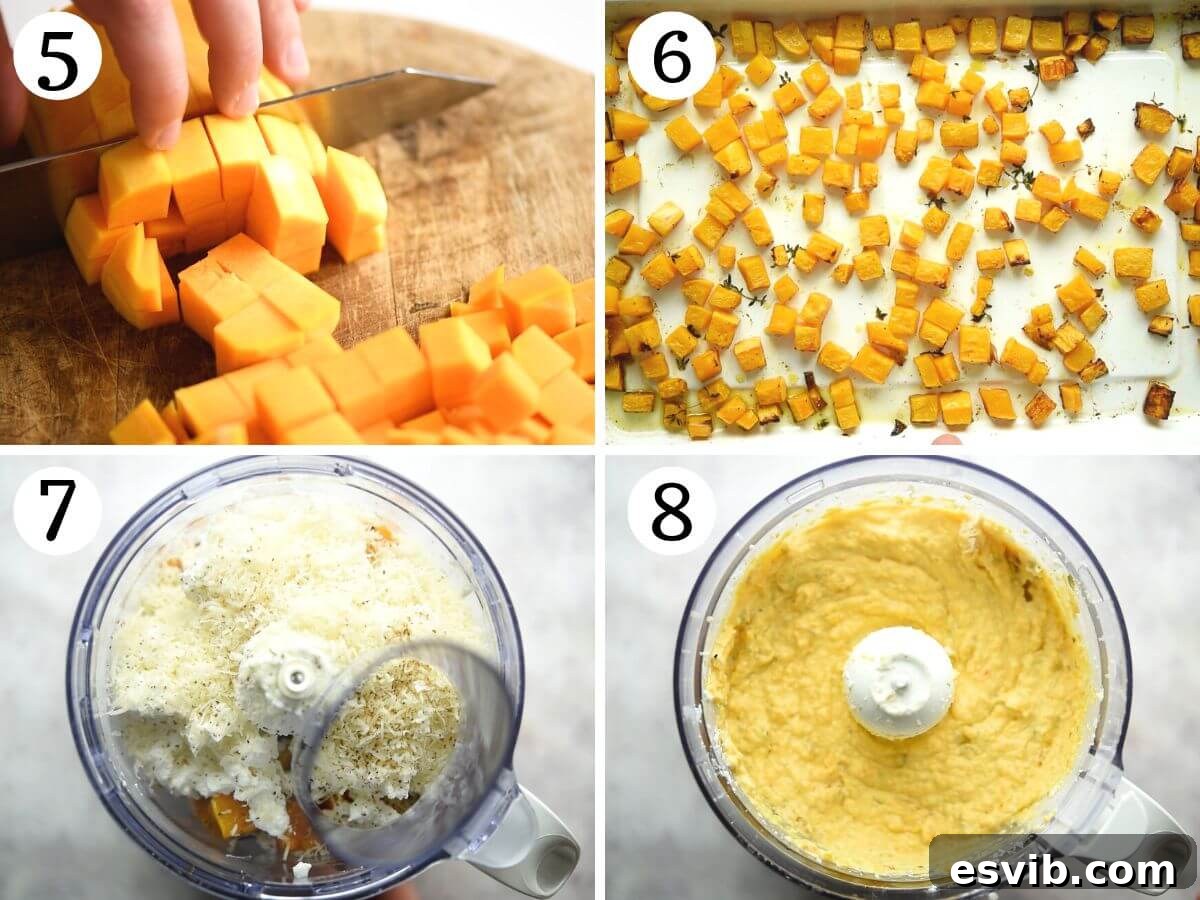
Once the roasted squash has cooled slightly (it doesn’t need to be completely cold, just cool enough to handle comfortably), transfer it to a food processor. Add the well-drained ricotta cheese (remember to press out excess moisture!), freshly grated Parmigiano Reggiano, and a hint of nutmeg for a subtle, warm spice note. Blitz these ingredients together until the mixture is perfectly smooth and uniformly combined. The goal is a velvety, spreadable consistency (photos 7 & 8).
It’s always a good practice, and highly recommended, to taste the filling once it’s blended. Adjust the seasoning as needed, adding more salt or pepper to achieve your desired flavor balance. The natural sweetness of the squash and the richness of the cheeses should be perfectly complemented by a subtle savory and herbaceous note.
Rolling Out the Silky Pasta Dough
Precision in rolling is paramount to achieving delicate, tender ravioli. Set up your pasta machine, ensuring the rollers are at their widest setting (this is typically marked as number 0 on most machines). Divide your well-rested pasta dough into four equal quarters. It is crucial to work with one quarter at a time, keeping the remaining dough portions tightly covered in plastic wrap to prevent them from drying out, which can make them brittle and difficult to work with.
Lightly dust your work surface and the pasta machine with flour. Take one piece of dough, press and flatten it gently with your hand into an oval or rectangle shape that will easily fit through the widest setting of your pasta machine. Ensure it’s lightly dusted with flour to prevent any sticking to the rollers (photo 9).
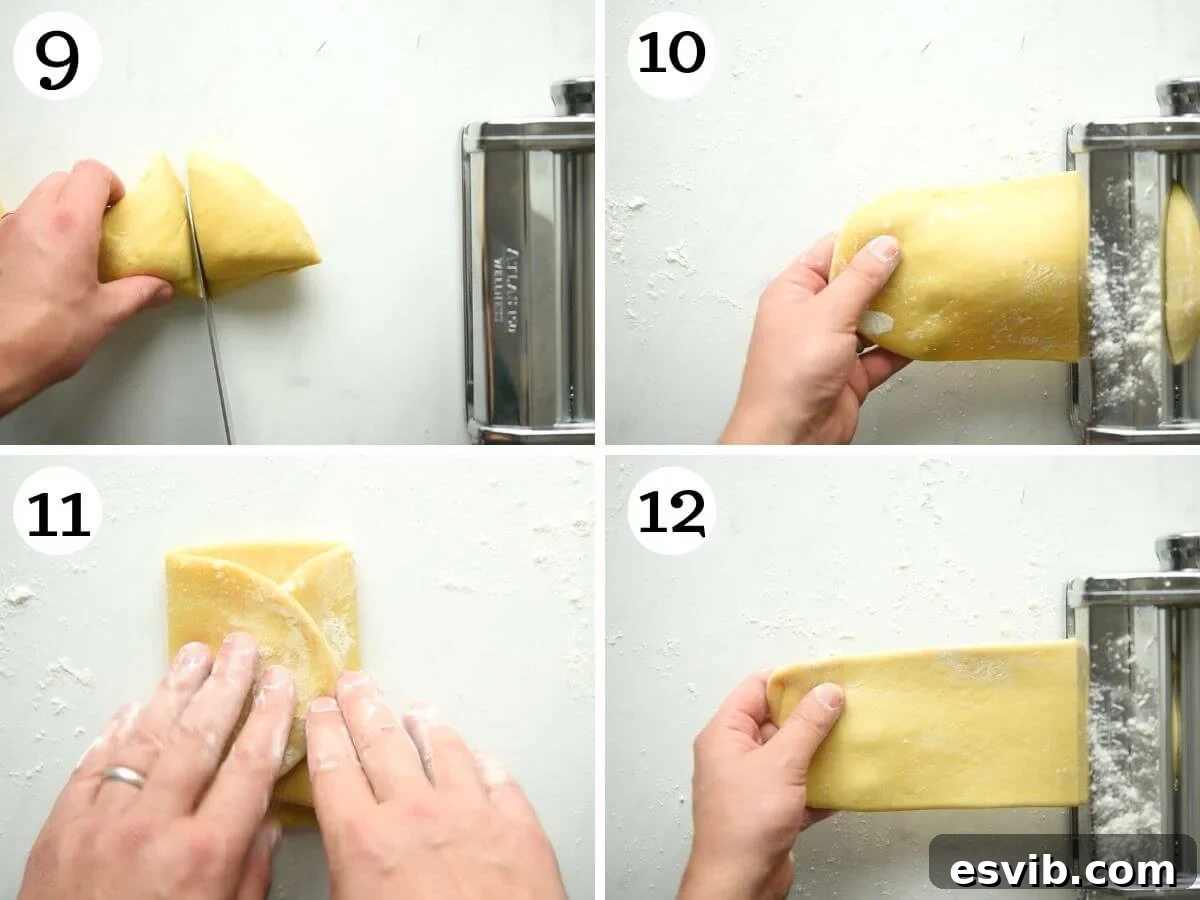
Pass your flattened dough through the pasta machine at its widest setting. After the first pass, take one end of the elongated dough sheet, fold it towards the middle, and then fold the other end over that, much like you would fold a leaflet or brochure. Gently press it down to remove any trapped air pockets and then pass it through the machine again at the *same* widest setting. Repeat this folding and passing process 4-5 times. This step is absolutely crucial for developing the dough’s strength, elasticity, and creating a smooth, homogenous texture, which will prevent tearing later on (photos 10 – 12).
Now, you are ready to progressively thin your pasta dough. Change the setting on your pasta machine to the next widest setting (usually number 1). Pass the dough through this setting. Continue passing the dough through each subsequent setting, gradually decreasing the thickness with each pass, until you reach setting number 6 or 7. For this delicate butternut squash ravioli recipe, I personally find that setting 6 on my Marcato Atlas 150 pasta machine yields the perfect delicate yet durable pasta thickness, allowing the filling to shine through without being too heavy (photo 13).
Assembling Your Exquisite Butternut Squash Ravioli
With your perfectly rolled pasta sheets ready, it’s time for the exciting and creative stage of assembly. If you are using a ravioli maker, ensure it is thoroughly and generously dusted with flour to prevent any delicate pasta from sticking to the mold; otherwise, generously flour your clean work surface if you’re using cutters. Take your long, thin sheet of pasta and carefully cut it into two equal lengths, suitable for your ravioli maker or for handling on the counter (photo 14).
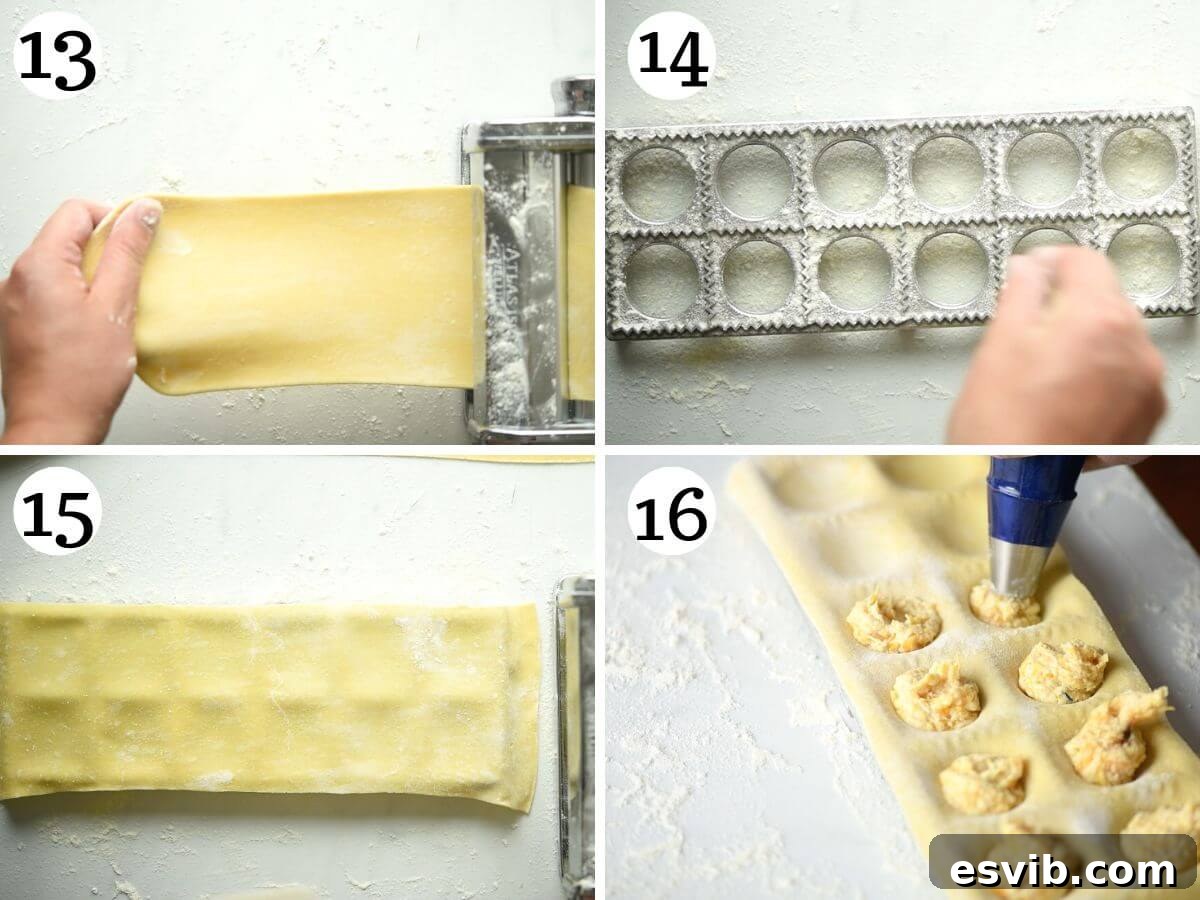
Carefully lay one of the pasta sheets over the floured ravioli maker. Gently place the indent mold on top, allowing it to create small, defined depressions for the filling. Now, using a small spoon or, for greater precision and a cleaner application, a piping bag (with the tip snipped), fill each of these depressions with a generous dollop of your creamy butternut squash filling. Be mindful not to overfill, as this can make sealing difficult and may cause the ravioli to burst during cooking. Once all depressions are filled, gently lay the second sheet of pasta directly on top, aligning it carefully over the first sheet and filling. Use the mini roller provided with the ravioli maker, or a small rolling pin, to firmly seal the ravioli, pressing out any air pockets between the pasta sheets and around the filling. This action also helps to cut and define the individual ravioli (photos 15-18).
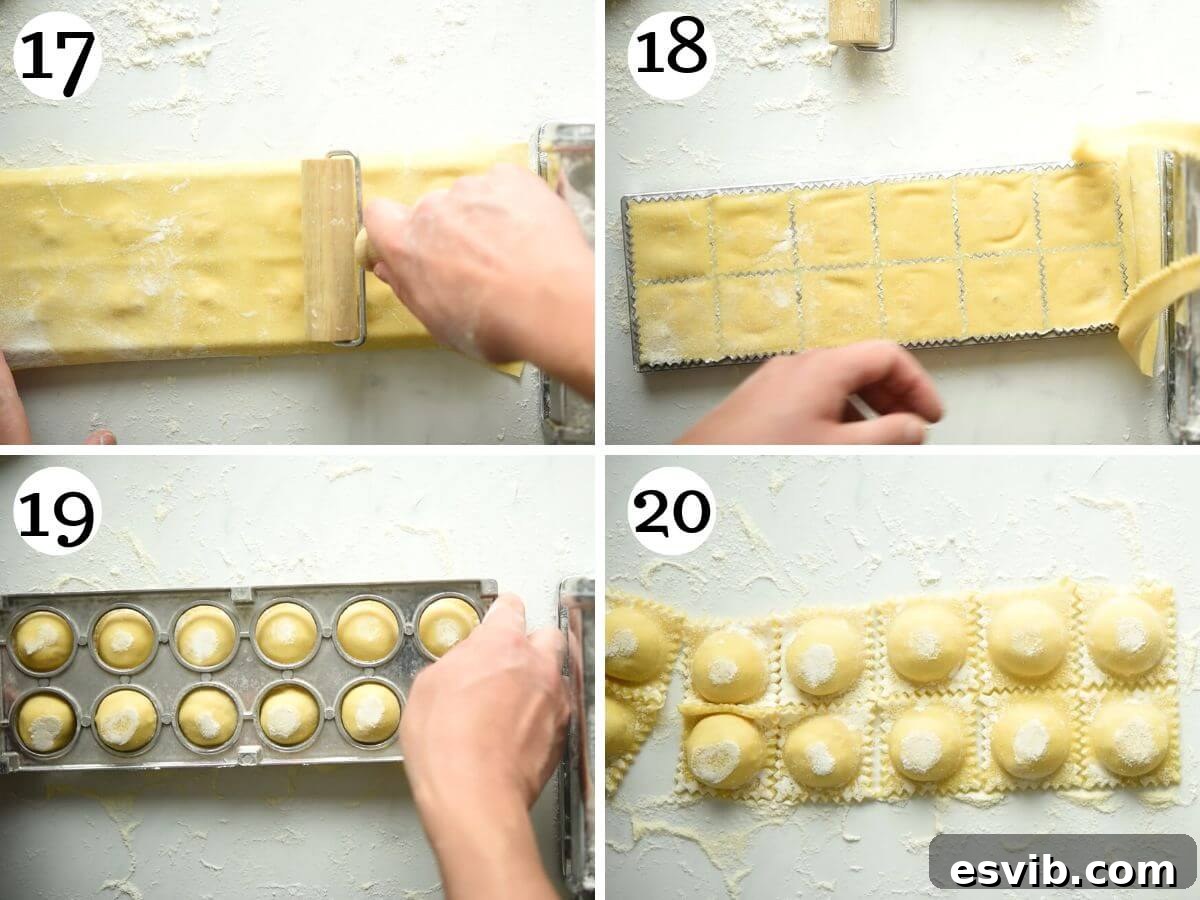
Once sealed and cut, carefully tip the ravioli maker upside down over a floured surface. The freshly formed ravioli should release easily and cleanly. Place them gently onto a clean baking sheet or board that has been generously dusted with flour to prevent them from sticking together. Repeat these detailed steps from the beginning with each remaining quarter of dough until all your delightful butternut squash ravioli are assembled and ready for cooking or storage (photos 19 & 20).
Cooking the Ravioli and Crafting the Irresistible Brown Butter and Sage Sauce
As you near the completion of all your ravioli, bring a very large pot of water to a vigorous, rolling boil. It’s crucial to season this water generously with salt – it should taste like the sea – as this is your primary opportunity to season the pasta itself from within. Carefully add your freshly made ravioli to the boiling water, stirring gently with a wooden spoon or tongs to prevent them from sticking to the bottom of the pot or to each other. Allow them to boil for a precise 4 minutes; fresh pasta cooks much quicker than dried. You’ll know they’re ready when they float to the surface, appear slightly puffed, and are tender yet still have a delightful slight bite (al dente).
While the ravioli are cooking, turn your attention to the glorious brown butter and sage sauce. In a large, wide skillet (preferably light-colored so you can easily observe the butter’s color change), add the unsalted butter and 8-10 fresh sage leaves, along with a small pinch of salt. Place the skillet over medium heat and allow the butter to melt and gently sizzle. Keep a close eye on it, swirling the pan occasionally. As the butter cooks, it will undergo a beautiful transformation: it will foam, then the milk solids will toast, settling at the bottom and developing a nutty aroma and a beautiful light golden brown color. This transformation, known in French as “beurre noisette,” is the magic of the sauce. If the butter appears to be browning too quickly, simply reduce the heat or remove the skillet from the burner momentarily to prevent it from burning, which would result in a bitter taste (photos 21 & 22).
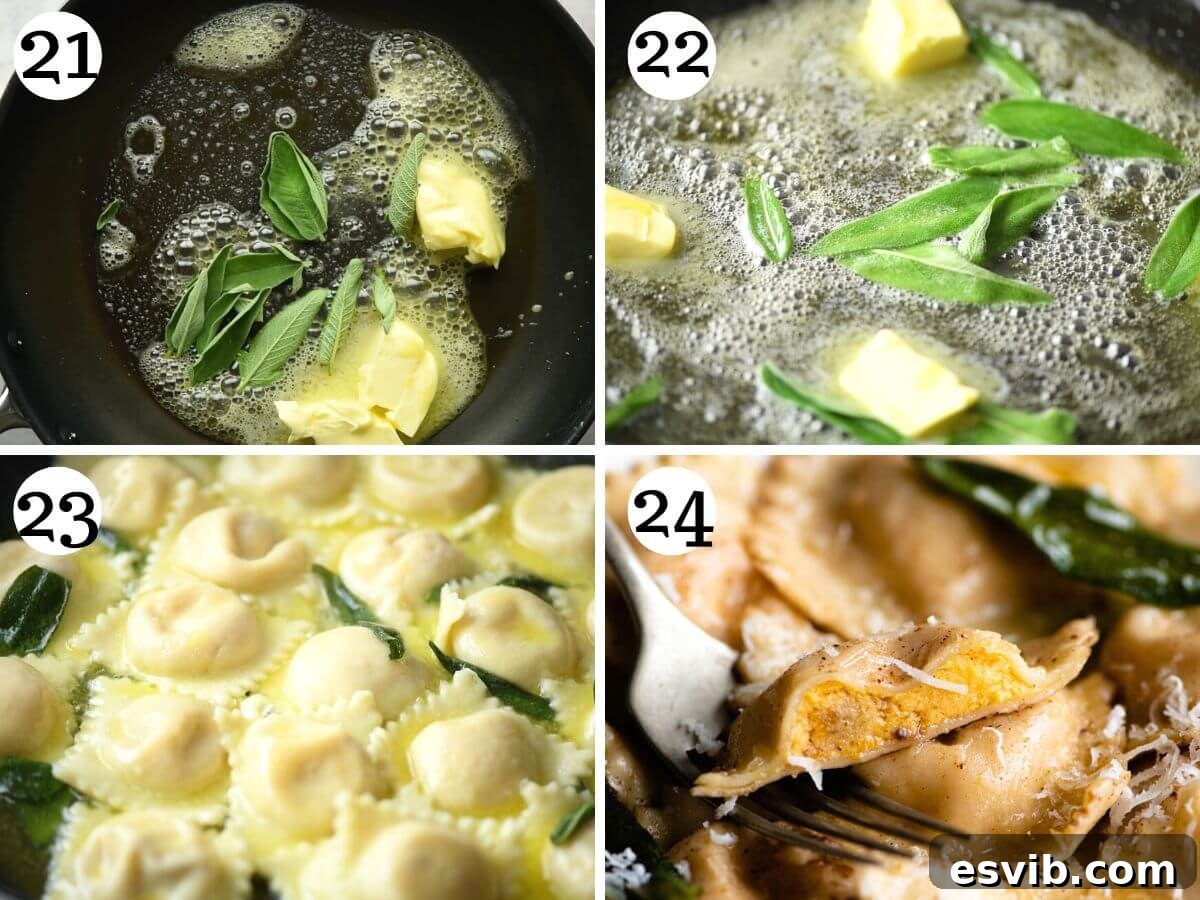
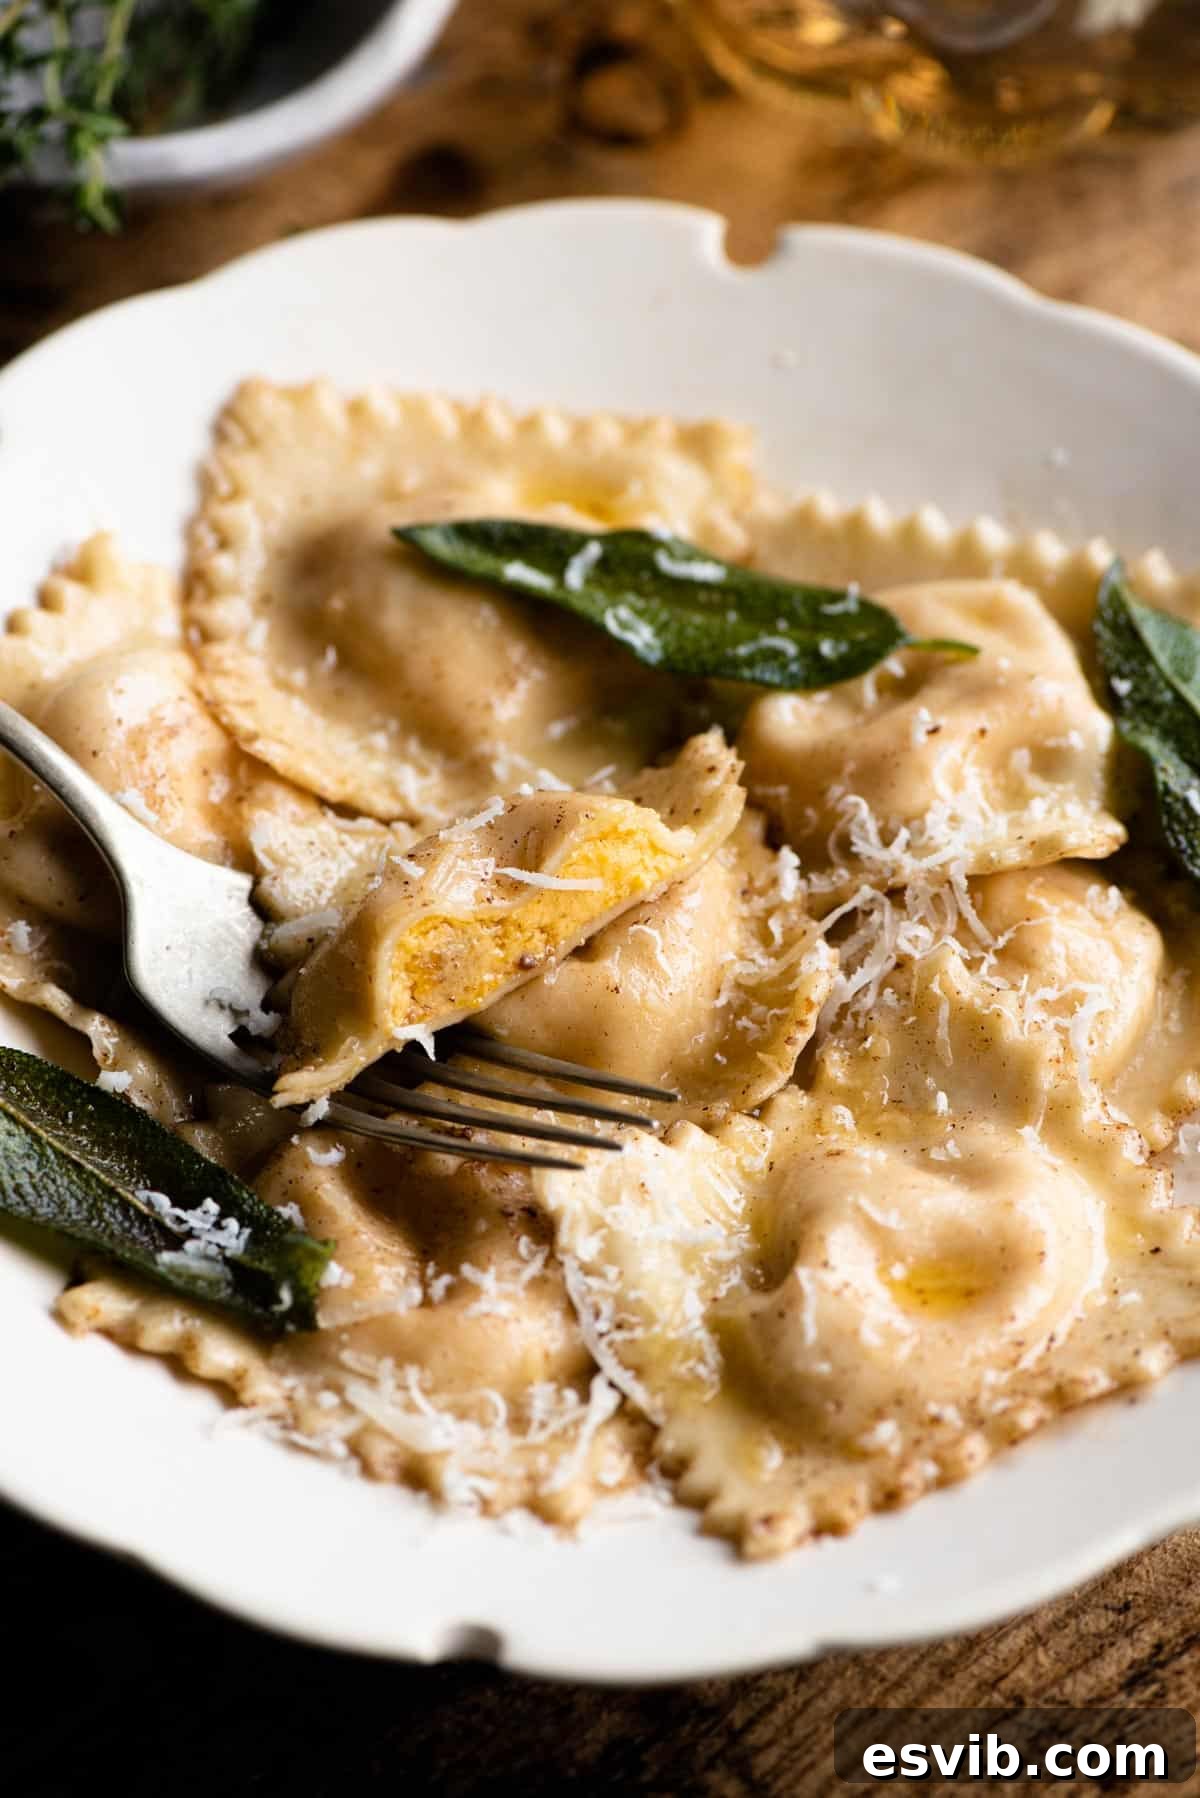
Once the ravioli are perfectly cooked and the brown butter sauce has achieved its exquisite golden hue and irresistible nutty fragrance, use a slotted spoon or a spider strainer to carefully transfer the cooked ravioli directly into the skillet with the shimmering sauce. Gently toss the ravioli, allowing them to absorb the rich flavors and ensuring each delicate piece is beautifully coated in the aromatic butter and infused with the essence of sage. Serve immediately in warm bowls, generously topped with an extra flourish of freshly grated Parmigiano Reggiano for an added layer of salty, cheesy goodness and a visually appealing finish (photos 23 & 24).
Chef’s Tip – If you are preparing a particularly large batch of ravioli, you might find that a single skillet isn’t spacious enough to comfortably coat all of them in the sauce without overcrowding. Overcrowding can lead to the ravioli steaming rather than coating. In such instances, an excellent alternative is to serve the ravioli in individual bowls or divide them among several serving dishes, and then generously spoon the exquisite sage and brown butter sauce directly over them before garnishing. This ensures every serving gets ample sauce.
Storing Your Fresh Homemade Ravioli for Future Enjoyment
Proper storage is absolutely essential when dealing with homemade, filled ravioli. Unlike their dried, shelf-stable counterparts, fresh filled pasta cannot be left to sit for extended periods on the counter or in the fridge uncooked. This is because the delicate pasta dough will quickly begin to absorb moisture from the luscious filling, leading to sticky, difficult-to-handle ravioli and, more importantly, compromising their desirable al dente texture when finally cooked.
The most effective and highly recommended method for storing fresh ravioli, whether you plan to refrigerate them for a few days or freeze them for longer preservation, involves a quick blanching step. Begin by bringing a large pot of water to a vigorous boil and season it generously with salt. Carefully blanch the ravioli in small batches for approximately 1 minute. This brief cooking time is just enough to set the pasta, make it more durable, and partially cook it without fully cooking the filling. Using a slotted spoon or a spider strainer, carefully remove the blanched ravioli and arrange them in a single layer on a clean kitchen towel placed over a cooling rack. This setup allows for optimal air circulation around each ravioli, facilitating even drying.
Allow the blanched ravioli to air dry for about 20-30 minutes on each side. During this time, they should feel tacky to the touch but no longer wet or excessively moist. Once properly dried, your ravioli are ready for storage. You can store them in an airtight container, separated by parchment paper, in the refrigerator for up to 3 days. For longer preservation, freezing is an excellent option.
Chef’s Tip – Blanching your homemade ravioli prior to freezing is a highly recommended step that significantly enhances the pasta’s durability. This process makes the ravioli far more resistant to cracking or bursting open when later introduced to boiling water straight from the freezer. While you *can* freeze ravioli without blanching first, they tend to be more brittle and prone to structural issues during cooking due to the sudden temperature change and unprotected dough. When cooking blanched and frozen ravioli, simply add them straight to boiling water for about 5 minutes (or until tender), without defrosting them first for the best results.
Expert Tips for Butternut Squash Ravioli Perfection
- Choosing the Best Flour: For authentic Italian homemade pasta, Italian 00 (doppio zero) flour is hands down the best choice. Its super-fine texture and lower protein content create a silky, tender dough that is incredibly pliable and perfect for rolling thinly. This results in the most delicate and delicious pasta.
- Kitchen Scale vs. Measuring Cups: For precise and consistent results in baking and pasta making, I cannot stress enough the importance of using a digital kitchen scale to weigh your flour. Cup measurements can vary wildly based on how the flour is scooped, its density, and even ambient humidity, leading to inconsistent dough. If you absolutely must use cups, the best method to avoid over-packing is to gently spoon the flour into the measuring cup and then level it off with the straight edge of a knife.
- Crafting the Filling: Using a food processor to blitz your roasted butternut squash, ricotta, Parmigiano Reggiano, and nutmeg ensures a wonderfully smooth, consistent, and lump-free filling. This smooth texture is ideal for piping or spooning cleanly into your ravioli pockets, ensuring even distribution and preventing air bubbles. If you don’t have a food processor, a potato masher or a sturdy fork can achieve a rustic, equally delicious mashed consistency for the squash, just ensure it’s thoroughly combined with the other ingredients for uniform flavor.
- Rolling Out the Dough: Generous and consistent flour dusting is your best friend when rolling out pasta dough, whether by hand or with a machine. Lightly flour your work surface and the pasta machine rollers frequently as you thin the dough. This creates a non-stick barrier, prevents tearing, and helps you achieve those beautifully thin sheets. Don’t be shy with the flour, but also avoid excessive amounts that could dry out the dough.
- Utilizing a Ravioli Maker: To ensure your delicate ravioli release cleanly and effortlessly from the mold without tearing, always dust the ravioli maker or mold very well with flour before laying down your first pasta sheet. This essential step creates a non-stick barrier, making the demolding process smooth and preserving the integrity of your freshly made pasta.
- Preparing the Filling in Advance: To spread out the workload and make the ravioli-making process more relaxed and enjoyable, you can easily prepare the butternut squash filling a day or two ahead of time. Simply allow the roasted squash to cool, then prepare the filling as directed, and store the prepared mixture in an airtight container in the refrigerator until you are ready to assemble your pasta. This breaks down the prep into manageable stages.
Frequently Asked Questions About Butternut Squash Ravioli
Absolutely! Using a stand mixer fitted with a dough hook attachment is a convenient and effective way to make pasta dough, saving you manual effort. First, whisk the eggs and egg yolk together in a separate bowl before adding them to the flour in the mixer’s bowl. Begin mixing on a low-medium speed until the ingredients come together and a rough, shaggy dough forms. Then, increase the speed to medium to medium-high and continue kneading for a full 10 minutes. This ensures proper gluten development, resulting in a smooth, elastic, and perfectly workable dough, just as if kneaded by hand.
Yes, garlic is a fantastic addition that complements butternut squash beautifully and can enhance the overall flavor profile! For a mellow, sweet garlic flavor seamlessly integrated into the filling, roast 2-3 cloves of garlic (still in their skins) alongside the butternut squash on the baking tray. Once roasted and cooled, simply squeeze the soft, caramelized garlic pulp from their skins and blitz it with the squash filling ingredients. Alternatively, for a more pronounced and aromatic garlic note in the sauce, you can add 1/2 to 1 clove of finely chopped or crushed fresh garlic to the brown butter and sage as it’s melting. Just be careful not to burn the garlic, as burnt garlic can taste bitter.
As detailed in the storage section above, the best way to store or freeze homemade ravioli is by blanching them first. After assembling your ravioli, bring a large pot of salted water to a boil. Blanch the ravioli in small batches for about 1 minute, which partially cooks and sets the pasta. Then, remove them with a slotted spoon and let them air dry on a clean kitchen towel placed over a cooling rack for 20-30 minutes per side until they feel tacky but not wet. Once dried, you can store them in an airtight container in the refrigerator for up to 3 days. For freezing, arrange the blanched and dried ravioli in a single layer on a baking tray. Once completely frozen solid, transfer them to freezer-safe bags or containers to save space. When ready to cook, boil the ravioli directly from frozen for approximately 5 minutes (or until tender), without defrosting them first, for optimal results and texture.
While the brown butter and sage sauce is an iconic, classic, and undeniably delicious pairing that highlights the autumnal flavors, butternut squash ravioli is surprisingly versatile and complements several other sauces beautifully. For a rich and indulgent alternative, consider our luscious Parmesan cream sauce, which is featured in our mushroom ravioli recipe – it’s incredibly creamy and adds another layer of decadent savoriness. Another excellent option, offering a vibrant contrast, would be our flavorful tomato vodka sauce. Its bright, slightly tangy, and herbaceous profile beautifully cuts through the inherent sweetness and richness of the squash filling, creating a balanced and exciting dish.
More Delightful Fall Recipes to Savor
Fresh Pasta
Mushroom Ravioli With Parmesan Cream Sauce
Risotto
Butternut Squash Risotto With Thyme
Fresh Pasta
Lobster Ravioli with Vodka Cream Sauce
Pasta
Creamy Butternut Squash Pasta
We genuinely hope you enjoy creating and savoring this Butternut Squash Ravioli with Brown Butter and Sage Sauce recipe. If you’ve tried this, or any other recipe from our blog, please don’t hesitate to rate it and share your experiences and any tips you discovered in the comments section below – we absolutely love hearing from you and learning about your culinary adventures! You can also connect with us and discover more delicious food by following us on Facebook, Instagram, and Pinterest, or by subscribing to our Newsletter for weekly updates and fresh culinary inspiration delivered straight to your inbox.
Step By Step Photos Above
Most of our recipes come with step by step photos, helpful tips and tricks to make it perfectly first time and even video!
Butternut Squash Ravioli with Brown Butter and Sage Sauce Recipe
By Emily
1 hr 15 mins
1 hr
2 hrs 15 mins
6 servings (around 48 small ravioli)
Equipment
-
Food processor
-
Pasta machine
-
Ravioli maker or stamp
-
Piping bag (optional, for filling)
Ingredients
For the Pasta Dough
- 3 cups* Italian 00 flour (400g) *spooned and leveled (plus extra for dusting)
- 4 large eggs (at room temperature)
- 1 egg yolk (at room temperature)
For the Filling
- 1-2 tablespoons olive oil
- 4 cups butternut squash (630g/1.3lbs, cut into medium-sized cubes)
- 1 sprig fresh thyme
- 1.5 cups ricotta cheese (375g/13oz, well-drained)
- ¾ cup Parmigiano Reggiano or Pecorino Romano (30g, freshly grated)
- salt and pepper
For the Sauce
- 1 stick unsalted butter (100g)
- 8-10 fresh sage leaves
Instructions
Make the Pasta Dough
-
Tip the flour onto a large clean work surface and make a wide well in the middle. (Alternatively, you can do this in a large mixing bowl or a stand mixer).
-
Add the eggs and yolk to the well. Use a fork to gently scramble them. Gradually begin to incorporate the surrounding flour into the eggs until a rough, shaggy dough has formed.
-
Use your hands to bring the dough together, kneading it until most or all of the flour has been absorbed. Continue kneading for approximately 10 minutes until the dough becomes smooth, elastic, and supple. Wrap the dough tightly in plastic wrap and allow it to rest at room temperature for at least 30 minutes. This resting period is crucial for relaxing the gluten.
Make the Filling
-
Preheat your oven to 400°F (200°C).
-
Carefully peel the skin from the butternut squash using a sharp knife or a vegetable peeler, then cut the squash into uniform, medium-sized cubes.
-
Place the cubed squash on a baking tray. Sprinkle generously with salt, pepper, and fresh thyme. Drizzle with olive oil and use your hands to toss everything together, ensuring the squash is evenly coated. Arrange the squash in a single, even layer on the tray. Roast in the preheated oven for 30-40 minutes, or until the squash is completely soft and tender when pierced with a fork.
-
Let the roasted squash cool slightly to prevent curdling the cheese, then transfer it to a food processor along with the well-drained ricotta cheese, freshly grated Parmigiano Reggiano, and a pinch of nutmeg. Blitz until the mixture is perfectly smooth and creamy. Taste the filling for seasoning and add any additional salt or pepper if needed to achieve your desired flavor.
-
For easier filling, you can transfer the squash mixture to a piping bag (with the end snipped off). Alternatively, leave it in a bowl and use a small spoon to fill the ravioli.
Assemble the Ravioli
-
Set up your pasta machine. Begin with the rollers at their widest setting (usually marked as number 0).
-
Divide your rested pasta dough into four equal quarters. Work with one quarter at a time, keeping the remaining portions covered tightly in plastic wrap to prevent them from drying out.
-
Lightly sprinkle your work surface and the pasta machine with flour. Press and flatten the piece of dough into an oval or rectangular shape that will easily pass through the widest setting of your pasta machine. Ensure it’s lightly dusted with flour.
-
Pass the dough through the pasta machine. Fold one end of the pasta sheet into the middle and then fold the other end over that (like folding a leaflet). Press it down firmly and pass it through the machine again at the same widest setting. Repeat this folding and passing step 4-5 times to develop gluten and make the dough smooth and elastic.
-
Now, begin progressively rolling out your pasta dough to your desired thickness. Change the setting on your pasta machine to the second widest setting (usually number 1) and pass the dough through. Continue to pass the dough through each subsequent setting, gradually decreasing the thickness, until you reach setting number 6 or 7. For this recipe, setting 6 on an Atlas pasta machine is usually ideal for creating delicate but durable ravioli sheets.
-
If using a ravioli maker, dust it very well with flour. If not, generously flour your work surface. Cut your long, rolled-out pasta sheet into two equal lengths. Carefully place one pasta sheet over the ravioli maker. Position the indent mold on top, then fill each ravioli pocket with the butternut squash filling (using a spoon or piping bag). Lay the second sheet of pasta directly on top, aligning it precisely. Use the mini roller or a small rolling pin to firmly seal the ravioli, pressing out any air.
-
Gently tip the ravioli maker upside down. The freshly formed ravioli should easily release. Place them onto a clean surface or board that has been dusted with flour to prevent sticking. Repeat these assembly steps from the beginning with each remaining quarter of dough.
Cooking the Ravioli & Making the Sauce
-
Once all your ravioli are assembled, bring a large pot of water to a vigorous boil. Salt the water generously until it tastes like the sea. Carefully add your fresh ravioli to the boiling water, stirring gently to ensure none stick to the bottom. Boil for exactly 4 minutes, or until the pasta is tender but still al dente.
-
While the ravioli are cooking, prepare the brown butter and sage sauce. In a large skillet, add the unsalted butter and fresh sage leaves along with a small pinch of salt. Place over a medium heat. Allow the butter to melt and then continue to cook, swirling occasionally, for the same duration that the ravioli are boiling. The butter will begin to foam, then turn a beautiful light golden brown color and develop a nutty aroma (beurre noisette). If it browns too rapidly, reduce the heat or remove it from the stove temporarily.
-
Using a slotted spoon, transfer the cooked ravioli directly from the boiling water into the skillet with the brown butter and sage sauce. Gently toss the ravioli to ensure each piece is thoroughly coated in the rich, aromatic sauce. Serve immediately in warm bowls, topped with an extra sprinkle of freshly grated Parmigiano Reggiano for a perfect finish.
Notes
- Kitchen Scale vs. Cups: For precise and consistent results, I highly recommend using a digital kitchen scale to weigh your flour. Cup measurements can vary drastically depending on the brand of flour, how it’s filled, and humidity. If using cups, the best method is to spoon the flour into the cups gently and then level it off with a knife to avoid over-packing.
- Making the Filling: Blitzing the roasted butternut squash filling in a food processor ensures it becomes beautifully smooth, which makes it incredibly easy to pipe or spoon into the ravioli pockets. If you don’t have a food processor, you can achieve a rustic texture by thoroughly mashing the squash in a bowl and mixing well with the other ingredients.
- Rolling Out the Dough: Always make sure to generously dust your work surface and the pasta machine rollers with flour when rolling out the dough. You’ll likely need to add more flour as you continue to thin the pasta sheets to prevent sticking.
- Using a Ravioli Maker: To ensure your ravioli release cleanly and easily from the mold, thoroughly dust the ravioli maker or mold with flour before you begin laying down your pasta sheets.
- Make the Filling in Advance: To simplify your prep and break up the cooking process, you can easily prepare the butternut squash filling a day or two before you plan to assemble the ravioli. Store it in an airtight container in the refrigerator.
- Storage & Freezing: For storing fresh, filled ravioli (either in the fridge or freezer), it’s best to blanch them first. Bring a large pot of salted water to a boil, then blanch the ravioli in batches for about 1 minute. Remove them with a slotted spoon and place them on a clean kitchen towel over a cooling rack. Let them air dry for approximately 20-30 minutes on each side until they feel tacky but not wet. They can then be stored in the fridge for up to 3 days.
- Freezing Note 2: Blanching ravioli before freezing makes the pasta much more durable and less prone to cracking or bursting when cooked from frozen. You can freeze them without blanching, but they may be more fragile. When cooking blanched and frozen ravioli, simply add them straight to boiling water for about 5 minutes (or until tender), do not defrost first.
Helpful Info for All Recipes
- I always use extra virgin olive oil in all of my recipes unless stated otherwise.
- When I use canned or jarred tomatoes of any kind, I consistently choose Cirio or Mutti brands for their superior quality, best results, and authentic flavor.
- All vegetables specified in our recipes are assumed to be medium-sized unless explicitly stated otherwise.
- All recipes featured on this site are meticulously tested and developed using a fan (convection) oven.
- Find out more about how nutrition information is calculated.
- Check out our must-have Italian Pantry Staples.
- You can also find all our Essential Kitchen Tools for Italian Cooking.
Nutrition Information (Approximate)
Nutrition information is automatically calculated, so should only be used as an approximation.